In Python, a static method is a type of method that does not require any instance to be called. It is very similar to the class method but the difference is that the static method doesn’t have a mandatory argument like reference to the object − self or reference to the class − cls.
Static methods are used to access static fields of a given class. They cannot modify the state of a class since they are bound to the class, not instance.
How to Create Static Method in Python?
There are two ways to create Python static methods −
Using staticmethod() Function
Using @staticmethod Decorator
Using staticmethod() Function
Python’s standard library function named staticmethod() is used to create a static method. It accepts a method as an argument and converts it into a static method.
Syntax
staticmethod(method)
Example
In the Employee class below, the showcount() method is converted into a static method. This static method can now be called by its object or reference of class itself.
Executing the above code will print the following result −
3
3
Using @staticmethod Decorator
The second way to create a static method is by using the Python @staticmethod decorator. When we use this decorator with a method it indicates to the Interpreter that the specified method is static.
Syntax
@staticmethoddefmethod_name():# your code
Example
In the following example, we are creating a static method using the @staticmethod decorator.
classStudent:
   stdCount =0def__init__(self, name, age):
      self.__name = name
      self.__age = age
      Student.stdCount +=1# creating staticmethod@staticmethoddefshowcount():print(Student.stdCount)

e1 = Student("Bhavana",24)
e2 = Student("Rajesh",26)
e3 = Student("John",27)print("Number of Students:")
Student.showcount()
Running the above code will print the following result −
Number of Students:
3
Advantages of Static Method
There are several advantages of using static method, which includes −
Since a static method cannot access class attributes, it can be used as a utility function to perform frequently re-used tasks.
We can invoke this method using the class name. Hence, it eliminates the dependency on the instances.
A static method is always predictable as its behavior remain unchanged regardless of the class state.
We can declare a method as a static method to prevent overriding.
Methods belongs to an object of a class and used to perform specific operations. We can divide Python methods in three different categories, which are class method, instance method and static method.
A Python class method is a method that is bound to the class and not to the instance of the class. It can be called on the class itself, rather than on an instance of the class.
Most of us often get class methods confused with static methods. Always remember, while both are called on the class, static methods do not have access to the “cls” parameter and therefore it cannot modify the class state.
Unlike class method, the instance method can access the instance variables of the an object. It can also access the class variable as it is common to all the objects.
Creating Class Methods in Python
There are two ways to create class methods in Python −
Using classmethod() Function
Using @classmethod Decorator
Using classmethod() Function
Python has a built-in function classmethod() which transforms an instance method to a class method which can be called with the reference to the class only and not the object.
Syntax
classmethod(instance_method)
Example
In the Employee class, define a showcount() instance method with the “self” argument (reference to calling object). It prints the value of empCount. Next, transform the method to class method counter() that can be accessed through the class reference.
Call showcount() with object and call count() with class, both show the value of employee count.
3
3
Using @classmethod Decorator
Use of @classmethod() decorator is the prescribed way to define a class method as it is more convenient than first declaring an instance method and then transforming it into a class method.
Syntax
@classmethoddefmethod_name():# your code
Example
The class method acts as an alternate constructor. Define a newemployee() class method with arguments required to construct a new object. It returns the constructed object, something that the __init__() method does.
There are four Employee objects now. If we run the above program, it will show the count of Employee object −
4
Access Class Attributes in Class Method
Class attributes are those variables that belong to a class and whose value is shared among all the instances of that class.
To access class attributes within a class method, use the cls parameter followed by dot (.) notation and name of the attribute.
Example
In this example, we are accessing a class attribute in class method.
classCloth:# Class attribute
   price =4000@classmethoddefshowPrice(cls):return cls.price

# Accessing class attributeprint(Cloth.showPrice())
On running the above code, it will show the following output −
4000
Dynamically Add Class Method to a Class
The Python setattr() function is used to set an attribute dynamically. If you want to add a class method to a class, pass the method name as a parameter value to setattr() function.
Example
The following example shows how to add a class method dynamically to a Python class.
classCloth:pass# class method@classmethoddefbrandName(cls):print("Name of the brand is Raymond")# adding dynamicallysetattr(Cloth,"brand_name", brandName)
newObj = Cloth()
newObj.brand_name()
When we execute the above code, it will show the following output −
Name of the brand is Raymond
Dynamically Delete Class Methods
The Python del operator is used to delete a class method dynamically. If you try to access the deleted method, the code will raise AttributeError.
Example
In the below example, we are deleting the class method named “brandName” using del operator.
classCloth:# class method@classmethoddefbrandName(cls):print("Name of the brand is Raymond")# deleting dynamicallydel Cloth.brandName
print("Method deleted")
On executing the above code, it will show the following output −
The properties or variables defined inside a class are called as Attributes. An attribute provides information about the type of data a class contains. There are two types of attributes in Python namely instance attribute and class attribute.
The instance attribute is defined within the constructor of a Python class and is unique to each instance of the class. And, a class attribute is declared and initialized outside the constructor of the class.
Class Attributes (Variables)
Class attributes are those variables that belong to a class and whose value is shared among all the instances of that class. A class attribute remains the same for every instance of the class.
Class attributes are defined in the class but outside any method. They cannot be initialized inside __init__() constructor. They can be accessed by the name of the class in addition to the object. In other words, a class attribute is available to the class as well as its object.
Accessing Class Attributes
The object name followed by dot notation (.) is used to access class attributes.
Example
The below example demonstrates how to access the attributes of a Python class.
classEmployee:
   name ="Bhavesh Aggarwal"
   age ="30"# instance of the class
emp = Employee()# accessing class attributesprint("Name of the Employee:", emp.name)print("Age of the Employee:", emp.age)
Output
Name of the Employee: Bhavesh Aggarwal
Age of the Employee: 30
Modifying Class Attributes
To modify the value of a class attribute, we simply need to assign a new value to it using the class name followed by dot notation and attribute name.
Example
In the below example, we are initializing a class variable called empCount in Employee class. For each object declared, the __init__() method is automatically called. This method initializes the instance variables as well as increments the empCount by 1.
classEmployee:# class attribute
   empCount =0def__init__(self, name, age):
      self.__name = name
      self.__age = age
      # modifying class attribute
      Employee.empCount +=1print("Name:", self.__name,", Age: ", self.__age)# accessing class attributeprint("Employee Count:", Employee.empCount)

e1 = Employee("Bhavana",24)print()
e2 = Employee("Rajesh",26)
Output
We have declared two objects. Every time, the empCount increments by 1.
Employee.__doc__: None
Employee.__name__: Employee
Employee.__module__: __main__
Employee.__bases__: (<class 'object'>,)
Employee.__dict__: {'__module__': '__main__', '__init__': <function Employee.__init__ at 0x0000022F866B8B80>, 'displayEmployee': <function Employee.displayEmployee at 0x0000022F866B9760>, '__dict__': <attribute '__dict__' of 'Employee' objects>, '__weakref__': <attribute '__weakref__' of 'Employee' objects>, '__doc__': None}
Instance Attributes
As stated earlier, an instance attribute in Python is a variable that is specific to an individual object of a class. It is defined inside the __init__() method.
The first parameter of this method is self and using this parameter the instance attributes are defined.
Example
In the following code, we are illustrating the working of instance attributes.
Python is an object-oriented programming language, which means that it is based on principle of OOP concept. The entities used within a Python program is an object of one or another class. For instance, numbers, strings, lists, dictionaries, and other similar entities of a program are objects of the corresponding built-in class.
In Python, a class named Object is the base or parent class for all the classes, built-in as well as user defined.
What is a Class in Python?
In Python, a class is a user defined entity (data types) that defines the type of data an object can contain and the actions it can perform. It is used as a template for creating objects. For instance, if we want to define a class for Smartphone in a Python program, we can use the type of data like RAM, ROM, screen-size and actions like call and message.
Creating Classes in Python
The class keyword is used to create a new class in Python. The name of the class immediately follows the keyword class followed by a colon as shown below −
classClassName:'Optional class documentation string'
   class_suite
The class has a documentation string, which can be accessed via ClassName.__doc__.
The class_suite consists of all the component statements defining class members, data attributes and functions.
Example
Following is the example of a simple Python class −
classEmployee:'Common base class for all employees'
   empCount =0def__init__(self, name, salary):
      self.name = name
      self.salary = salary
      Employee.empCount +=1defdisplayCount(self):print"Total Employee %d"% Employee.empCount

   defdisplayEmployee(self):print"Name : ", self.name,", Salary: ", self.salary
The variable empCount is a class variable whose value is shared among all instances of a this class. This can be accessed as Employee.empCount from inside the class or outside the class.
The first method __init__() is a special method, which is called class constructor or initialization method that Python calls when you create a new instance of this class.
You declare other class methods like normal functions with the exception that the first argument to each method is self. Python adds the self argument to the list for you; you do not need to include it when you call the methods.
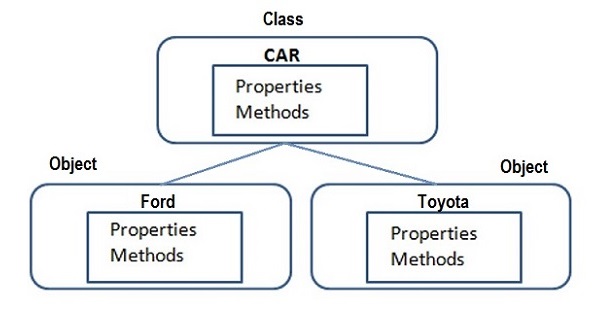
What is an Object?
An object is refered to as an instance of a given Python class. Each object has its own attributes and methods, which are defined by its class.
When a class is created, it only describes the structure of obejcts. The memory is allocated when an object is instantiated from a class.
In the above figure, Vehicle is the class name and Car, Bus and SUV are its objects.
Creating Objects of Classes in Python
To create instances of a class, you call the class using class name and pass in whatever arguments its __init__ method accepts.
# This would create first object of Employee class
emp1 = Employee("Zara",2000)# This would create second object of Employee class
emp2 = Employee("Manni",5000)
Accessing Attributes of Objects in Python
You access the object’s attributes using the dot operator with object. Class variable would be accessed using class name as follows −
classEmployee:"Common base class for all employees"
empCount =0def__init__(self, name, salary):
self.name = name
self.salary = salary
Employee.empCount +=1defdisplayCount(self):print("Total Employee %d"% Employee.empCount)defdisplayEmployee(self):print("Name : ", self.name,", Salary: ", self.salary)# This would create first object of Employee class
emp1 = Employee("Zara",2000)# This would create second object of Employee class
emp2 = Employee("Manni",5000)
emp1.displayEmployee()
emp2.displayEmployee()print("Total Employee %d"% Employee.empCount)
When the above code is executed, it produces the following result −
Name :  Zara , Salary:  2000
Name :  Manni , Salary:  5000
Total Employee 2
You can add, remove, or modify attributes of classes and objects at any time −
Instead of using the normal statements to access attributes, you can also use the following functions −
getattr(obj, name[, default]) − to access the attribute of object.
hasattr(obj,name) − to check if an attribute exists or not.
setattr(obj,name,value) − to set an attribute. If attribute does not exist, then it would be created.
delattr(obj, name) − to delete an attribute.
# Returns true if 'age' attribute existshasattr(emp1,'age')# Returns value of 'age' attributegetattr(emp1,'age')# Set attribute 'age' at 8setattr(emp1,'age',8)# Delete attribute 'age'delattr(empl,'age')
Built-In Class Attributes in Python
Every Python class keeps following built-in attributes and they can be accessed using dot operator like any other attribute −
SNo.
Attributes & Description
1
__dict__Dictionary containing the class’s namespace.
2
__doc__Class documentation string or none, if undefined.
3
__name__Class name
4
__module__Module name in which the class is defined. This attribute is “__main__” in interactive mode.
5
__bases__A possibly empty tuple containing the base classes, in the order of their occurrence in the base class list.
Example
For the above Employee class, let us try to access its attributes −
classEmployee:'Common base class for all employees'
   empCount =0def__init__(self, name, salary):
      self.name = name
      self.salary = salary
      Employee.empCount +=1defdisplayCount(self):print("Total Employee %d"% Employee.empCount)defdisplayEmployee(self):print("Name : ", self.name,", Salary: ", self.salary)print("Employee.__doc__:", Employee.__doc__)print("Employee.__name__:", Employee.__name__)print("Employee.__module__:", Employee.__module__)print("Employee.__bases__:", Employee.__bases__)print("Employee.__dict__:", Employee.__dict__)
When the above code is executed, it produces the following result −
Employee.__doc__: Common base class for all employees
Employee.__name__: Employee
Employee.__module__: __main__
Employee.__bases__: ()
Employee.__dict__: {'__module__': '__main__', 'displayCount':
<function displayCount at 0xb7c84994>, 'empCount': 2,
'displayEmployee': <function displayEmployee at 0xb7c8441c>,
'__doc__': 'Common base class for all employees',
'__init__': <function __init__ at 0xb7c846bc>}
Built-in Class of Python datatypes
As mentioned earlier, Python follows object-oriented programming paradigm. Entities like strings, lists and data types belongs to one or another built-in class.
If we want to see which data type belongs to which built-in class, we can use the Python type() function. This function accepts a data type and returns its corresponding class.
Example
The below example demonstrates how to check built-in class of a given data type.
num =20print(type(num))
num1 =55.50print(type(num1))
s ="TutorialsPoint"print(type(s))
dct ={'a':1,'b':2,'c':3}print(type(dct))defSayHello():print("Hello World")returnprint(type(SayHello))
When you execute this code, it will display the corresponding classes of Python data types −
Python deletes unwanted objects (built-in types or class instances) automatically to free the memory space. The process by which Python periodically reclaims blocks of memory that no longer are in use is termed Garbage Collection.
Python’s garbage collector runs during program execution and is triggered when an object’s reference count reaches zero. An object’s reference count changes as the number of aliases that point to it changes.
An object’s reference count increases when it is assigned a new name or placed in a container (list, tuple, or dictionary). The object’s reference count decreases when it’s deleted with del, its reference is reassigned, or its reference goes out of scope. When an object’s reference count reaches zero, Python collects it automatically.
# Create object <40>
a =40# Increase ref. count  of <40>
b = a
# Increase ref. count  of <40>
c =[b]# Decrease ref. count  of <40>del a
# Decrease ref. count  of <40>
b =100# Decrease ref. count  of <40>
c[0]=-1
You normally will not notice when the garbage collector destroys an unused instance and reclaims its space. But a class can implement the special method __del__(), called a destructor, that is invoked when the instance is about to be destroyed. This method might be used to clean up any non memory resources used by an instance.
Example
The __del__() destructor prints the class name of an instance that is about to be destroyed as shown in the below code block −
classPoint:def__init__( self, x=0, y=0):
      self.x = x
      self.y = y
   def__del__(self):
      class_name = self.__class__.__name__
      print(class_name,"destroyed")

pt1 = Point()
pt2 = pt1
pt3 = pt1
# prints the ids of the obejctsprint(id(pt1),id(pt2),id(pt3))del pt1
del pt2
del pt3
On executing, the above code will produces following result −
135007479444176 135007479444176 135007479444176
Point destroyed
Data Hiding in Python
An object’s attributes may or may not be visible outside the class definition. You need to name attributes with a double underscore prefix, and those attributes then are not be directly visible to outsiders.
When the above code is executed, it produces the following result −
1
2
ERROR!
Traceback (most recent call last):
  File <main.py>", line 11, in <module>
AttributeError: 'JustCounter' object has no attribute '__secretCount'
Python protects those members by internally changing the name to include the class name. You can access such attributes as object._className__attrName. If you would replace your last line as following, then it works for you −
print(counter._JustCounter__secretCount)
When the above code is executed, it produces the following result −
OOP is an abbreviation that stands for Object-oriented programming paradigm. It is defined as a programming model that uses the concept of objects which refers to real-world entities with state and behavior. This chapter helps you become an expert in using object-oriented programming support in Python language.
Python is a programming language that supports object-oriented programming. This makes it simple to create and use classes and objects. If you do not have any prior experience with object-oriented programming, you are at the right place. Let’s start by discussing a small introduction of Object-Oriented Programming (OOP) to help you.
Procedural Oriented Approach
Early programming languages developed in 50s and 60s are recognized as procedural (or procedure oriented) languages.
A computer program describes procedure of performing certain task by writing a series of instructions in a logical order. Logic of a more complex program is broken down into smaller but independent and reusable blocks of statements called functions.
Every function is written in such a way that it can interface with other functions in the program. Data belonging to a function can be easily shared with other in the form of arguments, and called function can return its result back to calling function.
Prominent problems related to procedural approach are as follows −
Its top-down approach makes the program difficult to maintain.
It uses a lot of global data items, which is undesired. Too many global data items would increase memory overhead.
It gives more importance to process and doesn’t consider data of same importance and takes it for granted, thereby it moves freely through the program.
Movement of data across functions is unrestricted. In real-life scenario where there is unambiguous association of a function with data it is expected to process.
Python – OOP Concepts
In the real world, we deal with and process objects, such as student, employee, invoice, car, etc. Objects are not only data and not only functions, but combination of both. Each real-world object has attributes and behavior associated with it.
Attributes
Name, class, subjects, marks, etc., of student
Name, designation, department, salary, etc., of employee
Invoice number, customer, product code and name, price and quantity, etc., in an invoice
Registration number, owner, company, brand, horsepower, speed, etc., of car
Each attribute will have a value associated with it. Attribute is equivalent to data.
Behavior
Processing attributes associated with an object.
Compute percentage of student’s marks
Calculate incentives payable to employee
Apply GST to invoice value
Measure speed of car
Behavior is equivalent to function. In real life, attributes and behavior are not independent of each other, rather they co-exist.
The most important feature of object-oriented approach is defining attributes and their functionality as a single unit called class. It serves as a blueprint for all objects having similar attributes and behavior.
In OOP, class defines what are the attributes its object has, and how is its behavior. Object, on the other hand, is an instance of the class.
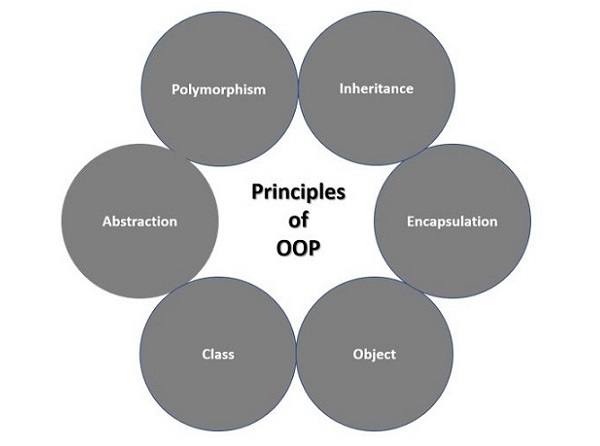
Principles of OOPs Concepts
Object-oriented programming paradigm is characterized by the following principles −
Class
Object
Encapsulation
Inheritance
Polymorphism
Class & Object
A class is an user-defined prototype for an object that defines a set of attributes that characterize any object of the class. The attributes are data members (class variables and instance variables) and methods, accessed via dot notation.
An object refers to an instance of a certain class. For example, an object named obj that belongs to a class Circle is an instance of that class. A unique instance of a data structure that is defined by its class. An object comprises both data members (class variables and instance variables) and methods.
Example
The below example illustrates how to create a class and its object in Python.
# defining classclassSmartphone:# constructor    def__init__(self, device, brand):
      self.device = device
      self.brand = brand

   # method of the classdefdescription(self):returnf"{self.device} of {self.brand} supports Android 14"# creating object of the class
phoneObj = Smartphone("Smartphone","Samsung")print(phoneObj.description())
On executing the above code, it will display the following output −
Smartphone of Samsung supports Android 14
Encapsulation
Data members of class are available for processing to functions defined within the class only. Functions of class on the other hand are accessible from outside class context. So object data is hidden from environment that is external to class. Class function (also called method) encapsulates object data so that unwarranted access to it is prevented.
Example
In this example, we are using the concept of encapsulation to set the price of desktop.
classDesktop:def__init__(self):
      self.__max_price =25000defsell(self):returnf"Selling Price: {self.__max_price}"defset_max_price(self, price):if price > self.__max_price:
         self.__max_price = price

# Object
desktopObj = Desktop()print(desktopObj.sell())# modifying the price directly
desktopObj.__max_price =35000print(desktopObj.sell())# modifying the price using setter function
desktopObj.set_max_price(35000)print(desktopObj.sell())
When the above code is executed, it produces the following result −
A software modelling approach of OOP enables extending capability of an existing class to build new class instead of building from scratch. In OOP terminology, existing class is called base or parent class, while new class is called child or sub class.
Child class inherits data definitions and methods from parent class. This facilitates reuse of features already available. Child class can add few more definitions or redefine a base class function.
Syntax
Derived classes are declared much like their parent class; however, a list of base classes to inherit from is given after the class name −
classSubClassName(ParentClass1[, ParentClass2,...]):'Optional class documentation string'
   class_suite
Example
The following example demonstrates the concept of Inheritance in Python −
#!/usr/bin/python# define parent classclassParent:
   parentAttr =100def__init__(self):print("Calling parent constructor")defparentMethod(self):print("Calling parent method")defsetAttr(self, attr):
      Parent.parentAttr = attr

   defgetAttr(self):print("Parent attribute :", Parent.parentAttr)# define child classclassChild(Parent):def__init__(self):print("Calling child constructor")defchildMethod(self):print("Calling child method")# instance of child
c = Child()# child calls its method
c.childMethod()# calls parent's method
c.parentMethod()# again call parent's method
c.setAttr(200)# again call parent's method
c.getAttr()
When the above code is executed, it produces the following result −
Similar way, you can drive a class from multiple parent classes as follows −
classA:# define your class A.....classB:# define your class B.....classC(A, B):# subclass of A and B.....
You can use issubclass() or isinstance() functions to check a relationships of two classes and instances.
The issubclass(sub, sup) boolean function returns true if the given subclass sub is indeed a subclass of the superclass sup.
The isinstance(obj, Class) boolean function returns true if obj is an instance of class Class or is an instance of a subclass of Class
Polymorphism
Polymorphism is a Greek word meaning having multiple forms. In OOP, polymorphism occurs when each sub class provides its own implementation of an abstract method in base class.
You can always override your parent class methods. One reason for overriding parent’s methods is because you may want special or different functionality in your subclass.
Example
In this example, we are overriding the parent’s method.
__cmp__ ( self, x )Object comparisonSample Call : cmp(obj, x)
Overloading Operators in Python
Suppose you have created a Vector class to represent two-dimensional vectors, what happens when you use the plus operator to add them? Most likely Python will yell at you.
You could, however, define the __add__ method in your class to perform vector addition and then the plus operator would behave as per expectation −
Example
classVector:def__init__(self, a, b):
      self.a = a
      self.b = b

   def__str__(self):return'Vector (%d, %d)'%(self.a, self.b)def__add__(self,other):return Vector(self.a + other.a, self.b + other.b)

v1 = Vector(2,10)
v2 = Vector(5,-2)print(v1 + v2)
When the above code is executed, it produces the following result −
The os.path is another Python module, which also provides a big range of useful methods to manipulate files and directories. Most of the useful methods are listed here −
os.path.getctime(path)Returns the system’s ctime, which on some systems (like Unix) is the time of the last change, and, on others (like Windows), is the creation time for path.
os.path.split(path)Splits the pathname path into a pair, (head, tail) where tail is the last pathname component and head is everything leading up to that.
27
os.path.splitdrive(path)Splits the pathname path into a pair (drive, tail) where drive is either a drive specification or the empty string.
28
os.path.splitext(path)Splits the pathname path into a pair (root, ext) such that root + ext == path, and ext is empty or begins with a period and contains at most one period.
29
os.path.walk(path, visit, arg)Calls the function visit with arguments (arg, dirname, names) for each directory in the directory tree rooted at path (including path itself, if it is a directory).
The OS module of Python provides a wide range of useful methods to manage files and directories. These are the built-in methods that help in interacting with operating systems. Most of the useful methods are listed here −
os.read(fd, n)Read at most n bytes from file descriptor fd. Return a string containing the bytes read. If the end of the file referred to by fd has been reached, an empty string is returned.
44
os.readlink(path)Return a string representing the path to which the symbolic link points.
os.tmpfile()Return a new file object opened in update mode (w+b).
58
os.tmpnam()Return a unique path name that is reasonable for creating a temporary file.
59
os.ttyname(fd)Return a string which specifies the terminal device associated with file descriptor fd. If fd is not associated with a terminal device, an exception is raised.
A file object is created using open() function. The file class defines the following methods with which different file IO operations can be done. The methods can be used with any file like object such as byte stream or network stream.
Sr.No.
Methods & Description
1
file.close()Close the file. A closed file cannot be read or written any more.
2
file.flush()Flush the internal buffer, like stdio’s fflush. This may be a no-op on some file-like objects.
3
file.fileno()Returns the integer file descriptor that is used by the underlying implementation to request I/O operations from the operating system.
4
file.isatty()Returns True if the file is connected to a tty(-like) device, else False.
5
file.next()Returns the next line from the file each time it is being called.
6
file.read([size])Reads at most size bytes from the file (less if the read hits EOF before obtaining size bytes).
7
file.readline([size])Reads one entire line from the file. A trailing newline character is kept in the string.
8
file.readlines([sizehint])Reads until EOF using readline() and return a list containing the lines. If the optional sizehint argument is present, instead of reading up to EOF, whole lines totalling approximately sizehint bytes (possibly after rounding up to an internal buffer size) are read.
file.truncate([size])Truncates the file’s size. If the optional size argument is present, the file is truncated to (at most) that size.
12
file.write(str)Writes a string to the file. There is no return value.
13
file.writelines(sequence)Writes a sequence of strings to the file. The sequence can be any iterable object producing strings, typically a list of strings.
In Python, directories, commonly known as folders in operating systems, are locations on the filesystem used to store files and other directories. They serve as a way to group and manage files hierarchically.
Python provides several modules, primarily os and os.path, along with shutil, that allows you to perform various operations on directories.
These operations include creating new directories, navigating through existing directories, listing directory contents, changing the current working directory, and removing directories.
Checking if a Directory Exists
Before performing operations on a directory, you often need to check if it exists. We can check if a directory exists or not using the os.path.exists() function in Python.
This function accepts a single argument, which is a string representing a path in the filesystem. This argument can be −
Relative path − A path relative to the current working directory.
Absolute path − A complete path starting from the root directory.
Example
In this example, we check whether the given directory path exists using the os.path.exists() function −
import os

directory_path ="D:\\Test\\MyFolder\\"if os.path.exists(directory_path):print(f"The directory '{directory_path}' exists.")else:print(f"The directory '{directory_path}' does not exist.")
Following is the output of the above code −
The directory 'D:\\Test\\MyFolder\\' exists.
Creating a Directory
You create a new directory in Python using the os.makedirs() function. This function creates intermediate directories if they do not exist.
The os.makedirs() function accepts a “path” you want to create as an argument. It optionally accepts a “mode” argument that specifies the permissions o set for the newly created directories. It is an integer, represented in octal format (e.g., 0o755). If not specified, the default permissions are used based on your system’s umask.
Example
In the following example, we are creating a new directory using the os.makedirs() function −
import os

new_directory ="new_dir.txt"try:
   os.makedirs(new_directory)print(f"Directory '{new_directory}' created successfully.")except OSError as e:print(f"Error: Failed to create directory '{new_directory}'. {e}")
After executing the above code, we get the following output −
Directory 'new_dir.txt' created successfully.
The mkdir() Method
You can use the mkdir() method of the os module to create directories in the current directory. You need to supply an argument to this method, which contains the name of the directory to be created.
Following is the syntax of the mkdir() method in Python −
os.mkdir("newdir")
Example
Following is an example to create a directory test in the current directory −
import os

# Create a directory "test"
os.mkdir("test")print("Directory created successfully")
The result obtained is as shown below −
Directory created successfully
Get Current Working Directory
To retrieve the current working directory in Python, you can use the os.getcwd() function. This function returns a string representing the current working directory where the Python script is executing.
Syntax
Following is the basic syntax of the getcwd() function in Python −
os.getcwd()
Example
Following is an example to display the current working directory using the getcwd() function −
import os

current_directory = os.getcwd()print(f"Current working directory: {current_directory}")
We get the output as follows −
Current working directory: /home/cg/root/667ba7570a5b7
Listing Files and Directories
You can list the contents of a directory using the os.listdir() function. This function returns a list of all files and directories within the specified directory path.
Example
In the example below, we are listing the contents of the specified directory path using the listdir() function −
import os

directory_path =r"D:\MyFolder\Pictures"try:
   contents = os.listdir(directory_path)print(f"Contents of '{directory_path}':")for item in contents:print(item)except OSError as e:print(f"Error: Failed to list contents of directory '{directory_path}'. {e}")
Output of the above code is as shown below −
Contents of 'D:\MyFolder\Pictures':
Camera Roll
desktop.ini
Saved Pictures
Screenshots
Changing the Current Working Directory
You can change the current directory using the chdir() method. This method takes an argument, which is the name of the directory that you want to make the current directory.
Syntax
Following is the syntax of the chdir() method in Python −
os.chdir("newdir")
Example
Following is an example to change the current directory to Desktop using the chdir() method −
import os

new_directory =r"D:\MyFolder\Pictures"try:
    os.chdir(new_directory)print(f"Current working directory changed to '{new_directory}'.")except OSError as e:print(f"Error: Failed to change working directory to '{new_directory}'. {e}")
We get the output as shown below −
Current working directory changed to 'D:\MyFolder\Pictures'.
Removing a Directory
You can remove an empty directory in Python using the os.rmdir() method. If the directory contains files or other directories, you can use shutil.rmtree() method to delete it recursively.
Syntax
Following is the basic syntax to delete a directory in Python −
os.rmdir(directory_path)# or
shutil.rmtree(directory_path)
Example
In the following example, we remove an empty directory using the os.rmdir() method −
import os
directory_path =r"D:\MyFolder\new_dir"try:
   os.rmdir(directory_path)print(f"Directory '{directory_path}' successfully removed.")except OSError as e:print(f"Error: Failed to remove directory '{directory_path}'. {e}")
In Python, you can rename and delete files using built-in functions from the os module. These operations are important when managing files within a file system. In this tutorial, we will explore how to perform these actions step-by-step.
Renaming Files in Python
To rename a file in Python, you can use the os.rename() function. This function takes two arguments: the current filename and the new filename.
Syntax
Following is the basic syntax of the rename() function in Python −
os.rename(current_file_name, new_file_name)
Parameters
Following are the parameters accepted by this function −
current_file_name − It is the current name of the file you want to rename.
new_file_name − It is the new name you want to assign to the file.
Example
Following is an example to rename an existing file “oldfile.txt” to “newfile.txt” using the rename() function −
import os

# Current file name
current_name ="oldfile.txt"# New file name
new_name ="newfile.txt"# Rename the file
os.rename(current_name, new_name)print(f"File '{current_name}' renamed to '{new_name}' successfully.")
Following is the output of the above code −
File 'oldfile.txt' renamed to 'newfile.txt' successfully.
Deleting Files in Python
You can delete a file in Python using the os.remove() function. This function deletes a file specified by its filename.
Syntax
Following is the basic syntax of the remove() function in Python −
os.remove(file_name)
Parameters
This function accepts the name of the file as a parameter which needs to be deleted.
Example
Following is an example to delete an existing file “file_to_delete.txt” using the remove() function −
import os

# File to be deleted
file_to_delete ="file_to_delete.txt"# Delete the file
os.remove(file_to_delete)print(f"File '{file_to_delete}' deleted successfully.")
After executing the above code, we get the following output −