Like most of the programming languages, a function in PHP is a block of organized, reusable code that is used to perform a single, related action. Functions provide better modularity for your application and a high degree of code reuse.
PHP supports a structured programming approach by arranging the processing logic by defining blocks of independent reusable functions. The main advantage of this approach is that the code becomes easy to follow, develop and maintain.
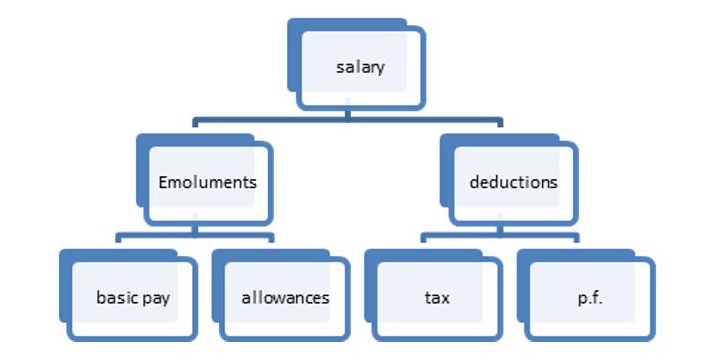
The following figure shows how the process of salary computation is successively broken down to independent and reusable functions.
Types of Functions
You already have seen many functions like fopen() and fread() etc. They are built-in functions but PHP gives you option to create your own functions as well. There are two types of functions in PHP −
- Built-in functions − PHP’s standard library contains a large number of built-in functions for string processing, file IO, mathematical computations and more.
- User-defined functions − You can create user-defined functions too, specific to the requirements of the programming logic.
A function may be invoked from any other function by passing required data (called parameters or arguments). The called function returns its result back to the calling environment.
There are two parts which should be clear to you −
- Creating a PHP Function
- Calling a PHP Function
In fact you hardly need to create your own PHP function because there are already more than 1000 built-in library functions created for different area and you just need to call them according to your requirement.
Please refer to PHP Function Reference for a complete set of useful functions.
Why Use Functions?
Here are some of the reasons provided to explain why you should use functions −
- Reusable code is defined as code that can be written once and used repeatedly.
- Breaking code into smaller parts makes it easier to maintain.
- Functions clarify and arrange the code.
Creating a Function in PHP
Now let’s understand the process in detail. The first step is to write a function and then you can call it as many times as required.
To create a new function, use the function keyword, followed by the name of the function you may want to use. In front of the name, put a parenthesis, which may or may not contain arguments.
It is followed by a block of statements delimited by curly brackets. This function block contains the statements to be executed every time the function is called. The general syntax of defining a function is as follows −
<?php
   function foo($arg_1, $arg_2, $arg_n) {
      statements;
      return $retval;
   }
?>
If the function is intended to return some result back to the calling environment, there should be a return statement as the last statement in the function block. It is not mandatory to have a return statement, as even without it, the program flow goes back to the caller, albeit without carrying any value with it.
Any valid PHP code may appear inside a function, even other functions and class definitions. Name of the function must follow the same rules as used to form the name of a variable. It should start with a letter or underscore, followed by any number of letters, numbers, or underscores.
Here is a simple function in PHP. Whenever called, it is expected to display the message “Hello World”.
functionsayhello(){echo"Hello World";}
User-defined Functions in PHP
Its very easy to create your own PHP function. Let’s start with a simple example after which we will elaborate how it works. Suppose you want to create a PHP function which will simply write a simple message on your browser when you will call it.
Example
In this example, we create a function called writeMessage() and then call it to print a simple message −
<?php
   /* Defining a PHP Function */
   function writeMessage() {
      echo "You are really a nice person, Have a nice time!";
   }

   /* Calling a PHP Function */
   writeMessage();

?>
Output
It will produce the following output −
You are really a nice person, Have a nice time!
Calling a Function in PHP
Once a function is defined, it can be called any number of times, from anywhere in the PHP code. Note that a function will not be called automatically.
To call the function, use its name in a statement; the name of the function followed by a semicolon.
<?php
   # define a function
   function sayhello(){
      echo "Hello World";
   }
   # calling the function
   sayhello();
?>
Output
It will produce the following output −
Hello World
Assuming that the above script “hello.php” is present in the document root folder of the PHP server, open the browser and enter the URL as http://localhost/hello.php. You should see the “Hello World” message in the browser window.
In this example, the function is defined without any arguments or any return value. In the subsequent chapters, we shall learn about how to define and pass arguments, and how to make a function return some value. Also, some advanced features of PHP functions such as recursive functions, calling a function by value vs by reference, etc. will also be explained in detail.
Additional Key Concepts in PHP Functions
Here are the key concepts used in php functions −
- Function Parameters and Arguments: Pass data to functions and specify default values.
- Return Values: Use return to send the results back to the caller.
- Variable Scope: Understand local and global variables, as well as the global keyword.
- Anonymous Functions: Create functions with no names (closures).
- Built-in Functions: Use PHP’s pre-defined functions (such as strlen() and date()).
- Recursive Functions: The functions are those that call themselves (for example, factorial calculation).
- Function Overloading: func_get_args() accepts multiple parameters.
- Passing by Reference: Use & to modify variables directly.
- Type declarations: Enforce the argument and return types (int, string).
- Error Handling: Manage errors with try, catch, and exceptions.