Category: C++ Design Patterns

https://zain.sweetdishy.com/wp-content/uploads/2026/02/Design-Patterns.png

  • Structural Design Pattern in C++

    The Structural Design Patterns is a way of combining or arranging different classes and objects to form larger and complex structures to solve a particular problem in a better way. These patterns help in simplifying the design by identifying simple ways to realize relationships between entities.

    Take a example of a Building. A building is made up of different parts like wallsroofdoors, and windows. Each part has its own characteristics and functions, but when combined, they form a complete structure that serves a specific purpose. Similarly, in software design, structural design patterns help in combining different classes and objects to create larger structures that are easier to understand and maintain.

    Structural design patterns are all about how classes and objects are composed to form larger structures. These patterns provide a way to create relationships between objects and classes in a way that is easy to understand and maintain.

    Types of Structural Design Patterns

    There are 7 main types of structural design patterns −

    • Adapter Pattern − Converts the interface of a class into another interface that a client expects.
    • Bridge Pattern − Separates an abstraction from its implementation so that the two can vary independently.
    • Composite Pattern − Composes objects into tree structures to represent part-whole hierarchies.
    • Decorator Pattern − Adds new functionality to an object dynamically without changing its structure.
    • Facade Pattern − Provides a simplified interface to a complex subsystem.
    • Flyweight Pattern − Reduces the memory footprint by sharing common parts of objects.
    • Proxy Pattern Provides a surrogate or placeholder for another object to control access to it.

    In the subsequent set of chapters, we will cover all these design patterns in detail.

    Illustration of Structural Design Patterns

    Following is the illustration of Structural Design Patterns in C++

    Structural Design Patterns in C++

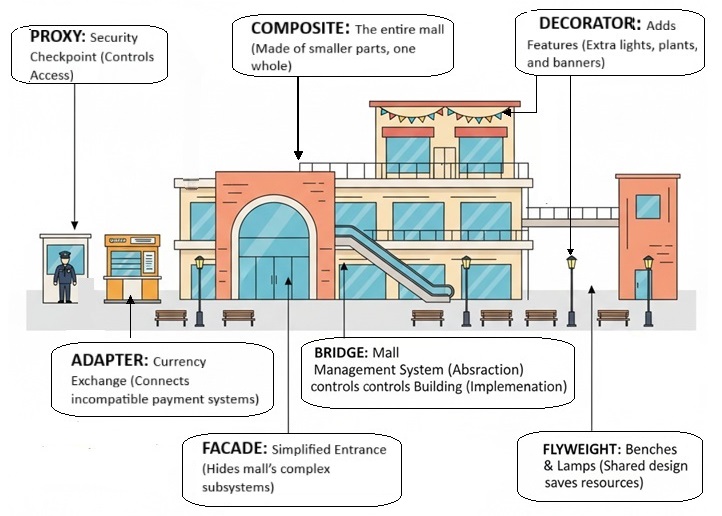
    We have taken example of a Mall. A entire mall is example of Composite Design Pattern, it’s entrance that shows how Facade Design Pattern works, the security guard at the entrance is example of Proxy Design Pattern, the management system of mall is example of Bridge Design Pattern, the Currency Exchange Point is example of Adapter Design Pattern, the Lamps, Banners, Lights are examples of Decorator Design Pattern, and the Benches and Lamps are examples of Flyweight Design Pattern as they are shared by multiple area like food court, parking area etc.

    Example of Structural Design Patterns in C++

    In this example, we have created a media player application that uses multiple structural design patterns to provide a flexible and maintainable solution. The Adapter Pattern allows us to convert different media file formats into a common interface that the media player can understand.

    The Composite Pattern allows us to create a playlist of media files that can be played together. The Decorator Pattern allows us to add new functionality to the media player dynamically. The Facade Pattern provides a simplified interface to the complex media player subsystem. The Proxy Pattern controls access to the media player and ensures that only authorized users can play certain media files.

    The Bridge Pattern separates the abstraction of the media player from its implementation, allowing us to easily switch between different media player implementations. Finally, the Flyweight Pattern reduces memory usage by sharing common parts of media files.

    Example of Structural Design Patterns in C++

    Following is the code that demonstrates the use of multiple structural design patterns together in C++ to create a media player application −

    #include <iostream>#include <string>#include <vector>#include <memory>usingnamespace std;// MediaFile interfaceclassMediaFile{public:virtual string getType()=0;virtualvoidplay()=0;virtual~MediaFile()=default;};// Concrete MediaFile classesclassMP3File:public MediaFile{public:
          string getType(){return"MP3";}voidplay(){
             cout <<"Playing MP3 file"<< endl;}};classMP4File:public MediaFile{public:
          string getType(){return"MP4";}voidplay(){
             cout <<"Playing MP4 file"<< endl;}};// Adapter PatternclassMediaAdapter:public MediaFile{private:
          shared_ptr<MediaFile> mediaFile;public:MediaAdapter(shared_ptr<MediaFile> file){
             mediaFile = file;}
          string getType(){return mediaFile->getType();}voidplay(){
             mediaFile->play();}};// Composite PatternclassPlaylist:public MediaFile{private:
          vector<shared_ptr<MediaFile>> mediaFiles;public:voidadd(shared_ptr<MediaFile> file){
             mediaFiles.push_back(file);}
          string getType(){return"Playlist";}voidplay(){
             cout <<"Playing playlist:"<< endl;for(auto& file : mediaFiles){
                file->play();}}};// Decorator PatternclassMediaDecorator:public MediaFile{protected:
          shared_ptr<MediaFile> mediaFile;public:MediaDecorator(shared_ptr<MediaFile> file){
             mediaFile = file;}
          string getType(){return mediaFile->getType();}voidplay(){
             mediaFile->play();}};classVisualEffectDecorator:public MediaDecorator{public:VisualEffectDecorator(shared_ptr<MediaFile> file):MediaDecorator(file){}voidplay(){
             mediaFile->play();
             cout <<"Adding visual effects"<< endl;}};classAudioEnhancementDecorator:public MediaDecorator{public:AudioEnhancementDecorator(shared_ptr<MediaFile> file):MediaDecorator(file){}voidplay(){
             mediaFile->play();
             cout <<"Enhancing audio quality"<< endl;}};// Facade PatternclassMediaPlayer{private:
          shared_ptr<MediaFile> mediaFile;public:MediaPlayer(shared_ptr<MediaFile> file){
             mediaFile = file;}voidplay(){
             mediaFile->play();}};// Proxy PatternclassMediaProxy:public MediaFile{private:
          shared_ptr<MediaFile> mediaFile;bool authorized;public:MediaProxy(shared_ptr<MediaFile> file,bool auth){
             mediaFile = file;
             authorized = auth;}
          string getType(){return mediaFile->getType();}voidplay(){if(authorized){
                mediaFile->play();}else{
                cout <<"Access denied"<< endl;}}};// Bridge PatternclassMediaImplementation{public:virtualvoidplay()=0;virtual~MediaImplementation()=default;};classVLCImplementation:public MediaImplementation{public:voidplay(){
             cout <<"Playing using VLC implementation"<< endl;}};classWindowsMediaImplementation:public MediaImplementation{public:voidplay(){
             cout <<"Playing using Windows Media implementation"<< endl;}};classMediaAbstraction{protected:
          shared_ptr<MediaImplementation> implementation;public:MediaAbstraction(shared_ptr<MediaImplementation> impl){
             implementation = impl;}virtualvoidplay()=0;virtual~MediaAbstraction()=default;};classAdvancedMediaPlayer:public MediaAbstraction{public:AdvancedMediaPlayer(shared_ptr<MediaImplementation> impl):MediaAbstraction(impl){}voidplay(){
             implementation->play();}};// Flyweight PatternclassMediaMetadata{private:
          string title;
          string artist;
          string album;public:MediaMetadata(string t, string ar, string al):title(t),artist(ar),album(al){}
          string getTitle(){return title;}
          string getArtist(){return artist;}
          string getAlbum(){return album;}voiddisplay(){
             cout <<"Title: "<< title <<", Artist: "<< artist <<", Album: "<< album << endl;}};classMediaMetadataFactory{private:
          vector<shared_ptr<MediaMetadata>> metadataPool;public:
          shared_ptr<MediaMetadata>getMetadata(string title, string artist, string album){for(auto& meta : metadataPool){if(meta->getTitle()== title &&
                    meta->getArtist()== artist &&
                    meta->getAlbum()== album){return meta;}}
             shared_ptr<MediaMetadata> newMeta =make_shared<MediaMetadata>(title, artist, album);
             metadataPool.push_back(newMeta);return newMeta;}};intmain(){// Create media filesauto mp3 =make_shared<MP3File>();auto mp4 =make_shared<MP4File>();auto adaptedMp3 =make_shared<MediaAdapter>(mp3);auto adaptedMp4 =make_shared<MediaAdapter>(mp4);// Create playlistauto playlist =make_shared<Playlist>();
       playlist->add(adaptedMp3);
       playlist->add(adaptedMp4);
       playlist->add(make_shared<VisualEffectDecorator>(adaptedMp4));
       playlist->add(make_shared<AudioEnhancementDecorator>(adaptedMp3));// Create media player facadeauto player =make_shared<MediaPlayer>(playlist);
       player->play();// Create media proxyauto proxy1 =make_shared<MediaProxy>(adaptedMp4,false);
       proxy1->play();auto proxy2 =make_shared<MediaProxy>(adaptedMp4,true);
       proxy2->play();// Create advanced media player with bridge patternauto vlcImpl =make_shared<VLCImplementation>();
       shared_ptr<MediaAbstraction> advancedPlayer =make_shared<AdvancedMediaPlayer>(vlcImpl);
       advancedPlayer->play();auto wmImpl =make_shared<WindowsMediaImplementation>();
       advancedPlayer =make_shared<AdvancedMediaPlayer>(wmImpl);
       advancedPlayer->play();// Create media metadata using flyweight patternauto metadataFactory =make_shared<MediaMetadataFactory>();auto meta1 = metadataFactory->getMetadata("Song1","Artist1","Album1");auto meta2 = metadataFactory->getMetadata("Song1","Artist1","Album1");auto meta3 = metadataFactory->getMetadata("Song2","Artist2","Album2");
       meta1->display();
       meta2->display();
       meta3->display();return0;}

    Following is the output of the above code −

    Playing playlist:
    Playing MP3 file
    Playing MP4 file
    Playing MP4 file
    
    Adding visual effects
    Playing MP3 file
    Enhancing audio quality
    Access denied
    Playing MP4 file
    Playing using VLC implementation
    Playing using Windows Media implementation
    Title: Song1, Artist: Artist1, Album: Album1
    Title: Song1, Artist: Artist1, Album: Album1
    Title: Song2, Artist: Artist2, Album: Album2
    

    When to Use Structural Design Patterns?

    Structural design patterns are useful in the following scenarios −

    • If you want to simplify the design of a complex system by breaking it down into smaller, more manageable parts.
    • Times when you think you need to improve the flexibility and maintainability of your code by creating relationships between objects and classes that are easy to understand and modify.
    • To optimize the performance of your code by reducing memory usage and improving access to objects.
    • When you want to add new functionality to an object dynamically without changing its structure.
    • To provide a simplified interface to a complex subsystem.
    • If you want to control access to an object by providing a surrogate or placeholder for it.
    • If you want to separate an abstraction from its implementation so that the two can vary independently.

    Pros and Cons of Structural Design Patterns

    Following are the some important pros and cons of Structural Design Patterns −

    ProsCons
    Improves code organization.Can introduce complexity.
    Enhances flexibility and maintainability.May lead to over-engineering.
    Facilitates code reuse.Can impact performance.
    Reduces memory usage.May require additional learning.
    Provides clear structure for complex systems.Can make debugging more difficult.

    Conclusion

    In this chapter, we have discussed the Structural Design Patterns in C++. We have seen the different types of structural design patterns and how they can be used to create flexible and maintainable code. We have also seen an example of how multiple structural design patterns can be used together to create a complex system. Structural design patterns are an important tool for any software developer, and understanding them can help you create better software.

  • Prototype Design Pattern in C++

    The Prototype Pattern is a part of the Creational Design Patterns family.

    Consider a scenario where you have an object and your friend asks you to create its replica. How would you do that? You are probably thinking of creating a new object and then copying the values from the existing object to the new object. That is some good thinking! But, what if the existing objects have some fields that are private and not visible outside the class. And also, you would have to know the class of the existing object to create a new object of the same class, which makes your code dependent on the class of the object. In such cases, we need to use the Prototype Pattern.

    The Prototype Pattern allows us to make copies from an actual object. It declares a common interface for all objects and those objects support cloning themselves. This means the object itself is responsible for creating a copy of itself. The client code can use the common interface to clone the object without knowing the class of the object. This interface has only one method, which is clone(). The clone() method is responsible for creating a copy of the object and returning it to the client code.

    Whichever object that supports cloning is called a prototype. If your objects have too many feilds and many different types of configurations, then you can just clone them.

    In the following image, an artist makes three different types of paintings. If someone wants a copy of one of the paintings, the artist can just clone the painting and give it to the person. The artist doesn’t need to create a new painting from scratch. This is how the Prototype Pattern works.

    Prototype Pattern in C++

    Illustration of Prototype Pattern

    Following is the illustration of Prototype Pattern. In the below image, we have a Client that wants to create a copy of an existing Prototype object. The Client uses the clone() method of the Prototype to create a copy of the object without knowing the class of the object.

    Prototype Pattern in C++

    Implementation of Prototype Pattern in C++

    We can implement the Prototype Pattern in the following two ways −

    • Basic Prototype Pattern − This is the simple way without any registry.
    • Prototype Pattern with Registry − This approach uses a registry to keep track of all prototypes.

    1. Basic Prototype Pattern in C++

    The following illustration shows the steps for implementing the Basic Prototype Pattern in C++

    Basic Prototype Pattern in C++

    Example of Basic Prototype Pattern in C++

    Let’s implement a simple example of Basic Prototype Pattern in C++

    Here we will take an example of a virtual machine class that supports cloning itself. The client will use the clone() method of the VirtualMachine class to create a copy of the object.

    #include <iostream>#include <memory>#include <string>usingnamespace std;// Prototype InterfaceclassVirtualMachine{public:virtual unique_ptr<VirtualMachine>clone()const=0;virtualvoidshowConfig()const=0;virtual~VirtualMachine()=default;};// Concrete Prototype: LinuxVMclassLinuxVM:public VirtualMachine{
       string os;int ram;int cpu;public:LinuxVM(string os,int ram,int cpu):os(move(os)),ram(ram),cpu(cpu){}
    
          unique_ptr<VirtualMachine>clone()constoverride{
             cout <<"Cloning Linux VM..."<< endl;returnmake_unique<LinuxVM>(*this);// deep copy}voidshowConfig()constoverride{
             cout <<"Linux VM - OS: "<< os 
                  <<", RAM: "<< ram <<"GB, CPU: "<< cpu <<" cores"<< endl;}};// Concrete Prototype: WindowsVMclassWindowsVM:public VirtualMachine{
       string os;int ram;int cpu;public:WindowsVM(string os,int ram,int cpu):os(move(os)),ram(ram),cpu(cpu){}
    
          unique_ptr<VirtualMachine>clone()constoverride{
             cout <<"Cloning Windows VM..."<< endl;returnmake_unique<WindowsVM>(*this);}voidshowConfig()constoverride{
             cout <<"Windows VM - OS: "<< os 
                  <<", RAM: "<< ram <<"GB, CPU: "<< cpu <<" cores"<< endl;}};// Client codeintmain(){// Create prototypes
       unique_ptr<VirtualMachine> linuxVM =make_unique<LinuxVM>("Ubuntu 20.04",8,4);
       unique_ptr<VirtualMachine> windowsVM =make_unique<WindowsVM>("Windows 10",16,8);//original objects
       cout <<"Original VMs:"<< endl;
       linuxVM->showConfig();
       windowsVM->showConfig();// Clone objects safely
       cout <<"\nCloning VMs:"<< endl;auto clonedLinuxVM = linuxVM->clone();auto clonedWindowsVM = windowsVM->clone();// Show configurations
       cout <<"\nCloned VMs:"<< endl;
       clonedLinuxVM->showConfig();
       clonedWindowsVM->showConfig();return0;}

    Following is the output of the above program −

    Original VMs:
    Linux VM - OS: Ubuntu 20.04, RAM: 8GB, CPU: 4 cores
    Windows VM - OS: Windows 10, RAM: 16GB, CPU: 8 cores
    
    Cloning VMs:
    Cloning Linux VM...
    Cloning Windows VM...
    
    Cloned VMs:
    Linux VM - OS: Ubuntu 20.04, RAM: 8GB, CPU: 4 cores
    Windows VM - OS: Windows 10, RAM: 16GB, CPU: 8 cores
    

    2. Prototype Pattern with Registry in C++

    The following illustration shows the steps for implementing the Prototype Pattern with Registry in C++

    Prototype Pattern with Registry in C++

    Example of Prototype Pattern with Registry in C++

    Let’s implement a simple example of Prototype Pattern with Registry in C++:

    Here we will take an example of making UI elements like Button and TextBox. We will create a Prototype Registry to keep track of all prototypes. The Client will use the registry to get the prototype and then clone whatever it wants.

    #include <iostream>#include <memory>#include <string>#include <unordered_map>usingnamespace std;// Prototype InterfaceclassUIElement{public:virtual unique_ptr<UIElement>clone()const=0;virtualvoidrender()const=0;virtual~UIElement()=default;};// Concrete Prototype: ButtonclassButton:public UIElement{
       string label;public:Button(string label):label(move(label)){}
    
          unique_ptr<UIElement>clone()constoverride{
             cout <<"Cloning Button..."<< endl;returnmake_unique<Button>(*this);// deep copy}voidrender()constoverride{
             cout <<"Rendering Button: "<< label << endl;}};// Concrete Prototype: TextBoxclassTextBox:public UIElement{
       string text;public:TextBox(string text):text(move(text)){}
    
          unique_ptr<UIElement>clone()constoverride{
             cout <<"Cloning TextBox..."<< endl;returnmake_unique<TextBox>(*this);}voidrender()constoverride{
             cout <<"Rendering TextBox: "<< text << endl;}};// Prototype RegistryclassPrototypeRegistry{
       unordered_map<string, unique_ptr<UIElement>> prototypes;public:voidregisterPrototype(const string& name, unique_ptr<UIElement> prototype){
             prototypes[name]=move(prototype);}
    
          unique_ptr<UIElement>getPrototype(const string& name)const{auto it = prototypes.find(name);if(it != prototypes.end()){return it->second->clone();}returnnullptr;}};// Client codeintmain(){// Create registry and register prototypes
       PrototypeRegistry registry;
       registry.registerPrototype("Button",make_unique<Button>("Submit"));
       registry.registerPrototype("TextBox",make_unique<TextBox>("Enter your name"));// Clone objects safely using the registry
       cout <<"Cloning UI Elements:"<< endl;auto clonedButton = registry.getPrototype("Button");auto clonedTextBox = registry.getPrototype("TextBox");// Show configurations
       cout <<"\nCloned UI Elements:"<< endl;if(clonedButton) clonedButton->render();if(clonedTextBox) clonedTextBox->render();return0;}

    Following is the output of the above program −

    Cloning UI Elements:
    Cloning Button...
    Cloning TextBox...
    
    Cloned UI Elements:
    Rendering Button: Submit
    Rendering TextBox: Enter your name
    

    Key Properties of Prototype Pattern

    Following are the key properties of the Prototype Pattern −

    • Cloning, you can copy of existing objects. You don’t need to create new objects from scratch.
    • Decoupling, the client code is decoupled from the class of the object.
    • Dynamic, you can add new prototypes at runtime.
    • Can Create More than one type, you can create different types of objects using the same interface.
    • Memory Usage, you can save memory by reusing existing objects instead of creating new ones.

    Conclusion

    In this chapter, we learned what is the Prototype Pattern and how to implement it in C++. We also saw two different ways of implementing the Prototype Pattern: Basic Prototype Pattern and Prototype Pattern with Registry. The Prototype Pattern is a powerful design pattern that allows us to create copies of existing objects without knowing their class. It helps in reducing memory usage and decoupling the client code from the class of the object.

  • Abstract Factory Design Pattern in C++

    The Abstract Factory is a creational design pattern that provides an interface with methods for a particular type of object, but it allows subclasses to alter the type of objects that will be created. The Abstract Factory pattern is used when we have multiple families of related or dependent objects and we want to create them without specifying their concrete classes.

    In other words, it is a factory of factories. In the last chapter, we discussed the Factory Method pattern which is used to create objects of a single family. But in Abstract Factory pattern, we can create objects of multiple families.

    Imagine you are building your dream house, and you have two choices for furniture: Modern or Victorian. Each type has its own matching set of items like a chair, a sofa, and a coffee table. Instead of picking each item one by one and possibly making a mix-match, you use a furniture factory that gives you the full set in one style. If you want Modern, you get all Modern items. If you want Victorian, you get all Victorian items. The Abstract Factory pattern works the same way: it gives you a whole set of related objects in one style, so everything fits together perfectly.

    Implementation of Abstract Factory Pattern in C++

    Following are the some important ways to implement Abstract Factory Pattern in C++:

    • Conventional Abstract Factory − It uses classic interface and concrete factories.
    • Registry-based Abstract Factory − It uses a registry of factories to create objects of different families.

    Concrete Factory means a class which implements the Abstract Factory interface and is responsible for creating the objects of a particular family. The client code uses the abstract factory interface to create the objects without knowing the concrete classes.

    Conventional Abstract Factory Implementation in C++

    In this approach, we create an abstract factory interface which is used for defining the methods for creating family of related objects. Then, we create concrete factory classes that implement the abstract factory interface and provide the implementation for creating the objects of a particular family.

    Example of Abstract Factory Pattern in C++

    In the below example, we have an abstract factory interface FurnitureFactory that defines the methods for creating family of related objects. We have two concrete factory classes ModernFurnitureFactory and VictorianFurnitureFactory that implement the FurnitureFactory interface and provide the implementation for creating the objects of a particular family. The client code uses the abstract factory interface to create the objects without knowing the concrete classes.

    Abstract Factory Pattern in C++

    Let’s implement a simple example of Abstract Factory Pattern in C++

    #include <iostream>#include <string>usingnamespace std;// Abstract Product AclassChair{public:virtual string getType()=0;};// Abstract Product BclassSofa{public:virtual string getType()=0;};// Concrete Product A1classModernChair:public Chair{public:
          string getType(){return"Modern Chair";}};// Concrete Product B1classModernSofa:public Sofa{public:
          string getType(){return"Modern Sofa";}};// Concrete Product A2classVictorianChair:public Chair{public:
          string getType(){return"Victorian Chair";}};// Concrete Product B2classVictorianSofa:public Sofa{public:
          string getType(){return"Victorian Sofa";}};// Abstract FactoryclassFurnitureFactory{public:virtual Chair*createChair()=0;virtual Sofa*createSofa()=0;};// Concrete Factory 1classModernFurnitureFactory:public FurnitureFactory{public:
          Chair*createChair(){returnnewModernChair();}
          Sofa*createSofa(){returnnewModernSofa();}};// Concrete Factory 2classVictorianFurnitureFactory:public FurnitureFactory{public:
          Chair*createChair(){returnnewVictorianChair();}
          Sofa*createSofa(){returnnewVictorianSofa();}};intmain(){
       FurnitureFactory* factory;
       Chair* chair;
       Sofa* sofa;// Create Modern Furniture
       factory =newModernFurnitureFactory();
       chair = factory->createChair();
       sofa = factory->createSofa();
       cout <<"Created the Modern furniture:"<< endl;
       cout <<"Chair: ";
       cout << chair->getType()<< endl;
       cout <<"Sofa: ";
       cout << sofa->getType()<< endl;// Create Victorian Furniture
       factory =newVictorianFurnitureFactory();
       chair = factory->createChair();
       sofa = factory->createSofa();
       cout <<"Created the Victorian furniture:"<< endl;
       cout <<"Chair: ";
       cout << chair->getType()<< endl;
       cout <<"Sofa: ";
       cout << sofa->getType()<< endl;return0;}

    Following is the output of the above program −

    Created the Modern furniture:
    Chair: Modern Chair
    Sofa: Modern Sofa
    Created the Victorian furniture:
    Chair: Victorian Chair
    Sofa: Victorian Sofa
    

    Registry-based Abstract Factory Implementation in C++

    This is a similar approach we have discussed in the Factory Method pattern. In this approach, we create a registry of factories that can create objects of different families. The registry is a map that maps the family name to the corresponding factory. The client code uses the registry to get the factory for a particular family and then uses the factory to create the objects.

    Example of Registry-based Abstract Factory Pattern in C++

    Let’s take an example of a car factory. Where, we have an abstract class CarFactory that defines the factory method createCar(). Then, we create concrete subclasses such as SUVFactory and SedanFactory that implement the factory method to create specific types of cars. We also create a registry of factories that maps the family name to the corresponding factory.

    Registry-based Abstract Factory Pattern in C++

    Following is a simple example of Registry-based Abstract Factory Pattern in C++

    #include <iostream>#include <string>#include <map>usingnamespace std;// Product interfaceclassCar{public:virtual string getType()=0;};// Concrete ProductsclassSUV:public Car{public:
          string getType(){return"SUV";}};classSedan:public Car{public:
          string getType(){return"Sedan";}};// Factory interfaceclassCarFactory{public:virtual Car*createCar()=0;};// Concrete FactoriesclassSUVFactory:public CarFactory{public:
          Car*createCar(){returnnewSUV();}};classSedanFactory:public CarFactory{public:
          Car*createCar(){returnnewSedan();}};// Registry of factoriesclassCarFactoryRegistry{private:
          map<string, CarFactory*> registry;public:voidregisterFactory(string type, CarFactory* factory){
             registry[type]= factory;}
          CarFactory*getFactory(string type){return registry[type];}};intmain(){
       CarFactoryRegistry registry;
       registry.registerFactory("SUV",newSUVFactory());
       registry.registerFactory("Sedan",newSedanFactory());
    
       CarFactory* factory;
       Car* car;// Create SUV
       factory = registry.getFactory("SUV");
       car = factory->createCar();
       cout <<"Created car of type: ";
       cout << car->getType()<< endl;// Create Sedan
       factory = registry.getFactory("Sedan");
       car = factory->createCar();
       cout <<"Created car of type: ";
       cout << car->getType()<< endl;return0;}

    Following is the output of the above program −

    Created car of type: SUV
    Created car of type: Sedan
    

    Pro’s and Cons of Abstract Factory Pattern

    Following are the some important pros and cons of Abstract Factory Pattern −

    ProsCons
    Makes groups of matching objects easy to create without worrying about details.Can make code bigger and more complex because you need extra factory classes.
    Keeps code flexible and lets you swap object families easily.Lots of classes if you have many object families.
    Easy to add new object families without changing old code.More work to update and keep track of all the factories.
    Ensures everything matches no mix-and-match mistakes.Too much for simple cases where one factory is enough.

    When to use Abstract Factory Pattern?

    Following are the some important scenarios where we can use Abstract Factory Pattern −

    • When the system needs to be independent of how its products are createdcomposed, and represented.
    • When the system is configured with one of multiple families of products.
    • When we want to provide a library of products, and we want to reveal just their interfaces, not their implementations.
    • When we want to ensure that the client code uses only objects from the same family.

    Conclusion

    Abstract Factory is a creational software design pattern that provides an interface for generating families of related or dependent objects without revealing their concrete classes. It is used when we have multiple families of related or dependent objects and want to create them without having their concrete classes defined. The Abstract Factory pattern conceals the objects’ construction and offers loose binding of the concrete classes and the client code, and it also satisfies the Open/Closed Principle, because it is feasible to add new families of related objects without altering the code.

  • Factory Method Pattern in C++

    The Factory Method Pattern is a creational design pattern that defines an interface for creating an object. It allows its subclasses to change the type of object that will be created.

    For example, imagine you are creating an employee management system for your comapany, and there are different types of employees such as full-time employees, part-time employees, and contract employees. Each type of employee has different attributes and behaviors. Instead of creating a separate class for each type of employee, you can use the factory method pattern to create a single interface for creating employees and then let the subclasses decide which type of employee to create.

    So, instead of calling new at the client side, we can just call a factory method which will return the object of the desired type.

    Implementation of Factory Method Pattern in C++

    There are ways to implement the Factory Method Pattern in C++. Some of the important and common implementations are:

    • Factory Method (GoF official one)
    • Simple Factory (static method)
    • Registry-based Factory (parameterized)

    Let’s discuss each of these implementations in detail.The important point to note is that the Factory Method Pattern is often used in conjunction with other design patterns such as Singleton, Abstract Factory, and Builder patterns.

    Also, the type of implementation you choose will depend on the specific requirements of your application and the complexity of the object creation process.

    Implementation of Factory Method by the Official GoF Way in C++

    This is an official implementation of the factory method pattern as described in the Gang of Four book. In this approach, we create an abstract class that defines the factory method and then create concrete subclasses that implement the factory method to create specific types of objects.

    Let’s take an example of a car factory. We have an abstract class CarFactory that defines the factory method createCar(). Then, we create concrete subclasses such as SUVFactory and SedanFactory that implement the factory method to create specific types of cars.

    Example of Factory Method Pattern in C++

    Following is the code implementation of Factory Method Pattern in C++ −

    #include <iostream>#include <string>classCar{public:virtualvoiddrive()=0;virtual~Car(){}};classSUV:public Car{public:voiddrive(){
            std::cout <<"Driving an SUV"<< std::endl;}};classSedan:public Car{public:voiddrive(){
            std::cout <<"Driving a Sedan"<< std::endl;}};classCarFactory{public:virtual Car*createCar()=0;virtual~CarFactory(){}};classSUVFactory:public CarFactory{public:
        Car*createCar(){returnnewSUV();}};classSedanFactory:public CarFactory{public:
        Car*createCar(){returnnewSedan();}};intmain(){
        CarFactory* factory =newSUVFactory();
        Car* car = factory->createCar();
        car->drive();delete car;delete factory;
    
        factory =newSedanFactory();
        car = factory->createCar();
        car->drive();delete car;delete factory;return0;}

    Following is the output of the above code −

    Driving an SUV
    Driving a Sedan
    

    Simple Factory Pattern Implementation in C++

    This is a simple way to implement the factory pattern also known as Static Factory Method. In this approach, we create a single class that contains a static method to create objects of different types based on the input parameters. Then, in the factory method, we use a switch statement or if-else statements to determine which type of object to create based on the input parameters.

    Let’s take an example of a shape factory. Here, we have a class Shape and different subclasses such as Circle and Square. We can create a static factory method in the ShapeFactory class to create objects of these subclasses based on the input parameters.

    Example of Simple Factory Pattern in C++

    Following is the code implementation of Simple Factory Pattern in C++

    #include <iostream>#include <string>classShape{public:virtualvoiddraw()=0;virtual~Shape(){}};classCircle:public Shape{public:voiddraw(){
            std::cout <<"Drawing a Circle"<< std::endl;}};classSquare:public Shape{public:voiddraw(){
            std::cout <<"Drawing a Square"<< std::endl;}};classShapeFactory{public:static Shape*createShape(const std::string& type){if(type =="Circle"){returnnewCircle();}elseif(type =="Square"){returnnewSquare();}returnnullptr;}};classClient{public:voiddrawShape(const std::string& type){
            Shape* shape =ShapeFactory::createShape(type);if(shape){
                shape->draw();delete shape;}else{
                std::cout <<"Invalid shape type"<< std::endl;}}};intmain(){
        Client client;
        client.drawShape("Circle");
        client.drawShape("Square");
        client.drawShape("Triangle");return0;}

    Following is the output of the above code −

    Drawing a Circle
    Drawing a Square
    Invalid shape type
    

    Registry-based Factory Pattern Implementation in C++

    This is a more advanced way to implement the factory pattern. In this approach, we create a registry of factory methods that can be used to create objects of different types. The registry is typically implemented as a map or dictionary that maps a string or an enum value to a factory method. This allows us to easily add new types of objects without modifying the existing code.

    In the previous approaches, we have used block of if-else or used small factory classes for each type. But in this approach, we can centralize the creation logic in a single registry class.

    Think of it as a map where −

    • The key is the type of thing we want (like “Cat” or “Dog”).
    • The value is a function that knows how to make that thing we want.

    It is like a notebook where you write down how to make different things. When you want to make something, you look it up in your notebook and follow the instructions. And when you want to make something new, you just add a new entry to your notebook without changing the existing ones.

    This way, we can easily extend the factory to create new types of objects without modifying the existing code.

    Example of Registry-based Factory Pattern in C++

    Following is the code implementation of Registry-based Factory Pattern in C++.

    #include <iostream>#include <string>#include <map>#include <functional>classShape{public:virtualvoiddraw()=0;};classCircle:public Shape{public:voiddraw(){
             std::cout <<"Drawing a Circle"<< std::endl;}};classSquare:public Shape{public:voiddraw(){
             std::cout <<"Drawing a Square"<< std::endl;}};classShapeFactory{public:using ShapeCreator = std::function<Shape*()>;static Shape*createShape(const std::string& type){auto it =registry().find(type);if(it !=registry().end()){return it->second();}returnnullptr;}staticvoidregisterShape(const std::string& type, ShapeCreator creator){registry()[type]= creator;}private:static std::map<std::string, ShapeCreator>&registry(){static std::map<std::string, ShapeCreator> instance;return instance;}};classClient{public:voiddrawShape(const std::string& type){
             Shape* shape =ShapeFactory::createShape(type);if(shape){
                shape->draw();delete shape;}else{
                std::cout <<"Invalid shape type"<< std::endl;}}};intmain(){ShapeFactory::registerShape("Circle",[](){returnnewCircle();});ShapeFactory::registerShape("Square",[](){returnnewSquare();});
    
       Client client;
       client.drawShape("Circle");
       client.drawShape("Square");
       client.drawShape("Triangle");return0;}

    Following is the output of the above code.

    Drawing a Circle 
    Drawing a Square 
    Invalid shape type 
    

    The Registry-based Factory Pattern has several important properties that make it very useful for beginners to understand.

    • First, it provides extensibility, which means you can easily add new types of shapes to your program without having to change any of the code you already wrote. This is like being able to add new recipes to your cookbook without having to rewrite the existing ones.
    • Second, it offers centralized control, meaning all the logic for creating different shapes is kept in one place (the factory), making it much easier to manage and find when you need to make changes. Think of it like having all your tools organized in one toolbox instead of scattered around your garage.
    • Finally, it provides decoupling, which is a fancy way of saying that the parts of your code that use the shapes don’t need to know exactly how those shapes are created – they just ask the factory for what they need, similar to how you order food at a restaurant without needing to know how the kitchen prepares it.

    Pros and Cons of Factory Method Pattern

    Following are some of the pros and cons of using the Factory Method Pattern.

    ProsCons
    Encapsulates object creation logic.Can cause unnecessary complexity if not used properly.
    Code become easy to reuse and maintain.Multiple factory classes can make the codebase complex.
    Supports the Open/Closed Principle that allows new types of objects to be added without modifying existing code.Can make the code harder to understand for developers who does not know the pattern.
    Decouples the client code from the concrete classes.It may affect performance due to the additional layer of abstraction.

    Real-World Applications of Factory Method Pattern

    Following are some real-world applications of the Factory Method Pattern:

    • GUI Frameworks − Many GUI frameworks use factory methods to create UI components like buttons, text fields, etc.
    • Game Development − In game development, factory methods are used to create different types of game objects (e.g., enemies, power-ups) without specifying their concrete classes.
    • Database Connections − Factory methods can be used to create database connection objects, and allows them to be used interchangeably for different types of databases.

    Conclusion

    The Factory Method is a powerful creational design pattern which provides a way to create an object without exposing the creation logic to the client. We can make our code easy to maintain and also we can reuse it in different parts of the application. But, it is important to use the Factory Method carefully, as it can add unnecessary complexity to the codebase, if not used correctly.

  • Singleton Pattern in C++

    Singleton Pattern is a design pattern which allows to create only one object of a class. Instead of allowing the class to create multiple instances everytime it is called, the singleton pattern ensures that only one instance of the class is created and it also provides it a global access point so that it can be accessed from anywhere in the code.

    The singleton pattern is useful when exactly one object is needed to coordinate actions across the system. For example, imagine you are in a office and you need to use a printer. Instead of having printer for a each employee, you can have a single printer that is shared by all employees. This way, you can ensure that only one person can use the printer at a time and it also saves resources.

    Key Points of Singleton Pattern

    Following are the key points of Singleton Pattern −

    • It restricts the instantiation of a class to one single instance.
    • It provides a global access point to that instance.
    • It is often used for managing shared resources such as database connections, configuration settings, logging, etc.
    • It can be implemented using lazy initialization, where the instance is created only when it is needed for the first time.

    Implementation of Singleton Pattern in C++

    There are several ways to implement the Singleton Pattern in C++. Some of the important and common implementations are −

    • Lazy Initialization Singleton
    • Eager Initialization Singleton (Hungry Singleton)
    • Mayers’ Singleton

    Mostly, the lazy initialization singleton is used as it is more efficient and it also saves memory. However, the eager initialization singleton is simpler and it is also thread-safe. The Mayers’ singleton implementation is a very good modern approach for creating singleton classes in C++.

    Lazy Initialization Singleton

    In this approach, the instance of the class is created only when it is needed for the first time. This can help us in creating only one instance of the class and it also saves memory.

    Step to implement Singleton Pattern in C++

    Following are the steps to implement Singleton Pattern in C++ −

    • Make the constructor of the class private so that it cannot be instantiated from outside the class.
    • Then, create a static variable that holds the single instance of the class.
    • Create a static method that returns the instance of the class. This method checks if the instance is already created, if not it creates one and returns it. Otherwise, it simply returns the existing instance.

    Example of Singleton Pattern in C++

    In the below example, we have a Logger class that implements the singleton pattern. The getInstance() method returns the single instance of the Logger class. The log() method is used to log messages.

    Let’s implement a simple Logger class using Singleton Pattern in C++.

    #include <iostream>#include <string>usingnamespace std;// Lazy Initialization Singleton of LoggerclassLogger{private:static Logger* instance;Logger(){}public:static Logger*getInstance(){if(instance ==nullptr){
                instance =newLogger();}return instance;}voidlog(string message){
             cout <<"Log: "<< message << endl;}};// Initialize the static member
    Logger* Logger::instance =nullptr;// Main functionintmain(){
       Logger* logger =Logger::getInstance();
       logger->log("This is a log message.");
       Logger* l1 =Logger::getInstance();
       l1->log("This is another log message.");return0;}

    Following is the output of the above program −

    Log: This is a log message.
    Log: This is another log message.
    

    Eager Initialization Singleton(Hungry Singleton) Implementation

    In this approach, we create the instance of the class at the time of class loading. This approach is simpler and it is also thread-safe. However, there is a drawback of this approach is that the instance is created even if it is not used, which can lead to resource wastage. So if you are sure that the instance will be used, then this approach is a good choice.

    Example of Eager Initialization Singleton Pattern in C++

    Let’s implement a simple Logger class using Eager Initialization Singleton Pattern in C++.

    #include <iostream>#include <string>usingnamespace std;// Eager Initialization Singleton of LoggerclassLogger{private:static Logger* instance;Logger(){}public:static Logger*getInstance(){return instance;}voidlog(string message){
             cout <<"Log: "<< message << endl;}};// Initialize the instance at the time of class loading
    Logger* Logger::instance =newLogger();// Main functionintmain(){
       Logger* logger =Logger::getInstance();
       logger->log("This is a log message.");
       Logger* l1 =Logger::getInstance();
       l1->log("This is another log message.");return0;}

    Following is the output of the above program −

    Log: This is a log message.
    Log: This is another log message.
    

    Mayers’ Singleton Implementation

    The Mayers’ Singleton implementation is a very good modern approach for creating singleton classes in C++. This approach uses a static local variable inside the getInstance() method to hold the single instance of the class. The instance is created when the method is called for the first time and it is destroyed automatically when the program exits. This approach is thread-safe and it also ensures that only one instance of the class is created.

    Example of Mayers’ Singleton Pattern in C++

    Let’s implement a simple Logger class using Mayers’ Singleton Pattern in C++.

    #include <iostream>#include <string>usingnamespace std;// Mayers' Singleton of LoggerclassLogger{private:Logger(){}public:static Logger&getInstance(){static Logger instance;return instance;}voidlog(string message){
             cout <<"Log: "<< message << endl;}};// Main functionintmain(){
       Logger& logger =Logger::getInstance();
       logger.log("This is a log message.");
       Logger& l1 =Logger::getInstance();
       l1.log("This is another log message.");return0;}

    Following is the output of the above program −

    Log: This is a log message.
    Log: This is another log message.
    

    Real-world use cases of Singleton Pattern

    Following are some real-world use cases of Singleton Pattern −

    • Logger class − As we have seen in the examples, the logger class uses the singleton pattern, so it can be accessed anywhere but creates only one instance throughout the application.
    • Configuration class − A configuration class can be implemented as a singleton to ensure that there is only one instance of the configuration settings throughout the application.
    • Database connection class − Another usecase is to implement a database connection class, so that you don’t need to create multiple connections to the database.
    • Printer Spooler − A printer spooler can be implemented as a singleton to manage print jobs in a centralized manner. So, your whole system has only one instance of the printer spooler instead of making multiple instances for every application on the system.

    Conclusion

    In this chapter, we covered in detail the Singleton Pattern in C++. We explained how to implement it and also provided an example of a Logger class that uses the singleton pattern. The singleton pattern is a useful design pattern which helps in managing shared resources and it also ensures that only one instance of a class is created.

  • Creational Design Patterns in C++

    The Creational Design Patterns is a category of design patterns which are all about how we can create objects. Instead of letting the code decide directly which class to make and how to make it, creational design patterns provides different ways to create object. Using these patterns, we can make our system independent of how its objects are composed or created and also how they are represented.

    If you make instances of classes directly everytime, you will make your code dependent on those classes(tightly coupled). This will make it difficult to change or extend your system in the future. Creational design patterns help to solve this problem by providing a way to create objects while hiding the creation logic from the client.

    For example, when you want to eat a pizza, and you just go to kitchen, you will need to do everything by yourself, like finding dough, chopping vegetables, cooking sause, baking it etc. All this is exhausting right? Instead, you can just call a pizza delivery service, and they will take care of everything for you. You just need to tell them what kind of pizza you want, and they will deliver it to your doorstep.

    The work of creational design patterns is similar to delivery service – they provide a way to create objects without exposing the creation logic to the client, and refer to the newly created object using a common interface.

    Types of Creational Design Patterns

    There are 5 main types of creational design patterns:

    • Singleton Pattern
    • Factory Method Pattern
    • Abstract Factory Pattern
    • Builder Pattern
    • Prototype Pattern

    When to use Creational Design Patterns?

    Creational design patterns are useful in the following scenarios:

    • If you require your code to produce objects but you don’t wish it fixed on a specific class.
    • Support multiple groups for related objects and easily toggle between such groups in your program.
    • When you won’t know until at program run time what type of object is needed.
    • If building an object requires many complicated steps that shouldn’t be scattered everywhere.
    • To ensure there is just a single copy of something in an entire program.
    • If object creation requires a large number of choices which would render the constructor cumbersome.
    • Waste less time or memory by duplicating an object in use instead of creating a brand-new object.

    Example of Creational Design Patterns in C++

    In the below example, we have a Pizza interface that defines the product. We have two concrete products, Margherita and Pepperoni, that implement the Pizza interface. The PizzaFactory class is a factory method that creates pizzas based on the type passed to it. The PizzaBuilder class is a builder that uses the factory method to create pizzas step by step. Finally, the PizzaSingleton class is a singleton that ensures only one instance of the pizza delivery service is created.

    Let’s take a look at an example of how to use multiple creational design patterns together in C++ −

    #include <iostream>#include <string>usingnamespace std;// Product interfaceclassPizza{public:virtual string getType()=0;};// Concrete ProductsclassMargherita:public Pizza{public:
          string getType(){return"Margherita";}};classPepperoni:public Pizza{public:
          string getType(){return"Pepperoni";}};// Factory MethodclassPizzaFactory{public:static Pizza*createPizza(string type){if(type =="Margherita"){returnnewMargherita();}elseif(type =="Pepperoni"){returnnewPepperoni();}else{returnnullptr;}}};// BuilderclassPizzaBuilder{private:
          Pizza* pizza;public:PizzaBuilder(){
             pizza =nullptr;}voidcreatePizza(string type){
             pizza =PizzaFactory::createPizza(type);}
          Pizza*getPizza(){return pizza;}};// SingletonclassPizzaSingleton{private:static PizzaSingleton* instance;PizzaSingleton(){}public:static PizzaSingleton*getInstance(){if(!instance){
                instance =newPizzaSingleton();}return instance;}};
    PizzaSingleton* PizzaSingleton::instance =nullptr;intmain(){
       PizzaBuilder builder;
       builder.createPizza("Margherita");
       Pizza* pizza = builder.getPizza();if(pizza){
          cout <<"Pizza Type: "<< pizza->getType()<< endl;}else{
          cout <<"Invalid Pizza Type"<< endl;}
       PizzaSingleton* singleton =PizzaSingleton::getInstance();return0;}

    When you run this code, it will execute to produce the following output:

    Pizza Type: Margherita
    Both singleton instances are the same.
    

    Conclusion

    In conclusion, creational design patterns are powerful tools that can help you create flexible and maintainable code. By using these patterns, you can decouple your code from the specific classes that are instantiated, making it easier to change and extend your system in the future.