Behavioural design patterns are ways of organising how different objects in a program communicate with each other. When a program becomes large, many objects need to exchange information or react to certain actions. If this communication is random or unplanned, the code becomes confusing. Behavioural design patterns give a simple and organised approach so every object knows when to speak, when to listen, and what its role is. This makes the whole program easier to understand and work with.
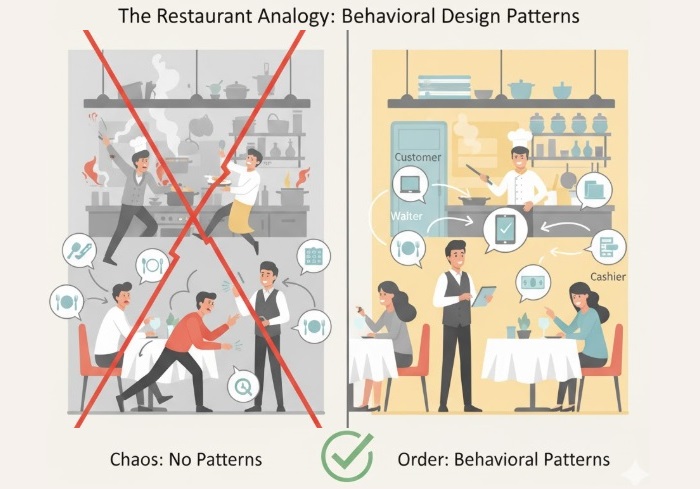
A good way to understand this is to picture a restaurant. A restaurant runs smoothly only because everyone inside knows how to behave and how to talk to each other. The waiter takes orders from customers, the chef cooks food, the cashier handles bills, and the manager watches over everything. The waiter does not suddenly start cooking, the chef does not run to take orders, and the customers don’t go into the kitchen to ask what is happening. Everyone has a specific job and a clear way to interact. This simple structure keeps the restaurant calm even when many people are involved.
Now imagine if the behaviour rules inside the restaurant didn’t exist. Customers might walk straight into the kitchen, chefs might run to tables arguing about orders, waiters might forget who to serve because everyone is shouting instructions. It would be a disaster. The same thing happens inside a program when communication is not planned properly. Behavioural design patterns prevent this problem by defining clean paths of communication, just like a restaurant defines who talks to whom and when.
For example, in the restaurant, when a customer gives an order, the waiter handles it. The chef reacts when the waiter passes the order. The cashier reacts only after the meal is finished and the bill is needed. Everyone responds at the right moment without unnecessary connections or confusion. Behavioural design patterns create this same kind of controlled flow between objects in a program.
They help cut down those super tight connections between objects, which makes it way easier to change things later. If you want to add a new feature or tweak how something works, you only touch the part that actually needs the change, not the whole project. This keeps the program easier to manage and stops random things from breaking for no reason.
In short, behavioural design patterns give a simple and natural way for objects to interact, just like people in a well-managed restaurant. They help keep communication clear, roles separate, and the overall system easy to maintain.
Types of Behavioural Design Patterns
We have total 11 types of Behavioural Design Patterns in C++. They are −
- Chain of Responsibility Design Pattern
- Command Design Pattern
- Interpreter Design Pattern
- Iterator Design Pattern
- Mediator Design Pattern
- Memento Design Pattern
- Observer Design Pattern
- State Design Pattern
- Strategy Design Pattern
- Template Method Design Pattern
- Visitor Design Pattern
We will cover each of these design patterns in detail in the upcoming chapters. but, for the moment let’s have a quick overview of each of these design patterns −
Chain of Responsibility Design Pattern
The Chain of Responsibility design pattern is all about passing a request through a series of handlers until one of them decides to handle it. Instead of one object trying to do everything, the request moves step by step through a chain. Each handler gets a chance to check the request. If it can handle it, it does so. If not, it simply passes it to the next handler in the chain. This makes the system flexible because you can easily add, remove, or rearrange handlers without changing how the request is made.
A simple example is customer support. When someone sends a support message, it may first go to a basic support agent. If that agent can’t fix the issue, the message goes to a senior agent, and if needed, it moves further to a manager. Each person in the chain checks the problem and handles it only if it matches their level.
Command Design Pattern
The Command design pattern is all about turning a request into a simple object. Think of it like writing a small note that says, “Do this task,” and handing that note to someone who knows how to execute it. This pattern separates the person asking for the work from the person who actually does the work. It’s useful when you want tasks to run later, undo tasks, or store a list of actions.
A real example is a TV remote. When you press the “volume up” button, the remote doesn’t directly change the TV’s volume. Instead, each button has a command object behind it. The remote only triggers the command. The TV carries out the actual work. Because of this, you can add new buttons (new commands) without changing how the remote works. It keeps things flexible and avoids connecting too many things directly.
Interpreter Design Pattern
The Interpreter pattern helps you deal with situations where you need to read, process, or understand a small language or set of rules. It breaks down expressions into pieces, and each piece knows how to explain itself.
A real example is a calculator that handles simple math like “2 + 5 – 3.” The calculator doesn’t memorise every possible calculation. Instead, each symbol (+, -, numbers) has its own meaning. The interpreter reads the whole expression step by step and evaluates it.
This pattern is useful when you have repeating rules that look like a language. It could be formulas, filters, search queries, or even instructions in a game. Instead of writing long if-else conditions, you build tiny interpreters that understand the rules. It keeps the code clean and allows you to add more rules easily.
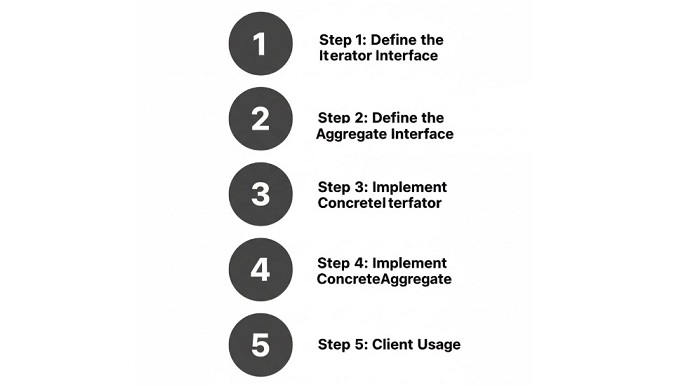
Iterator Design Pattern
The Iterator pattern gives you a clean way to move through a collection (like a list or array) without exposing how that collection is built. It’s like being given a remote control to move through items one by one without opening the machine.
A real example is flipping through a photo album using next and previous buttons. You don’t care where the photos are stored, how the system saves them, or what format they’re in. You only move to the next photo, then the next, and so on.
The iterator pattern keeps things neat. It gives you a consistent way to browse through any collection, even if the collection changes internally. You don’t break the structure because you’re not touching it directly. You just use the iterator to travel through the elements safely and simply.
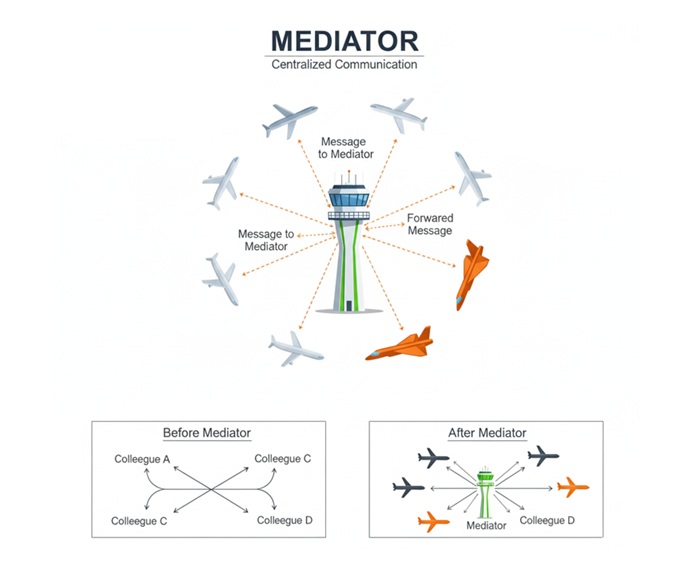
Mediator Design Pattern
The Mediator pattern is like having a friendly coordinator in the middle who makes objects talk to each other without letting them talk directly.
Imagine a classroom where students want to ask questions. Instead of shouting at each other, they talk to the teacher (the mediator). The teacher controls the flowâwho speaks, who responds, who gets attention. Students don’t communicate directly, which keeps order in the room. This pattern helps in avoiding messy connections where every object talks to every other object directly. That causes confusion and also causes too many dependencies.
With a mediator, everything becomes simpler. Objects only talk to the mediator, and the mediator decides what happens. This makes your code easier to manage, and changes don’t break everything.
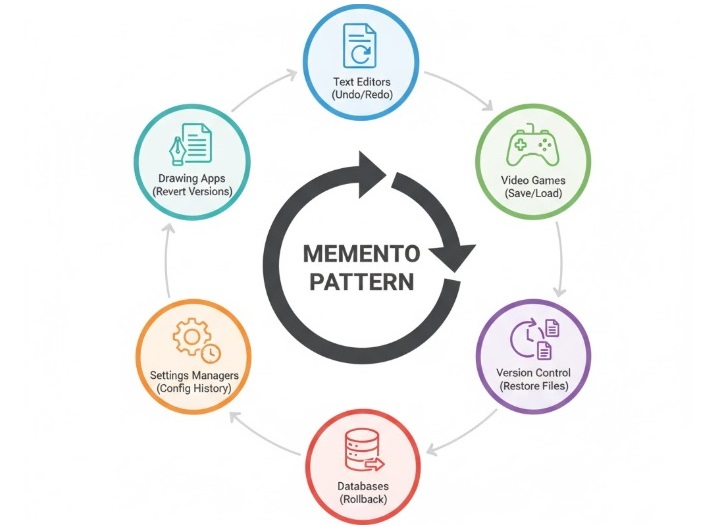
Memento Design Pattern
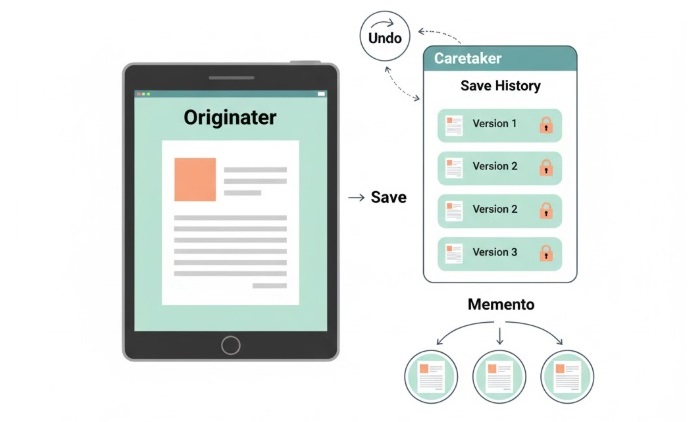
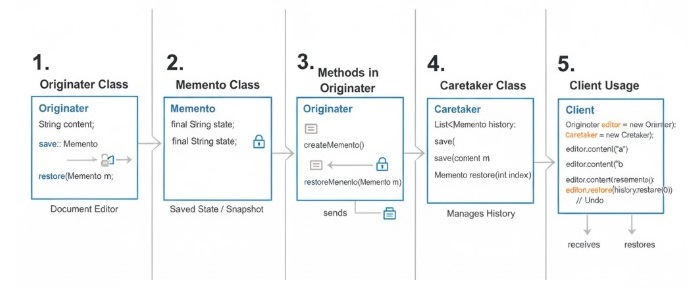
The Memento pattern is about saving and restoring an object’s previous state without exposing its internal details.
Think of a video game’s save feature. When you press “Save Game,” the game stores your location, health, inventory, and progress. Later, when you click “Load Game,” the game puts everything back exactly the way it was.
The player doesn’t know or care how the game stores all this dataâthey just know their progress is safe.
This pattern is very useful when you want undo features, history tracking, checkpoints, or safe rollbacks. It keeps the internal information hidden, but still lets you move backward when needed.
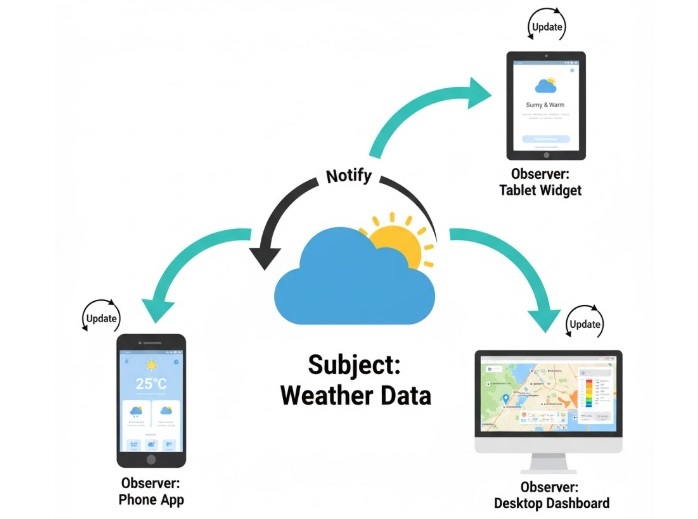
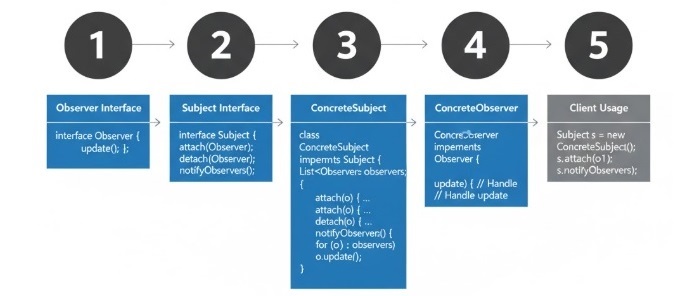
Observer Design Pattern
The Observer pattern connects one main object (subject) to many observers. When something changes in the subject, all observers get updated automatically.
A real-life example is subscribing to YouTube channels. When the channel uploads a new video, subscribers get notified instantly. The channel doesn’t message each subscriber manually; the system does it for you.
This pattern helps when many parts of your program need to know about one eventâsuch as UI updates, notifications, logs, or status changes. It avoids hard connections and makes adding or removing observers easy.
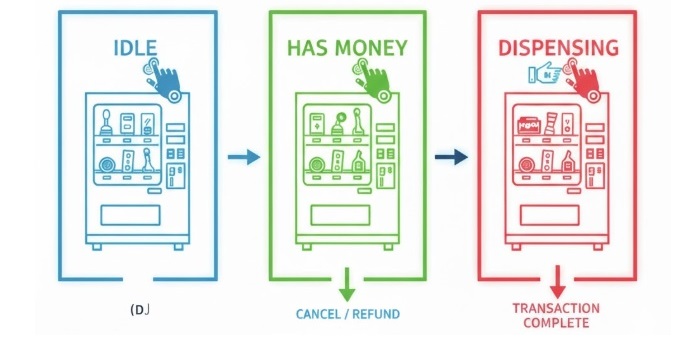
State Design Pattern
The State pattern lets an object change its behaviour depending on its current state. A good example is a mobile phone. When it’s locked, pressing the button shows the lock screen. When it’s unlocked, pressing the same button does something different. When it’s in power-saving mode, it behaves differently again.
The phone is one device, but the behavior changes based on its internal state. This pattern keeps code tidy and avoids big, messy if-else statements everywhere.
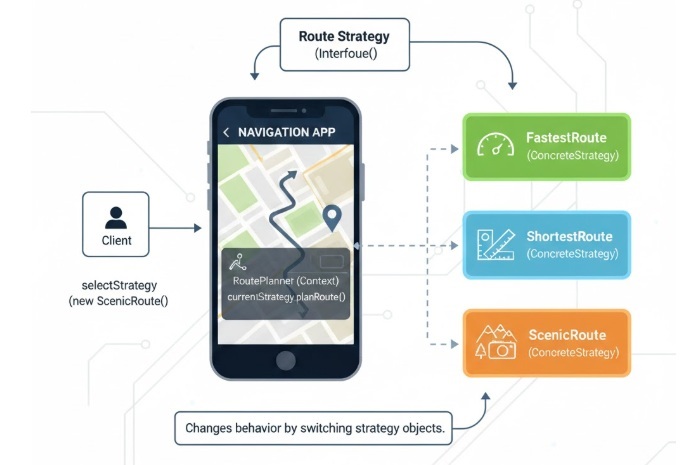
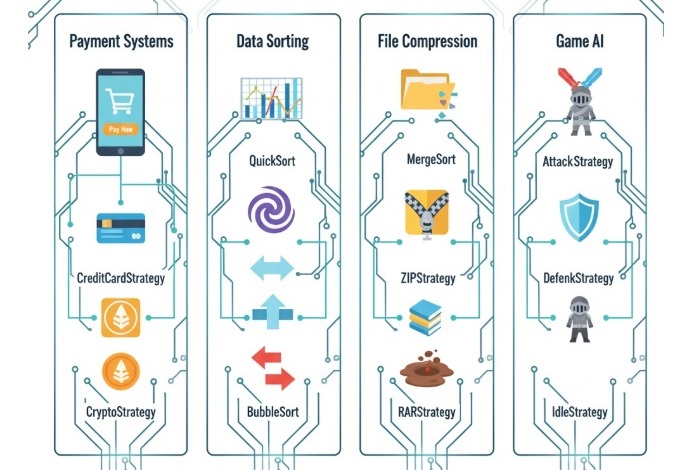
Strategy Design Pattern
The Strategy pattern lets you swap algorithms or methods at runtime. Imagine choosing travel options in Google Maps: car, bus, walking, bike. The destination is the same, but the route changes.
Each travel mode is a “strategy.” You pick the one you want. In code, this lets you change behaviour easilyâsorting methods, payment methods, filtering styles, etc.âwithout rewriting everything.
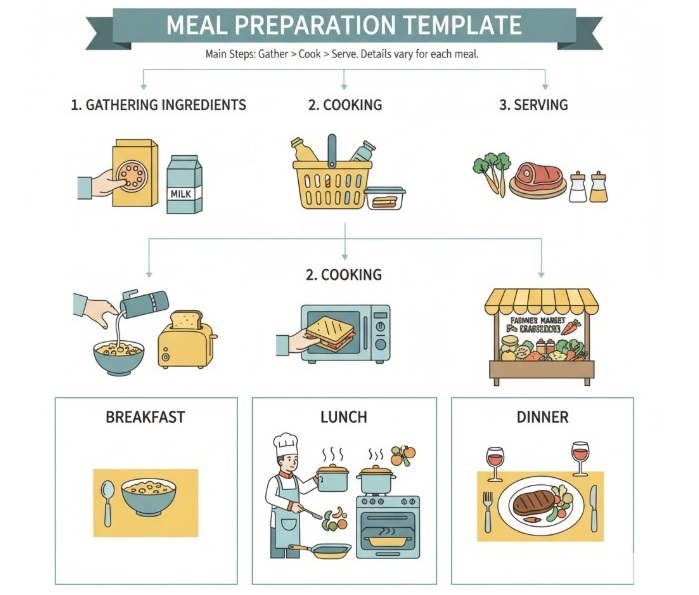
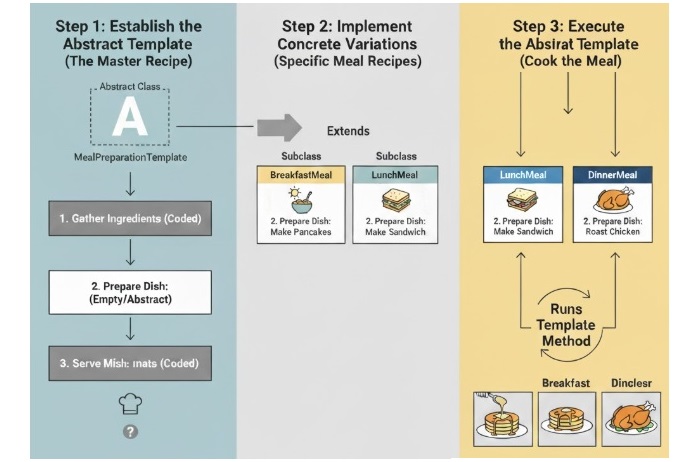
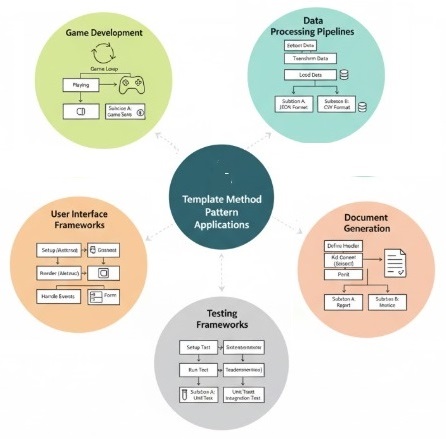
Template Method Design Pattern
The Template Method pattern defines the main steps of a process but lets subclasses fill in the details.
Think of making tea or coffee. The steps are similar: boil water, add ingredients, pour. But tea and coffee differ in the middle step. The “template” is the common structure. This pattern avoids rewriting the whole process and keeps shared logic in one place.
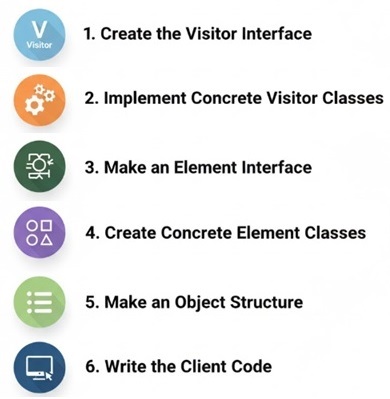
Visitor Design Pattern
The Visitor pattern lets you add new operations to a group of objects without modifying the objects themselves.
Imagine a zoo. You have animals, and different visitors come: a vet checks health, a photographer takes pictures, a feeder gives food. The animals stay the same, but each visitor performs a different action on them. This pattern helps when you want to change anything in the code without touching the classes.
C++ Implementation of Behavioural Design Patterns all Together
We will take a combined example to understand how these behavioural design patterns can work together in one simple C++ program. The idea here is not to make the code complicated, but to show how each pattern plays its own role, the same way different people in a team handle their own duties. This example mixes the Strategy Pattern for choosing behaviours, the Observer Pattern for sending updates to interested objects, and the Template Method Pattern for defining a common workflow that different classes can follow.
In this example, imagine we are building a small game-like setup. We have a character that can use different attack styles, such as a quick attack or a strong attack. This is where the Strategy Pattern helps, because we can swap attack behaviour without changing the character class itself. The character also has fans or followers who want to know whenever the character attacks. This is where the Observer Pattern comes in. The followers get a notification each time an attack happens. Finally, the Template Method Pattern is used to control the general flow of performing an action, like preparing, attacking, and finishing, while still allowing different steps to be customized depending on the type of attack.
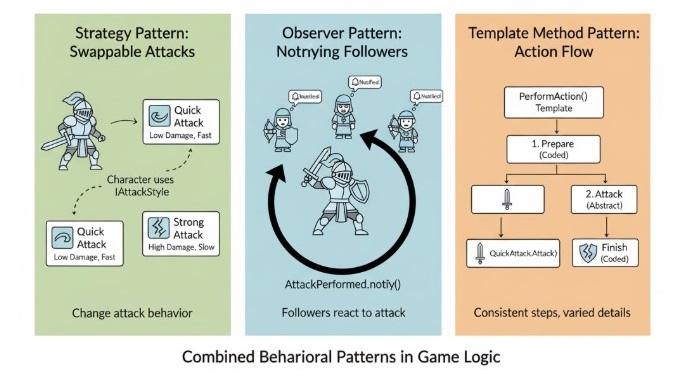
By combining these three patterns, we can see how behavioural patterns make communication inside a program clear and flexible. Each pattern solves a different communication problem, and when they are used together, the code becomes cleaner and easier to expand later.
#include <iostream>#include <vector>#include <string>usingnamespace std;//======= Strategy Pattern ====classAttackStrategy{public:virtualvoidattack()=0;virtual~AttackStrategy(){}};classQuickAttack:public AttackStrategy{public:voidattack()override{
      cout <<"Character performs a quick attack!"<< endl;}};classStrongAttack:public AttackStrategy{public:voidattack()override{
      cout <<"Character performs a strong attack!"<< endl;}};// ====== Observer Pattern =====classObserver{public:virtualvoidupdate(const string& msg)=0;virtual~Observer(){}};classFollower:public Observer{private:
   string name;public:Follower(string n):name(n){}voidupdate(const string& msg)override{
      cout << name <<" received update: "<< msg << endl;}};classSubject{private:
   vector<Observer*> observers;public:voidaddObserver(Observer* obs){
      observers.push_back(obs);}voidnotify(const string& msg){for(Observer* obs : observers){
         obs-<update(msg);}}};// ======= Template Method Pattern ======classActionTemplate{public:voidperformAction(){prepare();mainAction();finish();}protected:virtualvoidprepare(){
      cout <<"Character prepares for action..."<< endl;}virtualvoidmainAction()=0;virtualvoidfinish(){
      cout <<"Character finishes the action."<< endl;}};classAttackAction:public ActionTemplate{private:
   AttackStrategy* strategy;public:AttackAction(AttackStrategy* s):strategy(s){}protected:voidmainAction()override{
      strategy-<attack();}};// ====Putting Everything Together ======classGameCharacter:public Subject{private:
   AttackStrategy* strategy;public:GameCharacter(AttackStrategy* s):strategy(s){}voidsetStrategy(AttackStrategy* s){
      strategy = s;}voidperformAttack(){
      AttackAction action(strategy);
      action.performAction();notify("Character performed an attack!");}};intmain(){// Strategies
   AttackStrategy* quick =newQuickAttack();
   AttackStrategy* strong =newStrongAttack();// Character with default attack
   GameCharacter hero(quick);// Observers
   Follower f1("Follower 1");
   Follower f2("Follower 2");

   hero.addObserver(&f1);
   hero.addObserver(&f2);// Perform attacks
   cout <<"\n=== Quick Attack ==="<< endl;
   hero.performAttack();

   cout <<"\n=== Switching to Strong Attack ==="<< endl;
   hero.setStrategy(strong);
   hero.performAttack();delete quick;delete strong;return0;}
Followng is the output of the above code −
=== Quick Attack ===
Character prepares for action...
Character performs a quick attack!
Character finishes the action.
Follower 1 received update: Character performed an attack!
Follower 2 received update: Character performed an attack!
=== Switching to Strong Attack ===
Character prepares for action...
Character performs a strong attack!
Character finishes the action.
Follower 1 received update: Character performed an attack!
Follower 2 received update: Character performed an attack!
Applications of Behavioural Design Patterns
Following are the applications of the behavioral design patterns −
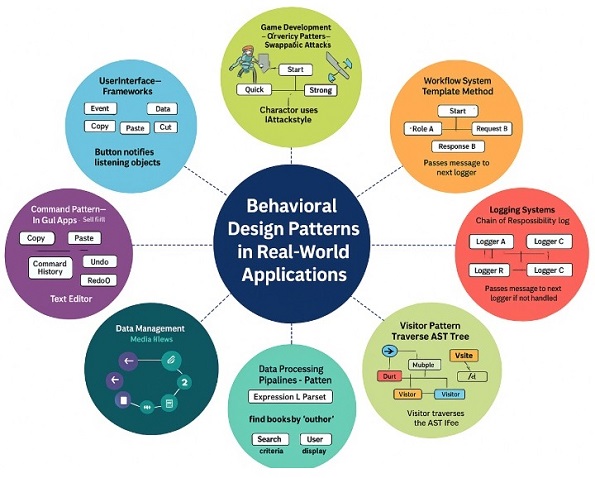
- User Interface Frameworks − In many apps, whenever you click a button or move something, some part of the app needs to react. This is where the Observer pattern helps. For example, when you click a button, all the functions that are waiting for that click get a message. It’s like saying, “Hey, the button was pressed,” and everyone who cares will act. The button doesn’t need to know who is listening, which keeps everything simple.
- Game Development − In games, characters need to change behaviour quickly. The Strategy pattern makes this easy. For example, an enemy can attack fast when the player is close or switch to a strong attack when the player is far. The enemy stays the same, only the attack style changes. This helps the game feel smarter without writing complicated code.
- Workflow Systems − Many office or company systems follow fixed steps. But some steps may differ based on what is being processed. The Template Method pattern fits perfectly here. For example, a document approval process always follows the same main flow, but the actions may change based on whether it’s a salary request, a leave request or a project approval. The structure stays the same, only details change.
- Command Pattern in GUI Apps − Apps like editors or drawing tools use the Command pattern a lot. Every action like copy, paste, cut, undo or redo is stored as a command. This makes undo and redo super easy because the app knows exactly what action happened last. It’s like keeping small notes of everything you did so you can reverse it anytime.
- Logging Systems − In logging, messages can have different importance levels. For example, some messages are simple, some are warnings and some are errors. With the Chain of Responsibility pattern, each logger checks if it should handle the message. If not, it passes it to the next logger. It works just like passing a complaint to the right person in an office.
- State Management − Some apps behave differently based on what state they are in. A media player is the best example. When it is in play state, the button plays the song. In pause state, the same button pauses the song. The behaviour changes based on the state, not the button.
- Data Processing Pipelines − When systems need to understand complex search text or expressions, the Interpreter pattern helps. Think of how a search bar reads your text and understands what you want. It breaks the text, understands the meaning and gives results. This pattern is perfect for situations like this one.
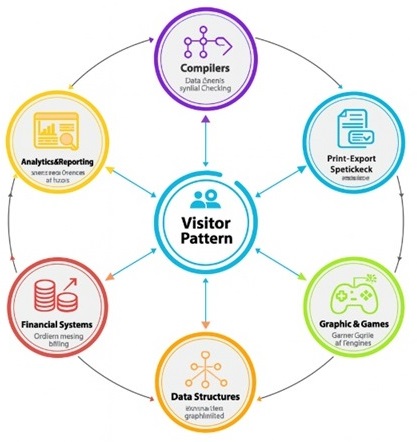
- Visitor Pattern in Compilers − Compilers need to check code, analyse it and then generate output. The Visitor pattern makes this easier by allowing different operations to run on the same code structure. It’s like different people checking the same file: one checks spelling, another checks grammar, another checks formatting without changing the file itself.
Conclusion
In this chapter, we learned about behavioural design patterns and how they make communication inside a program simple and clear. We looked at patterns like Strategy, Observer, and Template Method, and also saw how they can all work together in one simple C++ example. These patterns make sure objects talk to each other in a proper way without creating confusion or messy connections. When developers use behavioural patterns, the whole program becomes easier to understand, easier to change later, and easier to grow as new features are added.