Move semantics are used in C++ to transfer the ownership of resources from one object to another instead of copying them. It improves the performance as it avoid unnecessary copying of objects, reducing memory usage, improves efficiency, and efficiently handles the temporary objects like rvalue.
Why Move Semantics are Needed?
Before C++11, we used to copy the resource and it was less efficient and created duplicates. In C++11, move semantics were introduced to solve this problem of memory overhead and reducing the duplicates. Here are reasons why we need move semantics −
Move semantics avoid copying of resources. It helps in avoiding duplicates and cause less memory overhead.
It handles temporary objects like rvalues.
It improves the performance by moving the resources instead of copying.
Expression Types in C++
An expression in C++ means any valid combination of variable, operator, constant, and function call that can give result. There are two types of expression which are as follows −
lvalue Expression
An lvalue is a type of expression in which object has a memory address and can be modified if it is not const. Example of lvalue can be a variable, array elements, and many more.
An lvalue reference is used to create a reference to an lvalue. It is denoted by (&) and is used for implementing copy semantics.
rvalue Expression
An rvalue is a type of expression that does not have a memory address and it represents a value that generally appears on the right side. It is a temporary expression that is about to get destroyed. Example of rvalue can be a constant, temporary object, and many more.
An rvalue reference is used to reference rvalues or temporary objects. It is denoted by (&&) and is used for implementing move semantics.
Here is an example of demonstrating lvalue and rvalue in C++. The x is an lvalue expression and x+5 is an rvalue expression.
#include <iostream>usingnamespace std;intmain(){// x is an lvalueint x =10;// 'x + 5' is an rvalue         int y = x +5;

    cout <<"Old x: "<< x << endl;
    cout <<"Old y: "<< y << endl;// Demonstrating assignments
    x =20;// correct, as x is an lvalue// (x + 5) = 15;     // wrong, as x + 5 is an rvalue

    cout <<"New x: "<< x << endl;return0;}
The output of the above code is as follows −
Old x: 10
Old y: 15
New x: 20
The following example demonstrates lvalue reference(int &x) and rvalue reference(int &&x) −
#include <iostream>usingnamespace std;voidprintValue(int&x){
   cout <<"Calling with Lvalue reference: "<< x << endl;// lvalue reference}voidprintValue(int&&x){
   cout <<"Calling with Rvalue reference: "<< x << endl;// rvalue reference}intmain(){int a =10;printValue(a);// a is an lvalueprintValue(20);// 20 is an rvaluereturn0;}
The output of the above code is as follows −
Calling with Lvalue reference: 10
Calling with Rvalue reference: 20
Why do Move Semantics Apply to Rvalues Only?
The move semantics is applied only to rvalues because, the rvalues are temporary objects, that are about to get destroyed. The rvalue will not affect the program in future as they are temporary and can be changed. So, applying move semantics on rvalue to transfer the ownership won’t affect the program.
Here are the techniques that can be used to implement move semantics −
Move Constructor
A move constructor is a special constructor used to transfer the ownership of resources from a temporary object or rvalue to a new object using rvalue reference. The move constructor is automatically called when initializing an object with an rvalue.
In the above code, the desired output is not being displayed because of modern compiler apply RVO(Return Value Optimization).
Move Assignment Operator
The move assignment operator uses ‘(=)’ and rvalue reference for move semantic. First, it releases the current resource of object and then take ownership of the source object’s resources. Below is an example of move assignment operator −
Constructor called
Constructor called
Before move assignment:
Hello
World
Move assignment operator called
After move assignment:
World
Destructor called
Destructor called
Before move() function:
string 1: Hello

After move() function:
str2: Hello
str1:
Conclusion
In this chapter, we discussed about move semantics. Its main purpose is to transfer the ownership of resources of rvalues to save memory overhead and increase the efficiency of the code.
A good understanding of how dynamic memory really works in C++ is essential to becoming a good C++ programmer. Memory in your C++ program is divided into two parts −
The stack − All variables declared inside the function will take up memory from the stack.
The heap − This is unused memory of the program and can be used to allocate the memory dynamically when program runs.
Many times, you are not aware in advance how much memory you will need to store particular information in a defined variable and the size of required memory can be determined at run time.
You can allocate memory at run time within the heap for the variable of a given type using a special operator in C++ which returns the address of the space allocated. This operator is called new operator.
If you are not in need of dynamically allocated memory anymore, you can use delete operator, which de-allocates memory that was previously allocated by new operator.
new and delete Operators
There is following generic syntax to use new operator to allocate memory dynamically for any data-type.
new data-type;
Here, data-type could be any built-in data type including an array or any user defined data types include class or structure. Let us start with built-in data types. For example we can define a pointer to type double and then request that the memory be allocated at execution time. We can do this using the new operator with the following statements −
double* pvalue  =NULL;// Pointer initialized with null
pvalue  =newdouble;// Request memory for the variable
The memory may not have been allocated successfully, if the free store had been used up. So it is good practice to check if new operator is returning NULL pointer and take appropriate action as below −
double* pvalue  =NULL;if(!(pvalue  =newdouble)){
   cout <<"Error: out of memory."<<endl;exit(1);}
The malloc() function from C, still exists in C++, but it is recommended to avoid using malloc() function. The main advantage of new over malloc() is that new doesn’t just allocate memory, it constructs objects which is prime purpose of C++.
At any point, when you feel a variable that has been dynamically allocated is not anymore required, you can free up the memory that it occupies in the free store with the delete operator as follows −
delete pvalue;// Release memory pointed to by pvalue
Let us put above concepts and form the following example to show how new and delete work −
#include <iostream>usingnamespace std;intmain(){double* pvalue  =NULL;// Pointer initialized with null
   pvalue  =newdouble;// Request memory for the variable*pvalue =29494.99;// Store value at allocated address
   cout <<"Value of pvalue : "<<*pvalue << endl;delete pvalue;// free up the memory.return0;}
If we compile and run above code, this would produce the following result −
Value of pvalue : 29495
Dynamic Memory Allocation for Arrays
Consider you want to allocate memory for an array of characters, i.e., string of 20 characters. Using the same syntax what we have used above we can allocate memory dynamically as shown below.
char* pvalue  =NULL;// Pointer initialized with null
pvalue  =newchar[20];// Request memory for the variable
To remove the array that we have just created the statement would look like this −
delete[] pvalue;// Delete array pointed to by pvalue
Following the similar generic syntax of new operator, you can allocate for a multi-dimensional array as follows −
double** pvalue  =NULL;// Pointer initialized with null
pvalue  =newdouble[3][4];// Allocate memory for a 3x4 array
However, the syntax to release the memory for multi-dimensional array will still remain same as above −
delete[] pvalue;// Delete array pointed to by pvalue
Dynamic Memory Allocation for Objects
Objects are no different from simple data types. For example, consider the following code where we are going to use an array of objects to clarify the concept −
If you were to allocate an array of four Box objects, the Simple constructor would be called four times and similarly while deleting these objects, destructor will also be called same number of times.
If we compile and run above code, this would produce the following result −
An exception is a problem that arises during the execution of a program. A C++ exception is a response to an exceptional circumstance that arises while a program is running, such as an attempt to divide by zero.
Exceptions provide a way to transfer control from one part of a program to another. C++ exception handling is built upon three keywords: try, catch, and throw.
throw − A program throws an exception when a problem shows up. This is done using a throw keyword.
catch − A program catches an exception with an exception handler at the place in a program where you want to handle the problem. The catch keyword indicates the catching of an exception.
try − A try block identifies a block of code for which particular exceptions will be activated. It’s followed by one or more catch blocks.
Assuming a block will raise an exception, a method catches an exception using a combination of the try and catch keywords. A try/catch block is placed around the code that might generate an exception. Code within a try/catch block is referred to as protected code, and the syntax for using try/catch as follows −
You can list down multiple catch statements to catch different type of exceptions in case your try block raises more than one exception in different situations.
Throwing Exceptions
Exceptions can be thrown anywhere within a code block using throw statement. The operand of the throw statement determines a type for the exception and can be any expression and the type of the result of the expression determines the type of exception thrown.
Example
Following is an example of throwing an exception when dividing by zero condition occurs −
doubledivision(int a,int b){if( b ==0){throw"Division by zero condition!";}return(a/b);}
Catching Exceptions
The catch block following the try block catches any exception. You can specify what type of exception you want to catch and this is determined by the exception declaration that appears in parentheses following the keyword catch.
try{// protected code}catch( ExceptionName e ){// code to handle ExceptionName exception}
Above code will catch an exception of ExceptionName type. If you want to specify that a catch block should handle any type of exception that is thrown in a try block, you must put an ellipsis, …, between the parentheses enclosing the exception declaration as follows −
try{// protected code}catch(...){// code to handle any exception}
Example
The following is an example, which throws a division by zero exception and we catch it in catch block.
#include <iostream>usingnamespace std;doubledivision(int a,int b){if( b ==0){throw"Division by zero condition!";}return(a/b);}intmain(){int x =50;int y =0;double z =0;try{
      z =division(x, y);
      cout << z << endl;}catch(constchar* msg){
     cerr << msg << endl;}return0;}
Because we are raising an exception of type const char*, so while catching this exception, we have to use const char* in catch block. If we compile and run above code, this would produce the following result −
Division by zero condition!
C++ Standard Exceptions
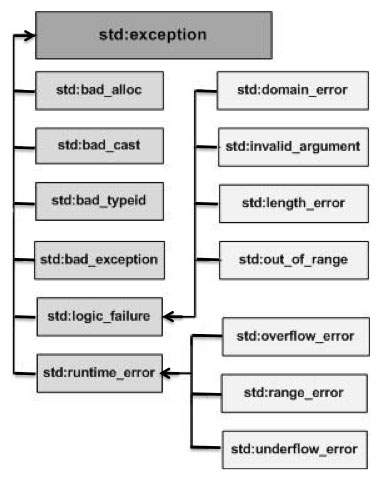
C++ provides a list of standard exceptions defined in <exception> which we can use in our programs. These are arranged in a parent-child class hierarchy shown below −
Here is the small description of each exception mentioned in the above hierarchy −
Sr.No
Exception & Description
1
std::exceptionAn exception and parent class of all the standard C++ exceptions.
2
std::bad_allocThis can be thrown by new.
3
std::bad_castThis can be thrown by dynamic_cast.
4
std::bad_exceptionThis is useful device to handle unexpected exceptions in a C++ program.
5
std::bad_typeidThis can be thrown by typeid.
6
std::logic_errorAn exception that theoretically can be detected by reading the code.
7
std::domain_errorThis is an exception thrown when a mathematically invalid domain is used.
8
std::invalid_argumentThis is thrown due to invalid arguments.
9
std::length_errorThis is thrown when a too big std::string is created.
10
std::out_of_rangeThis can be thrown by the ‘at’ method, for example a std::vector and std::bitset<>::operator[]().
11
std::runtime_errorAn exception that theoretically cannot be detected by reading the code.
12
std::overflow_errorThis is thrown if a mathematical overflow occurs.
13
std::range_errorThis is occurred when you try to store a value which is out of range.
14
std::underflow_errorThis is thrown if a mathematical underflow occurs.
Define New Exceptions
You can define your own exceptions by inheriting and overriding exception class functionality.
Example
Following is the example, which shows how you can use std::exception class to implement your own exception in standard way −
Here, what() is a public method provided by exception class and it has been overridden by all the child exception classes. This returns the cause of an exception.
File I/O (Input/Output) in C++ is the process of reading and writing to files. C++ provides this for handling files through the standard library with <fstream> header file. File I/O allows programs to persist data, interact with external resources, and store/retrieve information beyond the scope of program execution.
Types of File Streams
There are three primary types of file streams, where each is associated with different operations −
ifstream (Input File Stream) − This is used for reading data from a file.
ofstream (Output File Stream) − This is used for writing data to a file.
fstream (File Stream) − This is used for both input and output operations on a file. It combines the functionality of both ifstream and ofstream.
Basic Steps in File I/O
Heres the given basic steps in file I/O −
Opening a File
Before reading or writing to a file, it must be opened using one of the file stream classes. If the file is successfully opened, the program will proceed with I/O operations.
Performing File Operations
You can read from or write to a file using the appropriate methods.
Closing the File
After the file operations are completed, you should close the file to make sure that all data is flushed and the file is properly released.
Reading with ifstream (Stream Extraction Operator)
Using stream extraction operator (>>) is the simplest way to read data from a file in C++. This operator reads formatted data from a file, similar to how data is read from standard input.
Example
Heres the given example for Reading with ifstream −
#include <fstream>#include <iostream>#include <string>intmain(){
   std::ifstream inputFile("example.txt");// Open the file for readingif(!inputFile){
      std::cerr <<"Error opening file!"<< std::endl;return1;}

   std::string word;while(inputFile >> word){// Reads until a whitespace is encountered
      std::cout << word << std::endl;// Print each word from the file}

   inputFile.close();// Close the file when donereturn0;}
Here, The >> operator reads data word by word, stopping at whitespace (spaces, newlines, etc.).
But it doesn’t handle reading lines of text (as it stops at whitespace), and it can be tricky for reading complex data formats (like lines containing spaces).
Using getline() to Read Lines
If you want to read an entire line or text, including steps you can use the getline() function. This function will read characters from the file until a newline character (‘\n’) is encountered.
Example
Heres the given example for using getline() to read lines −
#include <fstream>#include <iostream>#include <string>intmain(){
   std::ifstream inputFile("example.txt");// Open the file for readingif(!inputFile){
      std::cerr <<"Error opening file!"<< std::endl;return1;}

   std::string line;while(std::getline(inputFile, line)){// Read a full line of text
      std::cout << line << std::endl;// Output the line to the console}

   inputFile.close();// Close the file when donereturn0;}
Reading Binary Files (using read())
The above discussed methods are for text files, for binary files you can use the read() function to read raw binary data from a file.
Example
Heres the given example for Reading Binary Files (using read()) −
#include <iostream>#include <fstream>intmain(){
   std::ifstream file("example.bin", std::ios::binary);// Check if the file was successfully openedif(!file){
      std::cerr <<"Error opening file!"<< std::endl;return1;}// Get the length of the file
   file.seekg(0, std::ios::end);
   std::streamsize size = file.tellg();
   file.seekg(0, std::ios::beg);// Read the entire file content into a bufferchar* buffer =newchar[size];
   file.read(buffer, size);// Print raw data (optional, for demonstration)for(std::streamsize i =0; i < size;++i){
      std::cout << std::hex <<(0xFF& buffer[i])<<" ";// Print byte in hex}delete[] buffer;
   file.close();return0;}
Handling Errors in File I/O
Handling errors is important to ensure that your program behaves correctly when files are not available, can’t be opened, or when unexpected conditions occur during reading/writing.
Checking for Errors with fail(), eof(), and good().
C++ provides several member functions of the ifstream/ofstream objects to check for various conditions.
fail(): Checks if a non-recoverable error occurred during I/O.
eof(): Checks if the end of file (EOF) was reached.
good(): Returns true if no error has occurred.
Handling End-of-File (EOF)
When reading from a file, it’s important to handle the case when you reach the end of the file. The standard approach is to use eof() or std::getline() operators, which automatically stop when the end of the file is reached.
Handling I/O Errors Gracefully
During file operations, you should check for fail() or bad() states to detect errors like unexpected end-of-file or data corruption.
So far, we have been using the iostream standard library, which provides cin and cout methods for reading from standard input and writing to standard output respectively.
This tutorial will teach you how to read and write from a file. This requires another standard C++ library called fstream, which defines three new data types −
Sr.No
Data Type & Description
1
ofstreamThis data type represents the output file stream and is used to create files and to write information to files.
2
ifstreamThis data type represents the input file stream and is used to read information from files.
3
fstreamThis data type represents the file stream generally, and has the capabilities of both ofstream and ifstream which means it can create files, write information to files, and read information from files.
To perform file processing in C++, header files <iostream> and <fstream> must be included in your C++ source file.
Opening a File
A file must be opened before you can read from it or write to it. Either ofstream or fstream object may be used to open a file for writing. And ifstream object is used to open a file for reading purpose only.
Following is the standard syntax for open() function, which is a member of fstream, ifstream, and ofstream objects.
voidopen(constchar*filename, ios::openmode mode);
Here, the first argument specifies the name and location of the file to be opened and the second argument of the open() member function defines the mode in which the file should be opened.
Sr.No
Mode Flag & Description
1
ios::appAppend mode. All output to that file to be appended to the end.
2
ios::ateOpen a file for output and move the read/write control to the end of the file.
3
ios::inOpen a file for reading.
4
ios::outOpen a file for writing.
5
ios::truncIf the file already exists, its contents will be truncated before opening the file.
You can combine two or more of these values by ORing them together. For example if you want to open a file in write mode and want to truncate it in case that already exists, following will be the syntax −
When a C++ program terminates it automatically flushes all the streams, release all the allocated memory and close all the opened files. But it is always a good practice that a programmer should close all the opened files before program termination.
Following is the standard syntax for close() function, which is a member of fstream, ifstream, and ofstream objects.
voidclose();
Writing to a File
While doing C++ programming, you write information to a file from your program using the stream insertion operator (<<) just as you use that operator to output information to the screen. The only difference is that you use an ofstream or fstream object instead of the cout object.
Reading from a File
You read information from a file into your program using the stream extraction operator (>>) just as you use that operator to input information from the keyboard. The only difference is that you use an ifstream or fstream object instead of the cin object.
Read and Write Example
Following is the C++ program which opens a file in reading and writing mode. After writing information entered by the user to a file named afile.dat, the program reads information from the file and outputs it onto the screen −
#include <fstream>#include <iostream>usingnamespace std;intmain(){char data[100];// open a file in write mode.
   ofstream outfile;
   outfile.open("afile.dat");

   cout <<"Writing to the file"<< endl;
   cout <<"Enter your name: ";
   cin.getline(data,100);// write inputted data into the file.
   outfile << data << endl;

   cout <<"Enter your age: ";
   cin >> data;
   cin.ignore();// again write inputted data into the file.
   outfile << data << endl;// close the opened file.
   outfile.close();// open a file in read mode.
   ifstream infile;
   infile.open("afile.dat");

   cout <<"Reading from the file"<< endl;
   infile >> data;// write the data at the screen.
   cout << data << endl;// again read the data from the file and display it.
   infile >> data;
   cout << data << endl;// close the opened file.
   infile.close();return0;}
When the above code is compiled and executed, it produces the following sample input and output −
$./a.out
Writing to the file
Enter your name: Zara
Enter your age: 9
Reading from the file
Zara
9
Above examples make use of additional functions from cin object, like getline() function to read the line from outside and ignore() function to ignore the extra characters left by previous read statement.
File Position Pointers
Both istream and ostream provide member functions for repositioning the file-position pointer. These member functions are seekg (“seek get”) for istream and seekp (“seek put”) for ostream.
The argument to seekg and seekp normally is a long integer. A second argument can be specified to indicate the seek direction. The seek direction can be ios::beg (the default) for positioning relative to the beginning of a stream, ios::cur for positioning relative to the current position in a stream or ios::end for positioning relative to the end of a stream.
The file-position pointer is an integer value that specifies the location in the file as a number of bytes from the file’s starting location. Some examples of positioning the “get” file-position pointer are −
// position to the nth byte of fileObject (assumes ios::beg) fileObject.seekg( n ); // position n bytes forward in fileObject fileObject.seekg( n, ios::cur ); // position n bytes back from end of fileObject fileObject.seekg( n, ios::end ); // position at end of fileObject fileObject.seekg( 0, ios::end );
Behavioural design patterns are ways of organising how different objects in a program communicate with each other. When a program becomes large, many objects need to exchange information or react to certain actions. If this communication is random or unplanned, the code becomes confusing. Behavioural design patterns give a simple and organised approach so every object knows when to speak, when to listen, and what its role is. This makes the whole program easier to understand and work with.
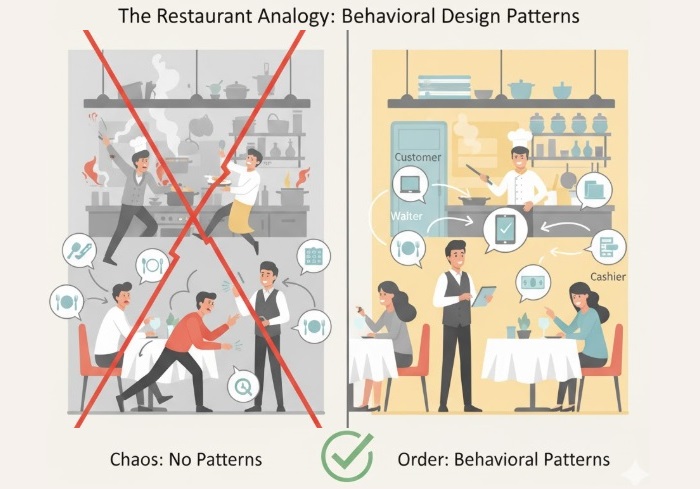
A good way to understand this is to picture a restaurant. A restaurant runs smoothly only because everyone inside knows how to behave and how to talk to each other. The waiter takes orders from customers, the chef cooks food, the cashier handles bills, and the manager watches over everything. The waiter does not suddenly start cooking, the chef does not run to take orders, and the customers don’t go into the kitchen to ask what is happening. Everyone has a specific job and a clear way to interact. This simple structure keeps the restaurant calm even when many people are involved.
Now imagine if the behaviour rules inside the restaurant didn’t exist. Customers might walk straight into the kitchen, chefs might run to tables arguing about orders, waiters might forget who to serve because everyone is shouting instructions. It would be a disaster. The same thing happens inside a program when communication is not planned properly. Behavioural design patterns prevent this problem by defining clean paths of communication, just like a restaurant defines who talks to whom and when.
For example, in the restaurant, when a customer gives an order, the waiter handles it. The chef reacts when the waiter passes the order. The cashier reacts only after the meal is finished and the bill is needed. Everyone responds at the right moment without unnecessary connections or confusion. Behavioural design patterns create this same kind of controlled flow between objects in a program.
They help cut down those super tight connections between objects, which makes it way easier to change things later. If you want to add a new feature or tweak how something works, you only touch the part that actually needs the change, not the whole project. This keeps the program easier to manage and stops random things from breaking for no reason.
In short, behavioural design patterns give a simple and natural way for objects to interact, just like people in a well-managed restaurant. They help keep communication clear, roles separate, and the overall system easy to maintain.
Types of Behavioural Design Patterns
We have total 11 types of Behavioural Design Patterns in C++. They are −
Chain of Responsibility Design Pattern
Command Design Pattern
Interpreter Design Pattern
Iterator Design Pattern
Mediator Design Pattern
Memento Design Pattern
Observer Design Pattern
State Design Pattern
Strategy Design Pattern
Template Method Design Pattern
Visitor Design Pattern
We will cover each of these design patterns in detail in the upcoming chapters. but, for the moment let’s have a quick overview of each of these design patterns −
Chain of Responsibility Design Pattern
The Chain of Responsibility design pattern is all about passing a request through a series of handlers until one of them decides to handle it. Instead of one object trying to do everything, the request moves step by step through a chain. Each handler gets a chance to check the request. If it can handle it, it does so. If not, it simply passes it to the next handler in the chain. This makes the system flexible because you can easily add, remove, or rearrange handlers without changing how the request is made.
A simple example is customer support. When someone sends a support message, it may first go to a basic support agent. If that agent can’t fix the issue, the message goes to a senior agent, and if needed, it moves further to a manager. Each person in the chain checks the problem and handles it only if it matches their level.
Command Design Pattern
The Command design pattern is all about turning a request into a simple object. Think of it like writing a small note that says, “Do this task,” and handing that note to someone who knows how to execute it. This pattern separates the person asking for the work from the person who actually does the work. It’s useful when you want tasks to run later, undo tasks, or store a list of actions.
A real example is a TV remote. When you press the “volume up” button, the remote doesn’t directly change the TV’s volume. Instead, each button has a command object behind it. The remote only triggers the command. The TV carries out the actual work. Because of this, you can add new buttons (new commands) without changing how the remote works. It keeps things flexible and avoids connecting too many things directly.
Interpreter Design Pattern
The Interpreter pattern helps you deal with situations where you need to read, process, or understand a small language or set of rules. It breaks down expressions into pieces, and each piece knows how to explain itself.
A real example is a calculator that handles simple math like “2 + 5 – 3.” The calculator doesn’t memorise every possible calculation. Instead, each symbol (+, -, numbers) has its own meaning. The interpreter reads the whole expression step by step and evaluates it.
This pattern is useful when you have repeating rules that look like a language. It could be formulas, filters, search queries, or even instructions in a game. Instead of writing long if-else conditions, you build tiny interpreters that understand the rules. It keeps the code clean and allows you to add more rules easily.
Iterator Design Pattern
The Iterator pattern gives you a clean way to move through a collection (like a list or array) without exposing how that collection is built. It’s like being given a remote control to move through items one by one without opening the machine.
A real example is flipping through a photo album using next and previous buttons. You don’t care where the photos are stored, how the system saves them, or what format they’re in. You only move to the next photo, then the next, and so on.
The iterator pattern keeps things neat. It gives you a consistent way to browse through any collection, even if the collection changes internally. You don’t break the structure because you’re not touching it directly. You just use the iterator to travel through the elements safely and simply.
Mediator Design Pattern
The Mediator pattern is like having a friendly coordinator in the middle who makes objects talk to each other without letting them talk directly.
Imagine a classroom where students want to ask questions. Instead of shouting at each other, they talk to the teacher (the mediator). The teacher controls the flowâwho speaks, who responds, who gets attention. Students don’t communicate directly, which keeps order in the room. This pattern helps in avoiding messy connections where every object talks to every other object directly. That causes confusion and also causes too many dependencies.
With a mediator, everything becomes simpler. Objects only talk to the mediator, and the mediator decides what happens. This makes your code easier to manage, and changes don’t break everything.
Memento Design Pattern
The Memento pattern is about saving and restoring an object’s previous state without exposing its internal details.
Think of a video game’s save feature. When you press “Save Game,” the game stores your location, health, inventory, and progress. Later, when you click “Load Game,” the game puts everything back exactly the way it was.
The player doesn’t know or care how the game stores all this dataâthey just know their progress is safe.
This pattern is very useful when you want undo features, history tracking, checkpoints, or safe rollbacks. It keeps the internal information hidden, but still lets you move backward when needed.
Observer Design Pattern
The Observer pattern connects one main object (subject) to many observers. When something changes in the subject, all observers get updated automatically.
A real-life example is subscribing to YouTube channels. When the channel uploads a new video, subscribers get notified instantly. The channel doesn’t message each subscriber manually; the system does it for you.
This pattern helps when many parts of your program need to know about one eventâsuch as UI updates, notifications, logs, or status changes. It avoids hard connections and makes adding or removing observers easy.
State Design Pattern
The State pattern lets an object change its behaviour depending on its current state. A good example is a mobile phone. When it’s locked, pressing the button shows the lock screen. When it’s unlocked, pressing the same button does something different. When it’s in power-saving mode, it behaves differently again.
The phone is one device, but the behavior changes based on its internal state. This pattern keeps code tidy and avoids big, messy if-else statements everywhere.
Strategy Design Pattern
The Strategy pattern lets you swap algorithms or methods at runtime. Imagine choosing travel options in Google Maps: car, bus, walking, bike. The destination is the same, but the route changes.
Each travel mode is a “strategy.” You pick the one you want. In code, this lets you change behaviour easilyâsorting methods, payment methods, filtering styles, etc.âwithout rewriting everything.
Template Method Design Pattern
The Template Method pattern defines the main steps of a process but lets subclasses fill in the details.
Think of making tea or coffee. The steps are similar: boil water, add ingredients, pour. But tea and coffee differ in the middle step. The “template” is the common structure. This pattern avoids rewriting the whole process and keeps shared logic in one place.
Visitor Design Pattern
The Visitor pattern lets you add new operations to a group of objects without modifying the objects themselves.
Imagine a zoo. You have animals, and different visitors come: a vet checks health, a photographer takes pictures, a feeder gives food. The animals stay the same, but each visitor performs a different action on them. This pattern helps when you want to change anything in the code without touching the classes.
C++ Implementation of Behavioural Design Patterns all Together
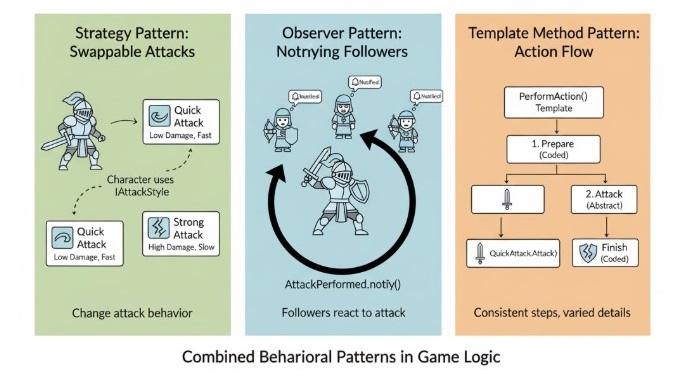
We will take a combined example to understand how these behavioural design patterns can work together in one simple C++ program. The idea here is not to make the code complicated, but to show how each pattern plays its own role, the same way different people in a team handle their own duties. This example mixes the Strategy Pattern for choosing behaviours, the Observer Pattern for sending updates to interested objects, and the Template Method Pattern for defining a common workflow that different classes can follow.
In this example, imagine we are building a small game-like setup. We have a character that can use different attack styles, such as a quick attack or a strong attack. This is where the Strategy Pattern helps, because we can swap attack behaviour without changing the character class itself. The character also has fans or followers who want to know whenever the character attacks. This is where the Observer Pattern comes in. The followers get a notification each time an attack happens. Finally, the Template Method Pattern is used to control the general flow of performing an action, like preparing, attacking, and finishing, while still allowing different steps to be customized depending on the type of attack.
By combining these three patterns, we can see how behavioural patterns make communication inside a program clear and flexible. Each pattern solves a different communication problem, and when they are used together, the code becomes cleaner and easier to expand later.
=== Quick Attack ===
Character prepares for action...
Character performs a quick attack!
Character finishes the action.
Follower 1 received update: Character performed an attack!
Follower 2 received update: Character performed an attack!
=== Switching to Strong Attack ===
Character prepares for action...
Character performs a strong attack!
Character finishes the action.
Follower 1 received update: Character performed an attack!
Follower 2 received update: Character performed an attack!
Applications of Behavioural Design Patterns
Following are the applications of the behavioral design patterns −
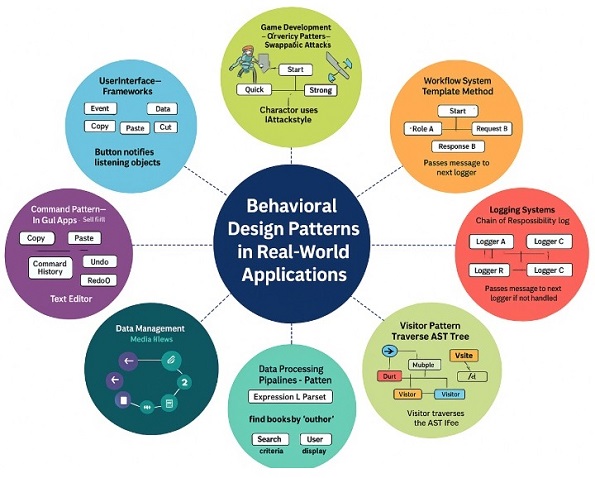
User Interface Frameworks − In many apps, whenever you click a button or move something, some part of the app needs to react. This is where the Observer pattern helps. For example, when you click a button, all the functions that are waiting for that click get a message. It’s like saying, “Hey, the button was pressed,” and everyone who cares will act. The button doesn’t need to know who is listening, which keeps everything simple.
Game Development − In games, characters need to change behaviour quickly. The Strategy pattern makes this easy. For example, an enemy can attack fast when the player is close or switch to a strong attack when the player is far. The enemy stays the same, only the attack style changes. This helps the game feel smarter without writing complicated code.
Workflow Systems − Many office or company systems follow fixed steps. But some steps may differ based on what is being processed. The Template Method pattern fits perfectly here. For example, a document approval process always follows the same main flow, but the actions may change based on whether it’s a salary request, a leave request or a project approval. The structure stays the same, only details change.
Command Pattern in GUI Apps − Apps like editors or drawing tools use the Command pattern a lot. Every action like copy, paste, cut, undo or redo is stored as a command. This makes undo and redo super easy because the app knows exactly what action happened last. It’s like keeping small notes of everything you did so you can reverse it anytime.
Logging Systems − In logging, messages can have different importance levels. For example, some messages are simple, some are warnings and some are errors. With the Chain of Responsibility pattern, each logger checks if it should handle the message. If not, it passes it to the next logger. It works just like passing a complaint to the right person in an office.
State Management − Some apps behave differently based on what state they are in. A media player is the best example. When it is in play state, the button plays the song. In pause state, the same button pauses the song. The behaviour changes based on the state, not the button.
Data Processing Pipelines − When systems need to understand complex search text or expressions, the Interpreter pattern helps. Think of how a search bar reads your text and understands what you want. It breaks the text, understands the meaning and gives results. This pattern is perfect for situations like this one.
Visitor Pattern in Compilers − Compilers need to check code, analyse it and then generate output. The Visitor pattern makes this easier by allowing different operations to run on the same code structure. It’s like different people checking the same file: one checks spelling, another checks grammar, another checks formatting without changing the file itself.
Conclusion
In this chapter, we learned about behavioural design patterns and how they make communication inside a program simple and clear. We looked at patterns like Strategy, Observer, and Template Method, and also saw how they can all work together in one simple C++ example. These patterns make sure objects talk to each other in a proper way without creating confusion or messy connections. When developers use behavioural patterns, the whole program becomes easier to understand, easier to change later, and easier to grow as new features are added.
The visitor design pattern is a way of writing code that helps you in adding new features or new types of work to your classes without changing those classes again and again.
In programming, we often create classes that represent some real things like shapes, items, files, animals, or anything else. These classes usually have some basic data in them and maybe one or two simple functions. But as the project grows, we want to do more and more operations with these classes. If we keep adding all the new operations directly inside these classes, the classes become very big and hard to read. The visitor pattern helps us avoid making our classes messy.
Imagine a school building. The school admin cannot repair wires, fix water pipes, clean the classrooms, or check the furniture. Instead, different people come to the school to do these jobs. An electrician comes to fix wires. A plumber comes to fix water pipes. A cleaner comes to clean the rooms. A carpenter comes to fix furniture. The school admin allows different workers to come inside and do their job.
This is the exact same idea in the visitor pattern. Your object is like the school building, and the visitor is like the worker who comes to do the job. The building has a door, and the objects have an accept method. The visitor enters through the accept method and then does the required work.
This pattern is used when you have many different objects and want to keep adding new tasks for those objects. If you try to put every single task inside the object classes, then those classes will become too large. The visitor pattern keeps things neat by moving the work into separate visitor classes.
Components of the Visitor Pattern
Following are the main components of the visitor design pattern −
Visitor Interface − This is like a plan that tells which types of objects the visitor can work with. It has one visit function for each element type. For example, visitCircle(), visitSquare(), visitRectangle().
Concrete Visitor − These are actual classes that do real work. For example, an AreaCalculator visitor will calculate area. A PerimeterCalculator visitor will calculate perimeter. A DrawingVisitor might draw the shapes on screen.
Element Interface − This is the main interface that all elements must follow. It usually contains only one function: accept(visitor). Every concrete element must implement this.
Concrete Element − These are your real objects. For example, Circle, Square, and Rectangle. They store simple data like radius or side length and implement the accept method.
Object Structure − This is usually a list or collection of elements. The visitor will go through this structure and visit each element one by one.
Client − The client sets everything up. It creates shapes, creates visitors, and asks the elements to accept the visitors.
Implementation of the Visitor Pattern in C++
Let’s implement the visitor design pattern in C++ using the shape example mentioned earlier. We’ll create a visitor interface for calculating area and perimeter, and concrete visitor classes for each operation.
Steps to Implement Visitor Design Pattern
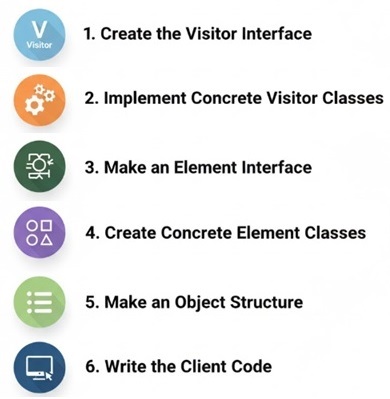
Following image shows the steps to implement the visitor design pattern.
First, make a Visitor interface . This interface will have one visit function for every type of element you have. For example, visitCircle, visitSquare, visitRectangle. This tells the visitor what kinds of objects it can work with.
Then create Concrete Visitor classes . These are the real workers. Each visitor class does one type of job, like calculating area, perimeter, printing details, drawing shapes, or anything else you need. Inside each visitor class, you write what happens when it visits each element type.
After that, make an Element interface . This interface has only one important function: accept . Every element (like Circle, Square, Rectangle) must use this interface. This accept function is the âdoorâ through which the visitor enters.
Next, create the Concrete Element classes . These are your actual objects. For example, Circle has radius, Square has side, Rectangle has width and height. Each one must implement the accept function. Inside accept, the element simply calls the visitor’s matching visit method and passes itself.
Make an Object Structure . This is just a collection (like a vector, list, or array) that holds all your elements. The visitor will go through this structure and visit each element one by one. This makes it easy to run a visitor on many elements at the same time.
Finally, write the Client code . The client creates the objects, puts them into the structure, and creates visitors. Then the client calls accept on each element and passes the visitor. This starts the whole process and makes the visitor run its work on each element.
C++ Code for Visitor Design Pattern
In this example, we have an abstract class Shape that defines the interface for shapes like Circle , Square , and Rectangle . The Visitor interface declares visit methods for each shape type. The concrete visitor classes AreaCalculator and PerimeterCalculator implement the visit methods to calculate area and perimeter, respectively.
Area of Circle: 78.5398
Perimeter of Circle: 31.4159
Area of Square: 16
Perimeter of Square: 16
Area of Rectangle: 18
Perimeter of Rectangle: 18
The output prints the area and perimeter of each shape. Important thing here is that the shapes did not calculate these values. The visitors did all the work and shapes only allowed the visitors to come in.
Pros and Cons of Visitor Design Pattern
Following are the advantages and disadvantages of using the visitor design pattern −
Pros
Cons
Easy to add new work later. You can make a new visitor anytime without touching the old classes.
If you add a new element type , you must update every visitor, which can be annoying.
Keeps element classes small . They only hold data and one accept function.
Takes time to understand at first, because the work is not inside the element but inside the visitor.
Good when you need to do many different tasks on the same set of objects. Each task stays in its own visitor.
Creates many visitor classes , which can make the project look larger if not kept organized.
Makes the project easier to maintain because the main classes rarely change. This reduces mistakes.
If the shape or structure of elements changes often, then visitors break easily.
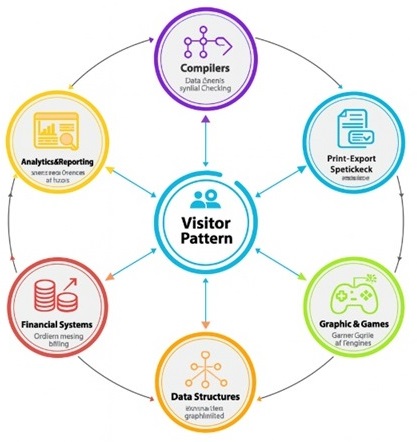
Real-World Applications of Visitor Design Pattern
Following are the real-world software use-cases of the visitor design pattern −
Compilers − Compilers use visitor pattern all the time because they need to walk through many different types of nodes in the syntax tree. These nodes represent things like numbers, variables, loops, conditions, functions, and more. Instead of putting checking, printing, optimization, and code generation inside every node class, they use visitors. This makes it easy to add new passes to the compiler without touching the original tree structure.
Document Processing − In document editors, you may have text blocks, images, tables, links, shapes, and other items. You may want to print the document, export it as PDF, count words, analyze styles, highlight mistakes, or convert it into another format. Instead of putting all these tasks into the document elements, each task becomes a visitor. This keeps the document classes simple and allows adding new features later.
Graphics and Game Development − Games have many objects like players, enemies, bullets, walls, items, and environment objects. You might want to render them differently, check collisions, update physics, or debug their state. Each of these actions can be a visitor. This makes the game code cleaner because you avoid stuffing every game object with too many functions. The visitor approach also helps when you want to run different âpasses,â like updating health, checking triggers, or drawing outlines for debugging.
Data Structures − Trees, graphs, and file systems are perfect places to use visitor pattern. These structures often contain many node types, and you need to perform many operations like searching, sorting, printing, exporting, computing size, checking rules, or validating data. Visitors make it easy to run all these operations without rewriting the structure code.
Financial Systems − In finance, you might have many types of financial instruments like loans, bonds, stocks, insurance plans, or transactions. You may want to calculate interest, total value, tax, risk score, or generate reports. Using visitors allows each of these operations to be written separately. This also helps financial companies update formulas or add new types of calculations without editing the core classes.
Analytics and Reporting Tools − Many dashboards and analytics tools deal with objects like charts, graphs, metrics, logs, and events. Visitors help perform tasks like generating weekly reports, exporting data, summarizing usage, cleaning logs, or transforming data into new formats.
IDE Tools and Code Editors − When an editor analyses your code to show errors, warnings, auto-suggestions, refactoring options, it often uses visitors to walk through your program structure. Each feature becomes a visitor.
Conclusion
In this chapter, we explored the visitor design pattern, a powerful behavioral design pattern that allows for the separation of algorithms from the objects on which they operate. We discussed the key components of the pattern, including the visitor interface, concrete visitors, element interface, and concrete elements. We also implemented the visitor pattern in C++ using a shape example, demonstrating how to calculate area and perimeter using separate visitor classes. Finally, we examined the pros and cons of the visitor pattern and highlighted its real-world applications in various domains. By using the visitor design pattern, developers can enhance code maintainability, promote separation of concerns, and easily add new operations to existing object structures.
The Template Method Design Pattern is a way to set up a common process that can be shared by different classes. It gives a main method called the template method that explains the steps to complete a task. Other classes can then fill in the details for some of those steps in their own way, without changing the main process. This helps in reusing code and keeping things simple as well as consistent.
This pattern is helpful when you have a task that follows the same steps every time, but a few steps might need to be done differently. You can keep the main steps in one place and let other classes change only the parts they need. This makes the program easy to read and simple to manage.
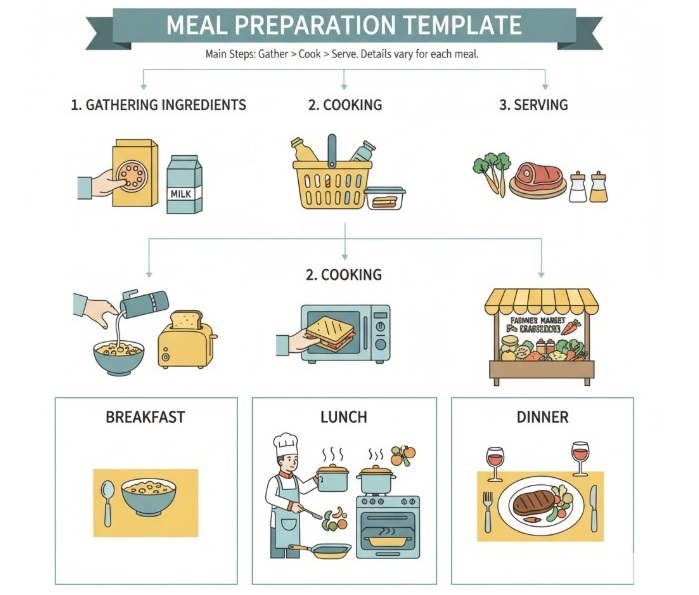
For example, think of a program that shows how to prepare a meal. The template method might describe the main steps : gathering ingredients, cooking, and serving. Now, other classes can change how these steps are done to make different meals like breakfast, lunch, or dinner. The main idea stays the same, but each meal can have its own special details.
Key Parts of the Template Method Design Pattern
The Template Method Design Pattern has following components that work together −
The Abstract Class is the main class that defines the overall process. It includes the template method, which lists all the steps in order. Some steps may already have code, while others are left empty so other classes can fill them in later.
The Template Method is the main method that shows how the task should be done from start to finish. It calls smaller methods for each step. Some of those smaller methods might be complete, and some might be waiting for other classes to finish them.
The Concrete Subclasses are the classes that come from the abstract class. They complete the unfinished steps by adding their own code. Each subclass can do things a little differently, but they all still follow the main process written in the template method.
The Hook Methods are optional steps that can be changed if needed. They let you add or skip small actions without touching the main process. Think of them like little switches you can turn on or off to change small parts of how things work.
C++ Implementation of the Template Method Design Pattern
Let’s learn how to use the Template Method pattern in C++ with a simple example. We’ll make a program that shows how to prepare different kinds of meals by following the same main steps.
Steps to use the Template Method pattern in C++
Following are the steps to implement the Template Method Design Pattern in C++
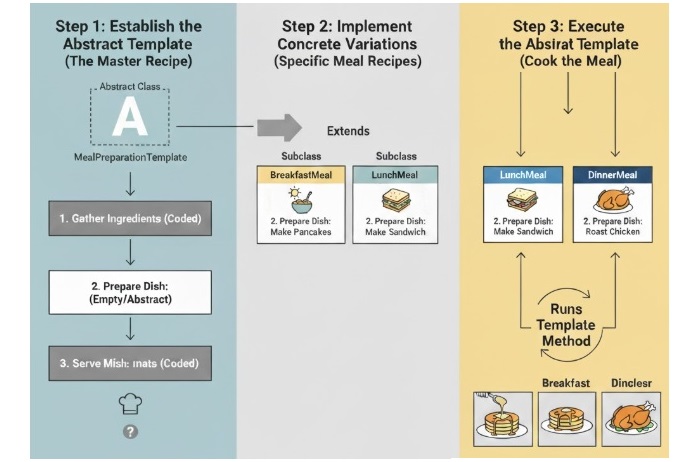
First, make an abstract class that has one main method called the template method. This method lists all the steps of the process, like a recipe. Some steps will already have code, and others will be left empty so that other classes can fill them in later.
Next, create subclasses that come from the abstract class. These classes will fill in the missing steps with their own code. For example, one class can show how to make breakfast, another one can show how to make lunch, and another one can show how to make dinner.
Finally, use these subclasses to run the template method. The main steps stay the same, but each subclass adds its own little changes to make the meal special in its own way.
This way, you can keep the main process in one place and still make it easy to add new meal types later without changing the whole program.
C++ Code to Implement Template Method Design Pattern
Below is a simple C++ code example demonstrating the Template Method Design Pattern for preparing different types of meals.
#include <iostream>usingnamespace std;// Abstract class defining the template methodclassMeal{public:// Template methodvoidprepareMeal(){gatherIngredients();cook();serve();}// Abstract methods to be implemented by subclassesvirtualvoidgatherIngredients()=0;virtualvoidcook()=0;// Concrete methodvoidserve(){
      cout <<"Serving the meal!"<< endl;}};// Concrete subclass for preparing a breakfast meal classBreakfast:public Meal{public:voidgatherIngredients()override{
      cout <<"Gathering ingredients for breakfast: eggs, bread, and coffee."<< endl;}voidcook()override{
      cout <<"Cooking breakfast: frying eggs and toasting bread."<< endl;}};// Concrete subclass for preparing a lunch mealclassLunch:public Meal{public:voidgatherIngredients()override{
      cout <<"Gathering ingredients for lunch: chicken, rice, and vegetables."<< endl;}voidcook()override{
      cout <<"Cooking lunch: grilling chicken and steaming vegetables."<< endl;}};intmain(){
   Meal* breakfast =newBreakfast();
   breakfast->prepareMeal();

   cout << endl;

   Meal* lunch =newLunch();
   lunch->prepareMeal();// Clean updelete breakfast;delete lunch;return0;}
Following is the output of the above code −
Gathering ingredients for breakfast: eggs, bread, and coffee.
Cooking breakfast: frying eggs and toasting bread.
Gathering ingredients for lunch: chicken, rice, and vegetables.
Cooking lunch: grilling chicken and steaming vegetables.
Serving the meal!
In this example, we have an abstract class called Meal. It has a main method named prepareMeal() that shows the full process of making a meal. The method includes three main steps â gathering ingredients, cooking, and serving.
The subclasses Breakfast and Lunch each add their own way of doing the steps. They give their own details for how to gather the ingredients and how to cook the food.
When we run the prepareMeal() method for each subclass, it follows the same main steps but changes the small details depending on the type of meal. This lets us keep the main process the same while still making each meal a little different.
Pros and Cons of the Template Method Design Pattern
Like any design pattern, the Template Method Design Pattern has its advantages and disadvantages. Here are some of the main pros and cons −
Pros
Cons
It helps reuse code by keeping a common process in one place, so you don’t have to write the same steps again and again.
It can create a strict class structure, which might make it harder to change the process later.
It keeps the process consistent across different parts of the program, so everything follows the same steps.
Subclasses don’t have much freedom to change the main process, since the overall structure stays fixed.
It makes maintenance easier because the main process logic is all written in one place.
You might end up with too many subclasses if you need lots of small changes for different versions of the process.
It makes it easy to see and understand how the whole process works from start to finish.
Sometimes it can cause code duplication if different subclasses write the same steps in slightly different ways.
Real-World Applications of the Template Method Design Pattern
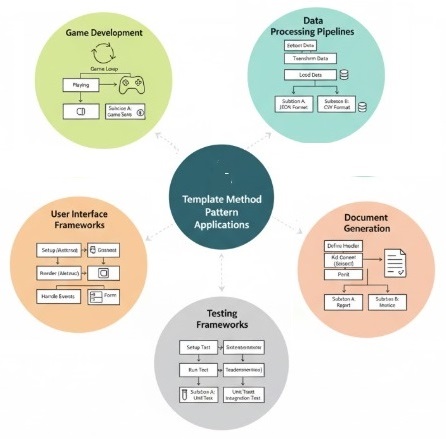
The Template Method Design Pattern is widely used in various real-world applications. Here are some common scenarios where this pattern might be useful −
Data Processing Pipelines − In data processing applications, a common sequence of steps such as data extraction, transformation, and loading (ETL) can be defined using the template method pattern. Different data sources or formats can be handled by subclasses that implement specific extraction and transformation logic.
Game Development − In game development, the template method pattern can be used to define the overall game loop structure, while allowing subclasses to implement specific behaviors for different game states, such as playing, paused, or game over.
Document Generation − In applications that generate documents (like reports or invoices), the template method pattern can define the overall structure of the document, while subclasses can implement specific formatting and content generation for different document types.
User Interface Frameworks − UI frameworks often use the template method pattern to define the lifecycle of UI components, such as initialization, rendering, and event handling, while allowing subclasses to customize specific behaviors for different types of components.
Testing Frameworks − Testing frameworks can use the template method pattern to define the overall structure of test cases, while allowing subclasses to implement specific setup, execution, and teardown logic for different types of tests.
Conclusion
The Template Method Design Pattern is a simple and practical way to keep one common process while letting different parts change only when it is needed. It helps you in reusing code, keeping your program organized, and make complex tasks easier to handle without repeating the same logic everywhere.
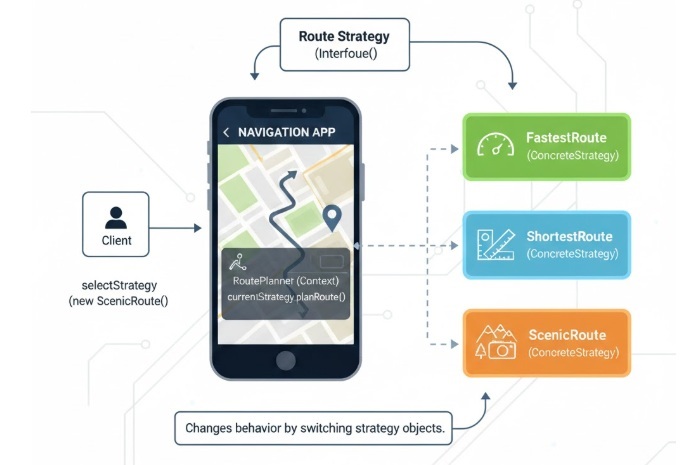
The Strategy Design Pattern is a simple and powerful way to organize your code when you have different ways to perform the same task. It defines a family of algorithms, places each one in its own separate class, and lets you switch between them easily. This means you can change the algorithm’s behavior without touching the main code that uses it.
For example, imagine you have a navigation app that can show routes based on different preferences: the fastest route, the shortest route, or the most scenic route. With the Strategy Design Pattern, you can create a separate class for each type of route and simply switch between them whenever needed, without changing how the main app works.
Key Components of the Strategy Design Pattern
The Strategy Design Pattern is built around a few main parts that make the code more flexible, organized, and easy to maintain. Let’s look at them one by one −
Strategy Interface − This defines a common method that every strategy (or algorithm) must follow. It ensures that all the different strategies can be used in the same way, no matter which one you choose.
Concrete Strategies − These are the actual classes that implement the Strategy Interface. Each one represents a different algorithm or way of doing a task. For example, one strategy might calculate the fastest route, while another finds the most scenic one.
Context − This is the main class that uses one of the strategies. It keeps a reference to a Strategy object and asks it to perform the task. The Context doesn’t care which strategy it’s using, it just knows that it can call the same method on any of them.
In short, the Strategy Design Pattern helps you write code that’s easier to update, cleaner to read, and simpler to extend. When a new way of doing something comes along, you can just add a new strategy class instead of rewriting your existing code.
C++ Implementation of the Strategy Design Pattern
In this section, we will see how to implement the Strategy Design Pattern in C++ with a simple and easy-to-understand example. We’ll create a Context class that can use different strategies to perform a calculation. Each strategy will be written in its own class, making the program flexible enough to switch between different strategies whenever needed it without changing the rest of the code.
Steps to Implement the Strategy Design Pattern in C++
Define the Strategy Interface − Start by creating an abstract class that defines a common method for the algorithm. This interface acts like a blueprint that every strategy class will follow this same structure.
Implement Concrete Strategies − Create separate classes that inherit from the Strategy Interface and provide their own version of the algorithm. Each class will represent a different way of performing the same task.
Create the Context Class − This is the main class that will use one of the strategies. It holds a reference to a Strategy object and uses it to perform the calculation. The Context doesn’t care which strategy it’s using and it just calls the same method.
Use the Strategy Pattern − In the main function, create objects for the Context and the different Strategy classes. Show how the Context can switch between strategies dynamically for example, changing from addition to multiplication â without rewriting any logic in the Context itself.
By following these steps, you’ll learn how the Strategy Design Pattern helps make your code cleaner, easier to extend, and more flexible when you need to change or add new behaviors.
C++ Example Code of the Strategy Design Pattern
Below is a simple C++ implementation of the Strategy Design Pattern. In this example, we have a context class that can use different strategies for performing calculations (addition and subtraction).
Like most design patterns, the Strategy Design Pattern has both advantages and disadvantages. Understanding both sides helps you decide when it’s actually worth using in a project.
Pros
Cons
This pattern gives you the freedom to change algorithms while the program is running. You don’t need to edit the main class; you can just switch one strategy for another, which keeps the code flexible and easy to adapt.
Each strategy needs its own class, which can increase the number of files in your project. This might make the codebase feel more cluttered and harder to navigate in larger applications.
Since every algorithm is placed in its own class, it’s much easier to update or fix without affecting other parts of the code. This separation makes the program cleaner and easier to maintain.
For small or simple programs, using this pattern can feel like too much work. Creating multiple classes for something straightforward might make the code more complex than necessary.
Strategies can be reused in different parts of your program or even in other projects. This helps you avoid repeating the same logic and keeps your code more organized.
Since the program has to go through an extra layer to reach the strategy object, there can be a small amount of performance overhead. It’s usually minor, but worth noting in performance-critical applications.
Overall, the Strategy Design Pattern is a practical and clean way to keep your code flexible and easy to manage. It’s especially useful when your program needs to switch between different algorithms or behaviors, but for very simple projects, it might be better to stick with a straightforward approach.
Real-World Examples of the Strategy Design Pattern
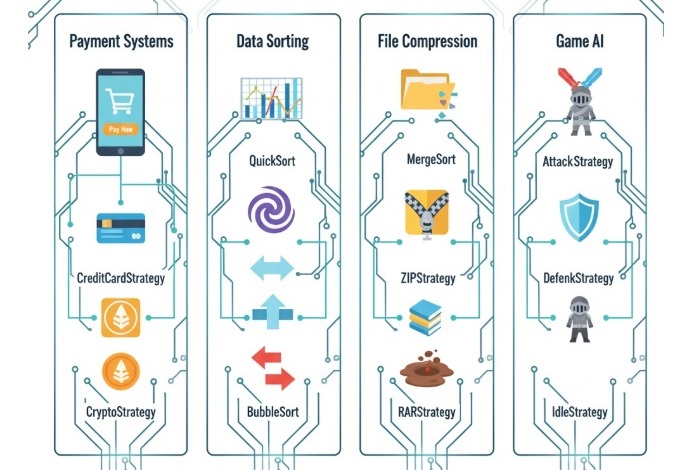
The Strategy Design Pattern is used in many software programs to make it easy to change the way something works. Here are some simple examples of where it can be used −
In payment systems, such as online shopping apps, different payment methods like credit card, PayPal, or cryptocurrency can each be written in a separate class. The program can then choose the right payment method based on what the user wants.
In programs that need to sort data, different sorting methods like quicksort, mergesort, or bubblesort can be used as separate strategies. The program can decide which one to use depending on how big or small the data is.
In file compression software, different compression types such as ZIP, RAR, or TAR can each be written separately. The user can choose which one to use without changing the main program.
In video games, different character behaviors like attacking, defending, or staying still can each be made as their own strategy. The game can switch between them based on what is happening during the game.
Conclusion
In this chapter, we explored the Strategy Design Pattern, its key components, and how it helps in making your code more flexible and easier to manage. We also saw some real-world examples where this pattern can be effectively applied.
The State Design Pattern is a way to let an object change how it behaves when its state changes. Instead of using lots of if-else or switch statements, you put the different behaviors into separate state classes. This makes your code cleaner and easier to understand.
In this pattern, you have a main class (called the context) that keeps track of its current state. When something happens, the context asks its current state what to do. If the state changes, the context just switches to a different state object. This way, the object can change its behavior at any time, just by changing its state.
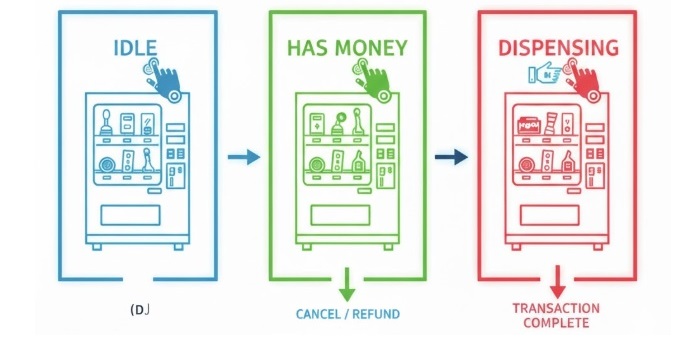
For example, think about a simple vending machine. It can be in different states like Idle (waiting for money), HasMoney (money inserted), or Dispensing (giving out a product). Each state knows what to do when you press a button or insert money. By using the State Design Pattern, the vending machine can easily switch between states and always do the right thing, without complicated code.
Key Components of the State Design Pattern
The State Design Pattern is made up of a few important parts that work together to make your code easier to manage and understand. Here’s what each part does:
Context − This is the main object you work with. It keeps track of what state it is in right now. When something happens, the context asks its current state what to do next. The context is also in charge of switching to a different state when needed.
State Interface − This is like a blueprint that says what actions every state should be able to do. All the different states must follow this blueprint and provide their own versions of these actions.
Concrete State Classes − These are the actual states your object can be in. Each state class has its own way of handling things. For example, the “Idle” state will do something different than the “Dispensing” state when you press a button.
State Transition: This is how the context changes from one state to another. When something happens (like inserting money), the context will switch to a new state so it can behave differently.
C++ Implementation of the State Design Pattern
In this C++ program, we will make a simple vending machine step by step. The vending machine will work in three main states Idle (waiting for money), HasMoney (money inserted), and Dispensing (item being given to the user). Each state will handle how the machine reacts when a user does something,like inserting money or selecting an item.
Steps to Build the Vending Machine using the State Design Pattern in C++
Following are the steps we will follow to create our vending machine using the State Design Pattern −
First, define a State interface that includes methods for actions like inserting money, selecting an item, and dispensing it.
Next, create separate classes for each state Idle, HasMoney, and Dispensing. Each class will describe how the vending machine behaves in that particular state.
Then, make a Context class that represents the vending machine itself. This class will keep track of the current state and will pass user actions to the state object to handle them.
Finally, add state transitions inside the Context class so that the machine can smoothly move from one state to another for example, from Idle to HasMoney when money is inserted, or from HasMoney to Dispensing after an item is selected.
Following are some advantages and disadvantages of using the State Design Pattern −
The State Design Pattern helps you write cleaner and more organized code. It does this by putting state-specific behavior inside separate classes, which removes the need for long and confusing conditional statements.
However, using the State Design Pattern can also increase the number of classes in your project, which might make the codebase harder to understand and maintain at first.
It improves maintainability and scalability because you can add new states easily without changing the existing code.
On the other hand, the growing number of classes may complicate navigation in the project if not organized properly.
The pattern allows dynamic behavior changes at runtime, which means the object can switch between different states smoothly.
But for developers who are new to design patterns, understanding and implementing the State Design Pattern can take some time and practice.
It makes your code more organized by separating the logic of each state from the main class. This creates a better separation of concerns and makes the program easier to update later.
Still, it might feel complex in the beginning and could slow down development until developers get used to the structure.
Real-World Examples of the State Design Pattern
The State Design Pattern is commonly used in many everyday software applications. Here are some practical examples −
User Interface Components − Buttons, sliders, and menus often behave differently based on their state (for example, enabled, disabled, or hovered). This pattern helps manage how these components react in each state.
Game Development − In video games, characters and objects have multiple states such as idle, running, jumping, or attacking. The State Design Pattern helps switch between these states and control their actions cleanly.
Network Protocols − A network connection can be in different states like connected, disconnected, or reconnecting. This pattern helps handle each state’s behavior separately, making network management easier.
Workflow Management − In workflow systems, tasks may have states like pending, in progress, or completed. The pattern helps define how each state behaves and transitions to the next one.
Conclusion
In this chapter, we explored the State Design Pattern, its key components, and how it helps in managing state-specific behavior in a clean and organized way. We also saw a practical C++ implementation of a vending machine using this pattern, along with its advantages, disadvantages, and real-world applications.