What is Chain of Pointers in C?
A chain of pointers in C is a series of pointers that point to each other. A pointer variable can store the address of another variable which can be of any type, including another pointer, in which case it is called a pointer to pointer.
A chain of pointers is when there are multiple levels of pointers. Theoretically, there is no limit to how many levels the chaining can be done, as shown in the following diagram −

Declaration of Chain of Pointers
This can be represented by the following code −
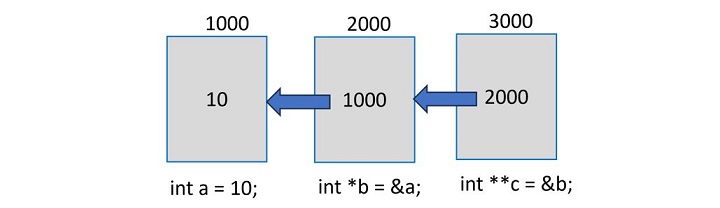
int a =10;int*x =&a;int**y =&x;int***z =&y;
In the above example, “x” is a pointer to an “int” type, as the notation “int *” indicates. To store the address of “x” in “y”, it should be a pointer to a pointer to int, i.e., “int **”.
Similarly, “z” is a “pointer to a pointer to a pointer” to int, hence the asterisk appears thrice in its declaration, i.e., “int ***”.
How Does the Dereferencing Work?
We know that “*x” returns the value at the address stored in “x”, i.e., the value of “a”.
Going by the same logic, “*y” should return its value (refer to the above diagram) which is 1000, which in turn is the address of “a”. Hence, the double dereferencing of “y” (i.e., “**y”) should give you the value of “a”.
Further, a triple referencing of “z” as “***z” should give the value of “a”.
Example
The following example shows how “double dereferencing” and “triple dereferencing” work −
#include <stdio.h>intmain(){int a =10;int*x =&a;int**y =&x;int***z =&y;printf("a: %d\n", a);printf("a: %d\n",*x);// dereferencing x;printf("a: %d\n",**y);// double dereferencing y;printf("a: %d\n",***z);// triple dereferencing z;return0;}
Output
Notice that all the three cases of dereferencing print the value of “a” −
a: 10
a: 10
a: 10
a: 10
A Chain of Float Pointers
We can follow the same logic to create a chain of float pointers and apply dereferencing of multiple levels to obtain the value of a float variable.
Example
The following example shows how you can work with a chain of float pointers −
#include <stdio.h>intmain(){float a =10.25;float*x =&a;float**y =&x;float***z =&y;printf("a: %f\n", a);printf("a: %f\n",*x);printf("a: %f\n",**y);printf("a: %f\n",***z);return0;}
Output
Run the code and check its output −
a: 10.250000
a: 10.250000
a: 10.250000
a: 10.250000
Updating the Original Variable by Dereferencing
We can also update the value of the original variable by dereferencing. Take a look at the following statement −
*x =11.25;
It will change the value of “a” accordingly. Similarly, it can be updated with the pointer at subsequent levels.
Example
The following program shows how you can update the original variable using different levels of dereferencing −
#include <stdio.h>intmain(){float a =10.25;;float*x =&a;float**y =&x;float***z =&y;printf("a: %f\n", a);// update with first pointer*x =11.25;printf("a: %f\n",*x);// update with second pointer**y =12.25;printf("a: %f\n",**y);// update with third pointer***z =13.25;printf("a: %f\n",***z);return0;}
Output
Run the code and check its output −
a:10.250000
a:11.250000
a:12.250000
a:13.250000
A Chain of Character Pointers
A string is represented as an array of “char” type or a pointer to “char” type −
char*a ="Hello";
Hence, we can create a chain of char pointers.
Note: The only difference is, here the original variable itself is a pointer, so the upper-level pointers have one asterisk more, as compared to the earlier examples.
Example
The following example shows how a chain of character pointers works −
#include <stdio.h>intmain(){char*a ="Hello";char**x =&a;char***y =&x;char****z =&y;printf("a: %s\n", a);printf("a: %s\n",*x);printf("a: %s\n",**y);printf("a: %s\n",***z);return0;}
Output
When you run this code, it will produce the following output −
a: Hello
a: Hello
a: Hello
a: Hello
Chaining of pointers is useful for creating linked lists and other data structures.