RSS, which stands for Really Simple Syndication, is used to publish often updated information from website like audio, video, images, etc. We can integrate RSS feeds to a website by using AJAX and PHP. This code demonstrates how to show RSS feeds in our site.
Index.html
The index page should be as follows −
<html><head><script>
function showRSS(str) {
if (str.length == 0) {
document.getElementById("output").innerHTML = "";
return;
}
if (window.XMLHttpRequest) {
xmlhttp = new XMLHttpRequest();
} else {
xmlhttp = new ActiveXObject("Microsoft.XMLHTTP");
}
xmlhttp.onreadystatechange = function() {
if (xmlhttp.readyState == 4 && xmlhttp.status == 200) {
document.getElementById("output").innerHTML = xmlhttp.responseText;
}
}
xmlhttp.open("GET","rss.php?q="+str,true);
xmlhttp.send();
}
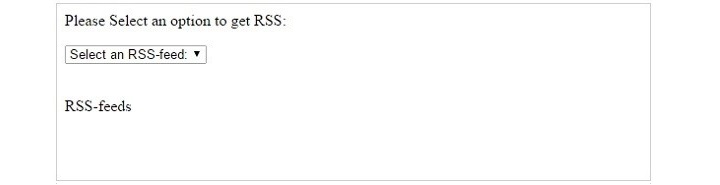
</script></head><body><p>Please Select an option to get RSS:</p><form><select onchange = "showRSS(this.value)"><option value = "">Select an RSS-feed:</option><option value = "cnn">CNN</option><option value = "bbc">BBC News</option><option value = "pc">PC World</option></select></form><br><div id = "output">RSS-feeds</div></body></html>
rss.php
“rss.php” has contained syntax about how to get access to RSS Feeds RSS Feeds and return RSS Feeds to the webpages.
Autocomplete feature is a typeahead mechanism to show input suggestion as the user enters data in the search box provided. It is also called live search because it reacts to the users’ input. In this example, we shall use AJAX and XML parser in PHP to demonstrate the use of auto complete text box.
This application has three main constituents −
The XML Document
JavaScript Code
XML Parser in PHP
Let us now discuss these three constituents in detail −
The XML Document
Save the following XML script as “autocomplete.xml” in the document root folder
The following script renders a text field for the user to enter a course name of his choice. On every keystroke a JavaScript function is called, and the input value is passed to the server-side PHP script with GET method. The servers response is asynchronously rendered.
Save this code as “index.php“.
<html><head><script>
      function showResult(str) {
         if (str.length == 0) {
            document.getElementById("livesearch").innerHTML = "";
            document.getElementById("livesearch").style.border = "0px";
            return;
         }

         if (window.XMLHttpRequest) {
            xmlhttp = new XMLHttpRequest();
         } else {
            xmlhttp = new ActiveXObject("Microsoft.XMLHTTP");
         }

         xmlhttp.onreadystatechange = function() {
            if (xmlhttp.readyState == 4 && xmlhttp.status == 200) {
               document.getElementById("livesearch").innerHTML = xmlhttp.responseText;
               document.getElementById("livesearch").style.border = "1px solid #A5ACB2";
            }
         }

         xmlhttp.open("GET","livesearch.php?q="+str,true);
         xmlhttp.send();
      }
   </script></head><body><form><h2>Enter Course Name</h2><input type = "text" size = "30" onkeyup = "showResult(this.value)"><div id = "livesearch"></div><a href = "https://www.tutorialspoint.com">More Details</a></form></body></html>
XML Parser in PHP
This the PHP script on the server. It parses the given XML source document, reads the characters entered in the input field, searches for it in the parsed XNL object, and sends back the response.
Save the following code as “livesearch.php”.
<?php
   $xml_doc = new DOMDocument();
   $xml_doc->load('autocomplete.xml');

   $x=$xml_doc->getElementsByTagName('link');

   $q = $_GET['q'];
   $result = '';
   foreach($x as $node) {
      if (stripos("{$node->nodeValue}", $q) !== false) {
         $result .= "{$node->nodeValue}";
      }
   }

   // Set $response to "No records found." in case no hint was found
   // or the values of the matching values
   if ($result == '')
      $result = 'No records found.';

   // show the results or "No records found."
   echo $result;
?>
With the XAMPP server running, visit “http://localhost/index.php” and the browser displays a input text field. For each character typed in it.
Using PHP with AJAX, we can parse an XML document from local directory as well as on a server. The following example demonstrates how to parse XML with web browser.
The client-end script renders a HTML form and defines a JavaScript function for sending a HTTP request to the server with XMLHttpRequest object.
On the server, a PHP script loads the DOM object from the required XML document, fetches the selected course from $_REQUEST variable, and renders the details of the course chosen as the response back to the client.
Step 1
The following XML document is stored on the document root of the XAMPP server.
<?xml version = "1.0" encoding = "utf-8"?><CATALOG><SUBJECT><COURSE>Android</COURSE><COUNTRY>India</COUNTRY><COMPANY>TutorialsPoint</COMPANY><PRICE>$10</PRICE><YEAR>2015</YEAR></SUBJECT><SUBJECT><COURSE>Html</COURSE><COUNTRY>India</COUNTRY><COMPANY>TutorialsPoint</COMPANY><PRICE>$15</PRICE><YEAR>2015</YEAR></SUBJECT><SUBJECT><COURSE>Java</COURSE><COUNTRY>India</COUNTRY><COMPANY>TutorialsPoint</COMPANY><PRICE>$20</PRICE><YEAR>2015</YEAR></SUBJECT><SUBJECT><COURSE>Microsoft</COURSE><COUNTRY>India</COUNTRY><COMPANY>TutorialsPoint</COMPANY><PRICE>$25</PRICE><YEAR>2015</YEAR></SUBJECT></CATALOG>
Step 2
The AJAX code below has a HTML form and a JavaScript function to raise HTTP request through XMLHttpRequest object.
<html><head><script>
      function showCD(str) {
         if (str == "") {
            document.getElementById("txtHint").innerHTML = "";
            return;
         }

         if (window.XMLHttpRequest) {

            // code for IE7+, Firefox, Chrome, Opera, Safari
            xmlhttp = new XMLHttpRequest();
         } else {

            // code for IE6, IE5
            xmlhttp = new ActiveXObject("Microsoft.XMLHTTP");
         }

         xmlhttp.onreadystatechange = function() {
            if (xmlhttp.readyState == 4 && xmlhttp.status == 200) {
               document.getElementById("txtHint").innerHTML = xmlhttp.responseText;
            }
         }
         xmlhttp.open("GET","hello.php?q="+str,true);
         xmlhttp.send();
      }
   </script></head><body><form>
      Select a Course:
      <select name = "cds" onchange = "showCD(this.value)"><option value = "">Select a course:</option><option value = "Android">Android </option><option value = "Html">HTML</option><option value = "Java">Java</option><option value = "Microsoft">MS technologies</option></select></form><div id = "txtHint"><b>Course info will be listed here...</b></div></body></html>
Step 3
The server-side PHP script to search within the XML document is as follows −
<?php
   $q = $_GET["q"];

   $xmlDoc = new DOMDocument();
   $xmlDoc->load("test.xml");

   $x = $xmlDoc->getElementsByTagName('COURSE');

   for ($i = 0; $i<=$x->length-1; $i++) {
      if ($x->item($i)->nodeType == 1) {
         if ($x->item($i)->childNodes->item(0)->nodeValue == $q) {
            $y = ($x->item($i)->parentNode);
         }
      }
   }

   $cd = ($y->childNodes);

   for ($i = 0;$i<$cd->length;$i++) {
      if ($cd->item($i)->nodeType == 1) {
         echo("<b>" . $cd->item($i)->nodeName . ":</b> ");
         echo($cd->item($i)->childNodes->item(0)->nodeValue);
         echo("<br>");
      }
   }
?>
Visit “http://localhost/example.php” to let the user select a course. Upon selection, the relevant details are fetched from the server and displayed as below −
AJAX is a shortform of the term Asynchronous JavaScript and XML. Ajax is used to build fast and dynamic web pages. Below example demonstrates interaction with the backend PHP script with AJAX functions to provide a search field on the webpage.
Step 1
Save the following script as “example.php” −
<html><head><style>
      span {
         color: green;
      }
   </style><script>
      function showHint(str) {
         if (str.length == 0) {
            document.getElementById("txtHint").innerHTML = "";
            return;
         } else {
            var xmlhttp = new XMLHttpRequest();
            xmlhttp.onreadystatechange = function() {
               if (xmlhttp.readyState == 4 && xmlhttp.status == 200) {
                  document.getElementById("txtHint").innerHTML = xmlhttp.responseText;
               }
            }
            xmlhttp.open("GET", "hello.php?q=" + str, true);
            xmlhttp.send();
         }
      }
   </script></head><body><p><b>Search your favourite tutorials:</b></p><form><input type = "text" onkeyup = "showHint(this.value)"></form><p>Entered Course name: <span id="txtHint"></span></p></body></html>
This code is essentially a HTML script that renders a HTML form with a text field. On its onkeyup event, a showHint() JavaScript function is called. The function sends a HTTP GET request to another PHP script on the server.
We will start this application by opening example.php in the browser by entering the URL http://localhost/example.php
On every keystroke in the search field, a GET request goes to the server. The server script reads the character from $_REQUEST array and searches for the course name that matches. The matched value is displayed below the text field in the browser.
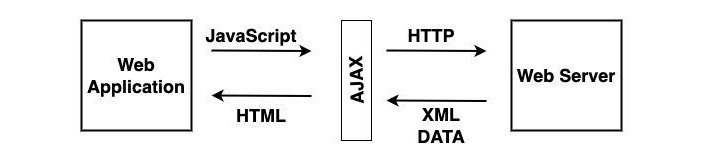
PHP powered web applications often make use of AJAX, together they are useful to create dynamic and interactive web applications. AJAX stands for Asynchronous Javascript and XML. It allows webpages to be updated asynchronously without reloading the entire page.
In AJAX applications, the exchange of data between a web browser and the server-side PHP script is asynchronous. PHP is a server-side scripting language that can be used to generate dynamic content and process data.
AJAX creates an additional layer known as AJAX engine in between the web application and web server due to which we can make background server calls using JavaScript and retrieve the required data, can update the requested portion of a web page without casing full reload of the page. It reduces the page refresh timing and provides a fast and responsive experience to the user.
What is Required to Run AJAX?
The technologies that are used by AJAX are already implemented in all the Morden browsers. So the client does not require any extra module to run the AJAX application. The technologies used by AJAX are −
Javascript − It is an important part of AJAX. It allows you to create client-side functionality. Or we can say that it is used to create AJAX applications.
XML − It is used to exchange data between web server and client.
The XMLHttpRequest − It is used to perform asynchronous data exchange between a web browser and a web server.
HTML and CSS − It is used to provide markup and style to the webpage text.
DOM − It is used to interact with and alter the webpage layout and content dynamically.
To use AJAX with PHP, you will need to use the XMLHttpRequest object in JavaScript to send requests to the PHP server. The PHP server will then process the request and return a response, typically in the form of JSON or XML. The JavaScript code can then parse the response and update the web page accordingly.
The XMLHttpRequest object in JavaScript is a browser-based API that allows developers to make HTTP requests to a server without reloading the page. This is the foundation of AJAX programming, which allows for dynamic and interactive web applications.
The XMLHttpRequest object can be used to −
Retrieve data from a server, such as JSON, XML, or HTML.
Send data to a server, such as form data or file uploads.
Update a web page without reloading it.
Create chat applications and other interactive features.
To use the XMLHttpRequest object, you first need to create a new instance of it. Then, you can use the open() method to specify the HTTP method and request URL. Next, you can set any request headers, if needed. Finally, you can send the request using the send() method.
Example
Here is a simple JavaScript code of how to use the XMLHttpRequest object to retrieve data from a server −
// Create a new XMLHttpRequest objectvar xhr =newXMLHttpRequest();// Set the HTTP method and request URL
xhr.open("GET","test.php");// Send the request
xhr.send();// Listen for the onload event to be fired
xhr.onload =function(){// Check the status code to ensure the request was successfulif(xhr.status ===200){// Get the response data.var users =JSON.parse(xhr.responseText);// Do something with the user data.}else{// Handle the error}};
The PHP script on the server retrieves the data from AJAX request and sends back the response.
// Get the request data.$name=$_GET["name"];// Create a response object.$response=newstdClass();$response->message="Hello, $name!";// Send the response back to the client.header("Content-Type: application/json");echojson_encode($response);
Message flashing in a PHP web application refers to the technique that makes certain messages popup on the browser window for the user to receive applications feedback. To be able to give the user a meaningful feedback to his interactions is an important design principle, that gives a better user experience.
In a PHP web application, we can use the session data to flash messages regarding success or failure of a certain action, notifications or warnings, etc., from time to time to keep the user informed.
A flash message allows you to create a message on one page and display it once on another page. To transfer a message from one page to another, you use the $_SESSION superglobal variable.
To start with, you add a variable to the $_SESSION array as follows −
Later, navigate to another page, and retrieve the flashed message from the $_SESSION variable and assign it to a variable. Then, you can display the message and then delete the message from the $_SESSION −
To generalize the basic idea of handling the flashed messages, we shall write a function that adds a message to the $_SESSION −
session_start();functioncreate_flash_message(string$name,string$message):void{// remove existing message with the nameif(isset($_SESSION[FLASH][$name])){unset($_SESSION[FLASH][$name]);}// add the message to the session$_SESSION[FLASH][$name]=['message'=>$message];}
Let us also have another function that reads back a message, flashes it on the browser, and removes it from the $_SESSION.
functiondisplay_flash_message(string$name):void{if(!isset($_SESSION[FLASH][$name])){return;}// get message from the session$flash_message=$_SESSION[FLASH][$name];// delete the flash messageunset($_SESSION[FLASH][$name]);// display the flash messageechoformat_flash_message($flash_message);}
The format_flash_message() function applies desired formatting to the obtained string with appropriate CSS rules.
If there are more than messages that have been flashed by the application, all of them can be retrieved and flashed with the following example −
functiondisplay_all_flash_messages():void{if(!isset($_SESSION[FLASH])){return;}// get flash messages$flash_messages=$_SESSION[FLASH];// remove all the flash messagesunset($_SESSION[FLASH]);// show all flash messagesforeach($flash_messagesas$flash_message){echoformat_flash_message($flash_message);}}
Use the following flash() function to create, format and flash the messages
functionflash(string$name='',string$message=''):void{if($name!==''&&$message!==''){create_flash_message($name,$message);}elseif($name!==''&&$message===''){display_flash_message($name);// display a flash message}elseif($name===''&&$message===''){display_all_flash_messages();// display all flash message}}
To implement the above method, call the flash() function on the first page.
flash('first','Hello World');
Navigate to another page and call the flash() function to retrieve and display the message −
flash('first');
Mechanism of using the flash messages is usually employed on a signup page to redirect users to the login page with a welcome message after they sign up.
When developing websites, we generally have to reuse the same information or code in many places. For example, we might want the same header, footer or menu across all pages. PHP allows us to use file inclusion instead of writing the same code many times!
File inclusion saves time, organizes our code and allows us to make simple changes. When we make a change to one file, that changes all other files that contain that file.
Types File Inclusion in PHP
You can include the content of a PHP file into another PHP file before the server executes it. There are two PHP functions which can be used to included one PHP file into another PHP file.
This is a strong point of PHP which helps in creating functions, headers, footers, or elements that can be reused on multiple pages. This will help developers to make it easy to change the layout of complete website with minimal effort. If there is any change required then instead of changing thousand of files just change included file.
The include() Function
The include() function takes all the text in a specified file and copies it into the file that uses the include function. If there is any problem in loading a file then the include() function generates a warning but the script will continue execution.
Syntax
Below is the syntax of the includefunction −
include'filename.php';
Here, filename.php is the file you want to include. It can be a relative or absolute path.
Example
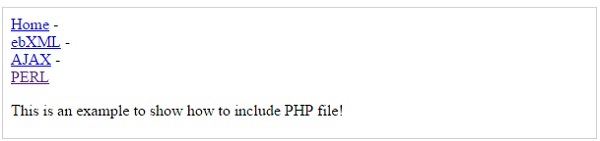
Assume you want to create a common menu for your website. Then create a file menu.php with the following content.
Now create as many pages as you like and include this file to create header. For example now your test.php file can have following content.
<?php <b>include("menu.php");</b> ?><p>This is an example to show how to include PHP file!</p>
Output
It will produce the following result −
Advantages of include() Method
Using the include() method in PHP has several advantages −
Adding a file allows you to reuse the same content on other pages without having to change any code.
You can add basic website elements like headers, footers, and menus to various pages.
If the included file has an error, include() will only display a warning message and the script will continue to run.
If you need to change the included file (for example, to update the header or footer), do so only once, and the changes will be reflected on all pages that use it.
The require() Function
The require() function takes all the text in a specified file and copies it into the file that uses the include function. If there is any problem in loading a file then the require() function generates a fatal error and halt the execution of the script.
So there is no difference in require() and include() except they handle error conditions. It is recommended to use the require() function instead of include(), because scripts should not continue executing if files are missing or misnamed.
Syntax
Below is the syntax of the requirefunction −
require'filename.php';
Here, filename.php is a file you want to require. It can be a relative or absolute path.
Example
You can try using above example with require() function and it will generate same result. But if you will try following two examples where file does not exist then you will get different results.
<?php include("xxmenu.php"); ?><p>This is an example to show how to include wrong PHP file!</p>
Output
This will produce the following result −
This is an example to show how to include wrong PHP file!
Now lets try same example with require() function.
<?php <b>require("xxmenu.php");</b> ?><p>This is an example to show how to include wrong PHP file!</p>
This time file execution halts and nothing is displayed.
NOTE − You may get plain warning messages or fatal error messages or nothing at all. This depends on your PHP Server configuration.
Advantages of require() Method
Using the require() method in PHP has many advantages −
If the required file is important for the page (for example, a database connection file), require() makes sure the script stops and displays an error if it is not found, preventing the page from loading with limited functionality.
The function makes sure all necessary files are always available for proper execution. This is useful for files that the website need to work properly.
Like include(), require() allows you to reuse code across multiple pages.
With require(), you only need to include the required code once, which reduces duplication.
Difference between include() and require() Methods
The require statement is also used to include a file within PHP code. However, there is one important difference between include and require: if a file is included using the include line but PHP cannot find it, the script will continue to run.
The include() function shows a warning and continues execution if the file is missing. While the require() method shows a fatal error and stops execution if the file is missing.
The include() function is basically used for non-critical files for example- header, footer. While require() is used for important files like database connection, configuration.
The include() method can include a file multiple times unless include_once() is used. And the require() includes a file multiple times unless require_once() is used.
The include() continues execution even if the file is not present of missing. And require() stops script execution if the file is missing.
The include_once() and require_once() Function
These functions are useful when you have to make sure a file is only included once.
// config.php
<?php
   $database_host = 'localhost';
?>

// settings.php
<?php
   // Includes config.php only once
   include_once 'config.php';

   // It will not include again if called multiple times
   require_once 'config.php';
   echo "Database host is: $database_host";
?>
Security Risks of File Inclusion
While file inclusion can make your code easier to work with, it may also create security risks, particularly if users have control over which files are included. This is known as Local File Inclusion (LFI) and can be used by attackers.
Example of a Vulnerable Code
In this scenario, a malicious user may gain access to any file on the server by changing the page query parameter, which could result in data breaches or other vulnerabilities. Here is an example code which you should avoid in your PHP applications −
<?php
   // User can set the page parameter
   $page = $_GET['page'];

   // This can lead to dangerous inclusions
   include($page);
?>
Prevent File Inclusion Vulnerabilities
Always check and sanitize any user input before using it in an include statement.
<?php
   $allowed_pages = ['home.php', 'about.php', 'contact.php'];
   if (in_array($page, $allowed_pages)) {
      include($page);
   } else {
      echo "Page not found.";
   }
?>
Instead of including files with user-generated content you can consider using predefined paths. If you don’t need remote file inclusion so you can disable it in your php.ini file.
Data types in PHP can be of “scalar type” or “compound type”. Integer, float, Boolean and string types are scalar types, whereas array and object types are classified as compound types. Values of more than one types can be stored together in a single variable of a compound type.
In PHP, objects and arrays are the two compound data types.
An array is an ordered collection of elements of other data types, not necessarily of the same type.
An object is an instance of either a built-in or a user defined class, consisting of properties and methods.
Arrays in PHP
An array is a data structure that stores one or more data values in a single variable. An array in PHP is an ordered map that associates the values to their keys.
There are two ways to declare an array in PHP. One is to use the built-in array() function, and the other is to put the array elements inside square brackets.
An array which is a collection of only values is called an indexed array. Each value is identified by a positional index staring from 0.
If the array is a collection of key-value pairs, it is called as an associative array. The key component of the pair can be a number or a string, whereas the value part can be of any type.
The array() Function in PHP
The built-in array() function uses the parameters given to it and returns an object of array type. One or more comma-separated parameters are the elements in the array.
array(mixed...$values):array
Each value in the parenthesis may be either a singular value (it may be a number, string, any object or even another array), or a key-value pair. The association between the key and its value is denoted by the “=>” symbol.
Instead of the array() function, the comma-separated array elements may also be put inside the square brackets to declare an array object. In this case too, the elements may be singular values or a string or another array.
To access any element from a given array, you can use the array[key] syntax. For an indexed array, put the index inside the square bracket, as the index itself is anyway the key.
Note that PHP internally treats the indexed array as an associative array, with the index being treated as the key. This fact can be verified by the var_dump() output of the array.
We can unpack each element of the indexed array in the key and value variables with the foreach syntax −
To declare an object of a class, we need to use the new operator.
$obj=newSayHello;
We can now call its method −
<?php
   class SayHello {
      function hello() {
         echo "Hello World". PHP_EOL;
      }
   }

   $obj=new SayHello;
   var_dump(gettype($obj));
   $obj->hello();
?>
It will produce the following output −
string(6) "object"
Hello World
The stdClass
PHP provides stdClass as a generic empty class which is useful for adding properties dynamically and casting. An object of stdClass is null to begin with. We can add properties to it dynamically.
A variable of any scalar type can also be converted to an object by type casting. The value of the scalar variable becomes the value of the object’s scalar property.
Heredoc and Nowdoc are PHP methods that allow you to write long strings without using too many quotes or escape characters. They allow you to write multi-line strings in a neat and readable manner.
PHP provides two alternatives for declaring single or double quoted strings in the form of heredoc and newdoc syntax.
Heredoc is useful for including variables, but Nowdoc is useful to get raw text without variable change.
The single quoted string doesn’t interpret the escape characters and doesn’t expand the variables.
On the other hand, if you declare a double quoted string that contains a double quote character itself, you need to escape it by the “\” symbol. The heredoc syntax provides a convenient method.
Heredoc Strings in PHP
The heredoc strings in PHP are much like double-quoted strings, without the double-quotes. It means that they don’t need to escape quotes and expand variables.
Heredoc Syntax
$str=<<<IDENTIFIER
place a string here
it can span multiple lines
and include single quote ' and double quotes "
IDENTIFIER;
First, start with the “<<<” operator. After this operator, an identifier is provided, then a newline. The string itself follows, and then the same identifier again to close the quotation. The string can span multiple lines and includes single quotes () or double quotes (“).
The closing identifier may be indented by space or tab, in which case the indentation will be stripped from all lines in the doc string.
Example
The identifier must contain only alphanumeric characters and underscores and start with an underscore or a non-digit character. The closing identifier should not contain any other characters except a semicolon (;). Furthermore, the character before and after the closing identifier must be a newline character only.
Take a look at the following example −
<?php
   $str1 = <<<STRING
   Hello World
      PHP Tutorial
         by TutorialsPoint
   STRING;

   echo $str1;
?>
It will produce the following output −
Hello World
    PHP Tutorial
        by TutorialsPoint
Example
The closing identifier may or may not contain indentation after the first column in the editor. Indentation, if any, will be stripped off. However, the closing identifier must not be indented further than any lines of the body. Otherwise, a ParseError will be raised. Take a look at the following example and its output −
<?php
   $str1 = <<<STRING
   Hello World
      PHP Tutorial
   by TutorialsPoint
   STRING;

   echo $str1;
?>
It will produce the following output −
PHP Parse error:  Invalid body indentation level
(expecting an indentation level of at least 16) in hello.php on line 3
Example
The quotes in a heredoc do not need to be escaped, but the PHP escape sequences can still be used. Heredoc syntax also expands the variables.
<?php
   $lang="PHP";
   echo <<<EOS
   Heredoc strings in $lang expand vriables.
   The escape sequences are also interpreted.
   Here, the hexdecimal ASCII characters produce \x50\x48\x50
   EOS;
?>
It will produce the following output −
Heredoc strings in PHP expand vriables.
The escape sequences are also interpreted.
Here, the hexdecimal ASCII characters produce PHP
Nowdoc Strings in PHP
A nowdoc string in PHP is similar to a heredoc string except that it doesn’t expand the variables, neither does it interpret the escape sequences.
<?php
   $lang="PHP";

   $str = <<<'IDENTIFIER'
   This is an example of Nowdoc string.
   it can span multiple lines
   and include single quote ' and double quotes "
   IT doesn't expand the value of $lang variable
   IDENTIFIER;

   echo $str;
?>
It will produce the following output −
This is an example of Nowdoc string.
it can span multiple lines
and include single quote ' and double quotes "
IT doesn't expand the value of $lang variable
The nowdoc’s syntax is similar to the heredoc’s syntax except that the identifier which follows the “<<<” operator needs to be enclosed in single quotes. The nowdoc’s identifier also follows the rules for the heredoc identifier.
Heredoc strings are like double-quoted strings without escaping. Nowdoc strings are like single-quoted strings without escaping.
Mathematical operations are important parts of programming. PHP has several built-in math functions that make calculations easy. These functions can be used to round numbers, find maximum and minimum values, work with exponents and logarithms and so on.
In this chapter, we will look at different PHP math functions and mathematical (arithmetic) operators and how they can be used with the help of some examples. If you need to calculate absolute values, round numbers or perform complex mathematical operations, PHP’s math functions make it easy and efficient.
The abs() function is an in-built function in PHP iterpreter. This function accepts any number as argument and returns a positive value, disregarding its sign. Absolute value of any number is always positive.
abs(mixed$num)
PHP abs() function returns the absolute value of num. If the data type of num is float, its return type will also be float. For integer parameter, the return type is integer.
negative float number: -9.99
absolute value : 9.99
positive float number: 25.55
absolute value : 25.55
negative integer number: -45
absolute value : 45
positive integer number: 25
absolute value : 25
PHP ceil() Function
The ceil() function is an in-built function in PHP iterpreter. This function accepts any float number as argument and rounds it up to the next highest integer. This function always returns a float number as the range of float is bigger than that of integer.
ceil(float$num):float
PHP ceil() function returns the smallest integer value that is bigger than or equal to given parameter.
Example 1
The following code rounds 5.78 to its next highest integer which is 6
The exp() function calculates exponent of e that is Euler Number. PHP has a predefined constant M_E that represents Euler Number and is equal to 2.7182818284590452354. Hence, exp(x) returns 2.7182818284590452354x
This function always returns a float.
exp(float$arg):float
PHP exp() function returns the Euler Number e raised to given arg. Note that e is the base of natural algorithm. The exp() function is the inverse of natural logarithm.
Example 1
One of the predefined constants in PHP is M_LN2 which stands for loge2 and is equal to 0.69314718055994530942. So, the exp() of this value will return 2.
The floor() function is another in-built function in PHP interpreter. This function accepts any float number as argument and rounds it down to the next lowest integer. This function always returns a float number as the range of float is bigger than that of integer.
floor(float$num):float
PHP floor() function returns the largest integer less than or equal to the given parameter.
Example 1
The following example shows how to round 15.05 to its next highest integer which is 15
The intdiv() function returns the integer quotient of two integer parameters. If x/y results in “i” as division and “r” as remainder, then −
x = y*i+r
In this case, intdiv(x,y) returns “i”
intdiv(int$x,int$y):int
The “x” parameter forms numerator part of the division expression, while the “y” parameter forms the denominator part of the division expression.
PHP intdiv() function returns the integer quotient of division of “x” by “y”. The return value is positive if both the parameters are positive or both the parameters are negative.
Example 1
The following example shows that if the numerator is less than the denominator, then intdiv() function returns 0.
The log10 () function calculates the base-10 logarithm of a number. Base-10 logarithm is also called common or standard algorithm. The log10(x) function calculates log10x. It is related to natural algorithm by the following equation −
log10x=logex/loge10 ; So that
log10100=loge100/loge10 =2
In PHP, log10 is represented by log10() function
log10(float$arg):float
PHP log10() function returns the base-10 logarithm of arg.
Example 1
The following code calculates the base-10 logarithm of 100
The max () function returns the highest element in an array, or the highest amongst two or more comma separated parameters.
max(array$values):mixed
Or,
max(mixed$value1[,mixed $...]):mixed
If only one parameter is given, it should be an array of values which may be of same or different types.
If two or more parameters are given, they should be any comparable values of same or different types.
PHP max() function returns the highest value from the array parameter or sequence of values. Standard comparison operators are applicable. If multiple values of different types evaluate as equal (e.g. 0 and ‘PHP’), the first parameter to the function will be returned.
Example 1
The following code returns the highest value from a numeric array.
The min () function returns the lowest element in an array, or the lowest amongst two or more comma separated parameters.
min(array$values):mixed
Or,
min(mixed$value1[,mixed $...]):mixed
If only one parameter is given, it should be an array of values which may be of same or different types
If two or more parameters are given, they should be any comparable values of same or different types
PHP min() function returns the lowest value from the array parameter or sequence of values. Standard comparison operators are applicable. If multiple values of different types evaluate as equal (e.g. 0 and ‘PHP’), the first parameter to the function will be returned
Example 1
The following code returns the smallest value from numeric array.
The pow () function is used to compute the power of a certain number. It returns xy calculation, also termed as x raised to y. PHP also provides “**” as exponentiation operator.
So, pow(x,y) returns xy which is same as x**y.
pow(number$base,number$exp):number
The first parameter is the base to be raised. The second parameter is the power to which base needs to be raised.
PHP pow() function returns the base raised to the power of exp. If both arguments are non-negative integers, the result is returned as integer, otherwise it is returned as a float.
Example 1
The following example calculates 102 using pow() function −
The round() function proves useful in rounding any floating point number upto a desired precision level. Positive precision parameter causes the number to be rounded after the decimal point; whereas with negative precision, rounding occurs before the decimal point. Precision is “0” by default.
For example, round(10.6) returns 11, round(10.2) returns 10. The function always returns a floating point number.
This function also has another optional parameter called mode that takes one of the redefined constants described later.
round(float$value,int$precision,int$mode):float
Parameters
Value − A float number to be rounded.
Precision − Number of decimal digits to round to. Default is 0. Positive precision rounds given number after decimal point. Negative precision rounds the given number before decimal point.
Mode − One of the following predefined constants.
Sr.No
Constant & Description
1
PHP_ROUND_HALF_UPRounds number away from 0 when it is half way there. Hence, 1.5 becomes 2 and -1.5 to -2
2
PHP_ROUND_HALF_DOWNRounds number towards 0 when it is half way there. Hence 1.5 becomes 1 and -1.5 to -1
3
PHP_ROUND_HALF_EVENRounds the number to nearest even value
4
PHP_ROUND_HALF_ODDRounds the number to nearest odd value
PHP round() function returns a float number that by rounding the value to a desired precision.
Example 1
The following code rounds the given number to positive precision values −
The sqrt() function returns the square root of a positive float number. Since square root for a negative number is not defined, it returns NAN. This is one of the most commonly used functions. This function always returns a floating point number.
sqrt(float$arg):float
PHP sqrt() function returns the square root of the given arg number. For negative numbers, the function returns NAN.
Example 1
The following code calculates the square root of 100 −